Building a Basement Foundation
- DreamDen AI Editorial Team
- Nov 10, 2025
- 9 min read


A basement foundation is one of the most technically demanding parts of a construction project. It defines how stable, dry, and long-lasting the building above it will be. Getting it right means precision from the first scoop of dirt to the final waterproof coating.
This blog explains every phase of a basement foundation build—from excavation through drainage installation—based on a real-world sequence of work. You’ll see what’s involved, why each stage matters, and how the pieces fit together into one solid, watertight structure.
Step 1. Excavation and Site Preparation
Every basement begins with excavation, but digging a hole isn’t as simple as it sounds. Depth, shape, and position must match the plan exactly. A few centimeters off now can turn into major problems later.
Before the dig begins, surveyors mark the perimeter with stakes and bright paint. The excavation area is typically about one meter wider than the finished basement footprint. This buffer gives room for drainage pipes, waterproofing, and workers to move freely once the walls rise.
A 12-ton excavator loads clay or soil directly into dump trucks in rotation so spoil doesn’t pile up and block the site. As the depth approaches target level, crews check with a laser or optical level to confirm accuracy across the full area. A level base means even load transfer once concrete is placed.
When the hole reaches final depth, the sides are shaved smooth and plumb. Straight walls prevent caving and make it easier to apply membranes later. The bottom is raked clean of rocks and loose soil.
Because clay retains water, standing water often appears overnight after rain. It’s pumped out or drained through the lowest corner—often the planned garage or basement entry—to keep the working surface stable.
Step 2. Establishing Layout and Reference Axes
Once excavation is complete, layout begins. This is the translation of the architectural plan into physical lines on the site. Workers drive timber pegs into the ground around the perimeter. Using an optical level, they mark each peg at the same benchmark height—the line that represents the finished foundation elevation. Horizontal boards, called batter boards, are then fastened to the pegs, and string lines are stretched tightly between them.
These strings mark the exact edges of the future foundation. Measurements are checked several times, and diagonals are compared until they match. Equal diagonals confirm that the layout is perfectly square.
This system of strings and pegs will guide nearly every following task: drilling piles, aligning rebar cages, and setting the formwork. Once the geometry is verified, the crew can start the foundation’s deep elements.
Step 3. Drilling and Pouring Piles
Piles transfer building loads down into stable ground. On this project, a mini-excavator with an auger attachment drilled piles roughly one meter deep through dense clay. Clay resists drilling, so the auger is cleaned after every hole to prevent jamming and ensure consistent diameter.
After drilling, the crew mixes a simple batch of concrete on site—one bucket of cement, one bucket of water, and about thirteen shovels of sharp sand per mix. Each pile hole is filled halfway with this mix before the steel rebar cage is inserted. Then more concrete is added to bring the level to the top.
Setting the cage into half-filled concrete locks it firmly in place while allowing fine adjustments for height. The tops of all cages line up with the layout string, ensuring every pile is consistent and ready to tie into the footing reinforcement.
Step 4. Sand Sub-Base and Compaction
Between the piles, crews spread a layer of sharp sand. This sub-base keeps workers off the clay, provides a clean surface for rebar placement, and distributes weight evenly under the foundation.
Sharp sand interlocks when compacted, unlike soft or rounded sand that shifts under pressure. A plate compactor passes over the entire surface several times until it feels solid underfoot. The base is checked with a straightedge and level to remove humps or dips. A well-compacted sub-base prevents settlement and uneven stress in the finished slab.
Step 5. Reinforcing the Footing with Rebar Cages
Reinforcement gives concrete its tensile strength. Each rebar cage is cut and assembled on site. Lower bars rest on steel spacers welded to the tops of piles, lifting them slightly off the sand to maintain a protective concrete cover underneath.
Corners are bent at right angles so the cages form continuous loops around the entire footprint. Horizontal ties hold everything rigid. At the top, rebar spacers are welded across to mark the final width of the footing and guide the formwork edges later.
All intersections are tied with steel wire. Once the frame is fully wired, it behaves as a single structure—strong enough to hold its shape during the pour.
Step 6. Installing the Formwork
Formwork defines the exact shape of the foundation beam and holds the concrete while it cures. Before installation, every board is brushed or sprayed with form oil to prevent the concrete from sticking.
Work starts from the corners outward. Panels are set against the welded rebar spacers so alignment is automatic. Wooden pegs are driven into the ground and locked to the base of each panel. Because the ground is wet clay, simple pegging might loosen, so builders reinforce the setup with threaded rods connecting pegs to the forms and heavy steel wire ties across the top. Wooden spacers prevent the ties from crushing the panels when tightened.
Next, they mark the finished concrete level directly on the formwork using a laser level and small nails. These nails act as permanent height guides when leveling the concrete later.
Any exposed portion of the foundation—like under a garage entry—receives an EPS 100 insulation board under the concrete to prevent cold bridging and frost damage.
Step 7. Pouring and Finishing the Concrete
When all checks are complete, it’s time to pour. Roughly 10 cubic meters of ready-mixed concrete fills the formwork in sections, starting at corners and working around. Vibrators or tamping rods remove air pockets.
Once filled, the crew strikes off the top using the nails as reference points. A trowel smooths the surface, followed by a putty knife pulled lightly across to remove fine ridges. The result is a flat, clean footing with sharp edges and no “honeycomb” voids. The concrete cures for several days before formwork is removed. The exposed footing shows a dense, even finish—evidence of proper compaction and vibration.
Step 8. Installing Overflow and Drainage Pipes Inside the Foundation
Before any backfilling, the interior drainage system is set up. These overflow pipes act as a safety measure if leaks ever occur inside the basement. Using the floor plan as a guide, workers lay out pipe routes and mark outlet points. Trenches are hand-dug along these paths with a gentle slope leading toward the exterior drainage outlet. The slope ensures that any water drains naturally by gravity.
The bottom of each trench receives a bed of fine sand to cushion the pipe and protect it from sharp stones. After the pipes are laid, they’re covered with more sand and compacted by hand with the back of a shovel handle. Clay backfill is avoided because it swells and shifts when wet, which could distort the pipes over time. When finished, every room in the basement has its own overflow connection leading outward.
Step 9. Clearing and Preparing the Exterior for Waterproofing
After the concrete has cured and internal systems are in place, attention shifts to the outside. Rain often washes clay back into the excavation, so it must be cleared before waterproofing can begin. A smaller 7-ton excavator is ideal for this cleanup work.
Once the perimeter is clean, a trench is dug around the entire foundation about 20 centimeters deeper than the base of the footing. This will hold the exterior drainage pipe, which collects groundwater and directs it toward an outlet at the front of the site.
The slope of this trench is carefully checked so water flows smoothly away from the structure without pooling anywhere along the wall.
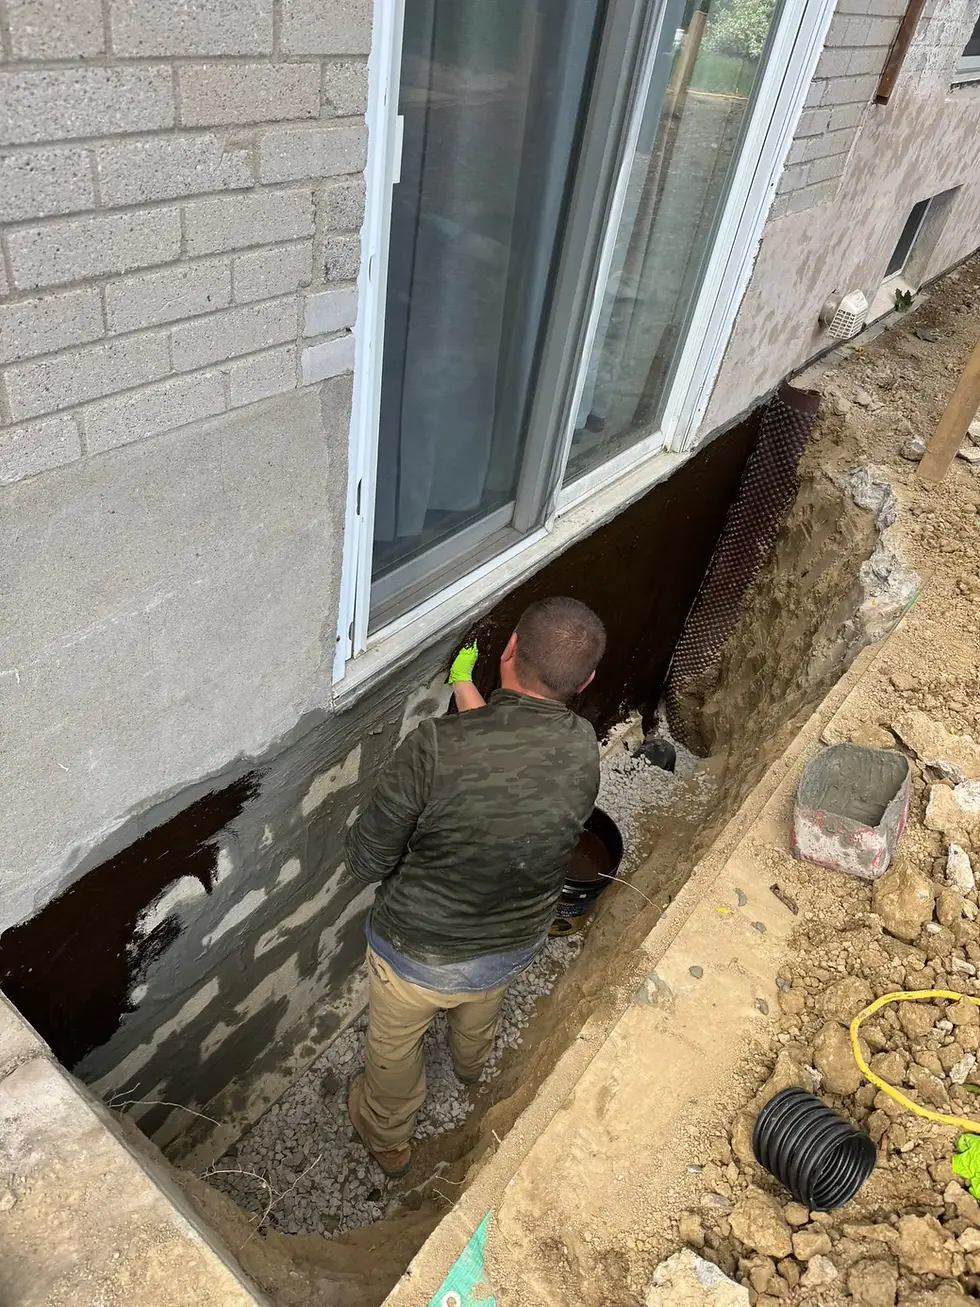
Step 10. Waterproofing the Foundation Walls
Waterproofing protects the basement from hydrostatic pressure and ground moisture. It’s a multi-layer process:
Surface Cleaning: All dirt and concrete residue are brushed off the foundation walls.
Hole Patching: Any form-tie holes or imperfections are filled with mortar.
First Coat: A thin layer of bituminous waterproofing compound (often a tar-based product) is brushed on to seal pores in the concrete.
Second Coat: After drying, a second, thicker coat is applied to strengthen the barrier.
Protective Membrane: A dimpled drainage sheet is fastened over the coating. Its raised bumps create a small air gap, letting moisture drain down without damaging the bitumen.
Together, these layers create a durable, flexible shield that resists water intrusion and protects the structure for decades.
Step 11. Installing the Exterior Drainage System
With waterproofing complete, the trench bottom receives a thin layer of sharp sand. The perforated drainage pipe—often called a French drain—is then laid at a continuous slope toward the outlet point. Builders double-check the gradient with a laser or spirit level.
Each section of pipe connects to the internal overflow system, giving water multiple paths to escape. After installation, the pipes are covered with clean sand instead of gravel in this case. Sand cushions the pipe and allows easy water flow while simplifying backfilling. (Gravel can also be used and provides even faster drainage.) Finally, the trench is backfilled in layers, compacting lightly to avoid stressing the new pipe.
Step 12. Final Backfill and Surface Preparation
Once waterproofing and drains are protected, the rest of the excavation is backfilled. Material is placed in thin lifts and compacted evenly around all sides of the foundation. Care is taken not to damage the membrane. The upper layers are finished with topsoil or aggregate, depending on the landscaping plan. If the basement includes an exterior entrance, any exposed concrete sections are insulated again or faced with protective panels.
At this stage, the structure is stable, dry, and ready for basement wall construction.
Quality Control Checklist
A foundation only performs as well as its weakest detail. Professional crews confirm the following before moving on:
Layout and Geometry
Diagonals are equal and axes are square.
Benchmark elevations match across all sides.
Piling and Rebar
Piles drilled to specified depth, cages aligned vertically.
Rebar cover maintained; no steel in contact with soil.
All ties tight, corners lapped correctly.
Formwork
Panels oiled and secure.
Threaded rods and ties in place to resist concrete pressure.
Height nails set for accurate leveling.
Concrete Work
Mix proportion consistent.
Concrete placed continuously and vibrated properly.
Top finished smooth and level to reference nails.
Drainage and Waterproofing
Interior and exterior pipes slope correctly to outlet.
Two coats of waterproofing applied evenly.
Dimpled membrane installed without tears or gaps.
Backfill
Sand protects pipes and membranes.
Compaction even, no voids against the wall.
Practical Lessons from the Build
A few takeaways stand out from this type of foundation work:
Fill piles halfway, then insert cages. It’s faster and ensures the cage sits correctly.
Use welded top spacers. They eliminate guesswork when aligning formwork.
Cap every rebar end with plastic protectors. They prevent damage to panels.
Mark pour levels with nails, not tape. Nails stay visible even when wet.
Brace formwork in two directions. Wet concrete exerts heavy pressure.
Never backfill directly against waterproofing. Always protect it first.
Keep your sand and clay separate. Mixing them weakens compaction and drainage.
These small details make the difference between a foundation that performs flawlessly and one that causes headaches later.
Common Mistakes to Avoid
Skipping diagonal checks during layout, resulting in out-of-square walls.
Under-compacting the sub-base, which leads to cracks as soil settles.
Letting clay touch drainpipes, which causes shifting and blockages.
Neglecting formwork reinforcement—a blowout can ruin an entire pour.
Applying waterproofing on damp concrete, which prevents proper bonding.
Failing to provide fall on drainage pipes, allowing water to stagnate.
Ignoring protective membranes, leaving coatings vulnerable during backfill.
Safety Practices on Site
Basement construction involves heavy machinery and deep excavations, so safety is constant priority:
Install edge barriers or trench boxes for deep sections.
Provide ladders for safe entry and exit.
Keep people clear of the auger while drilling piles.
Use proper PPE: helmets, gloves, goggles, and respirators when cutting rebar or applying bitumen.
Secure formwork and braces before pouring.
Never work alone in deep excavations.
Well-managed safety protects both workers and project timelines.
The Finished Result
When done correctly, the finished basement foundation looks simple from the surface—clean edges, level top, and smooth walls. But beneath that appearance lies careful coordination of excavation, reinforcement, waterproofing, and drainage. Every step supports the next, and skipping one can compromise the structure for years to come.
This foundation now provides a solid, waterproof base for concrete block walls and the rest of the home above. With proper detailing, it will resist shifting, moisture, and frost for decades.
Final Thoughts
A basement foundation is as much about patience as it is about engineering. Precision layout, consistent compaction, strong rebar ties, and meticulous waterproofing separate quality builds from quick ones.
Whether you’re planning a new construction, managing a crew, or just studying the process, understanding each phase helps you make informed decisions on site. A well-built foundation isn’t something you see every day—but it’s what keeps everything else standing.


Comments