How Do I Install a Gas Water Heater?
- DreamDen AI Editorial Team
- Aug 18, 2025
- 20 min read

Updated: Aug 22, 2025
Heating equipment contributes to about 13% of all home fires in the U.S. (2016–2020 data). Source - nfpa.org
Around 23% of water heater–related fires are due to heat sources placed too close to combustibles
Source - superbrothers.com
Improper installation is linked to 20–30% of water heater failures, often leading to denied insurance claims.
Source - drftps.com
Installing Hot Gas Water Heater
Imagine waking up to a cold shower on a freezing morning—frustrating, right? If your old water heater has quit or you're upgrading to a more energy-efficient model, installing a gas water heater can save you hundreds of dollars—if you know how to do it right.
We’ll show you how to safely and efficiently install a gas water heater on your own. From expert prep tips to connection tricks and safety checks, this post is packed with actionable advice, crucial safety reminders, and cost-saving hacks to get the job done without hiring a plumber.
Important Note: If you’re uncomfortable working with gas lines or local codes, hiring a licensed professional is highly recommended. Safety first!
Quick Glance: What You’ll Learn
What tools and parts you need before starting
How to disconnect and remove your old water heater
Step-by-step gas water heater installation
How to test for gas leaks and ensure safety
Insider tips to boost efficiency and avoid common mistakes
Costs, timelines, and bonus maintenance tips
Tools & Materials Checklist: Get These Before You Start
Don’t start until you’ve gathered everything you need. Here’s a no-fluff list of must-haves:
Tools:
Pipe wrench
Adjustable wrench
Pipe cutter
Screwdrivers
Bucket
Garden hose
Gas leak detector solution (or soapy water)
Flashlight
Voltage tester
Drill (if venting needs work)
Materials:
New gas water heater (40 or 50-gallon recommended for most homes)
Flexible gas line connector
Water connectors (flexible braided stainless steel recommended)
Teflon tape
Pipe joint compound (for gas)
Venting pipe (if replacing an older model)
Earthquake straps (if required in your area)
Expansion tank (if required by code)
Why Upgrade to a New Gas Water Heater?
If you’re considering replacing a water heater that is more than 10–12 years old, it's very likely that you are overdue for an upgrade. Water heaters, like many appliances, have a finite lifespan, and as they age, their efficiency tends to decline significantly. According to Energy.gov, modern water heaters boast advancements in technology and design that make them up to 20% more efficient compared to older models. This improvement in efficiency can translate into substantial savings on your energy bills, potentially saving you anywhere from $100–$200 per year. Over time, these savings can accumulate, making the initial investment in a new water heater worthwhile.
Upgrading your water heater not only helps in cutting down on energy costs but also enhances your overall home experience. As you evaluate the need for a new unit, consider the following common reasons homeowners decide to upgrade:
Increased hot water demand: As families grow or lifestyles change, the demand for hot water can increase significantly. Whether it’s more showers being taken, additional appliances that use hot water, or simply a desire for better performance, a new water heater can meet these heightened needs more effectively.
Better energy efficiency: With advancements in technology, newer models are designed to consume less energy while providing the same or even improved levels of service. This not only reduces your carbon footprint but also contributes to lower utility bills, making it an environmentally and financially sound decision.
New safety features: Modern water heaters come equipped with enhanced safety features that were not available in older models. These may include improved temperature controls, automatic shut-off valves, and better insulation to prevent overheating. Such features significantly reduce the risk of accidents and ensure safer operation.
Local code requirements: Building codes and regulations can change over time, and older water heaters may no longer meet current safety and efficiency standards. Upgrading ensures compliance with local regulations, which can be particularly important if you plan to sell your home in the near future.
Home resale value: A modern, efficient water heater can enhance the appeal of your home to potential buyers. Prospective homeowners often look for properties with updated appliances, and a new water heater can be a selling point that adds to the overall value of your home, making it more attractive in a competitive market.
Step 1: Shut Off Utilities and Prepare the Area
Turn Off the Gas Supply
Begin by locating the gas shutoff valve, which is typically situated close to the gas water heater. This valve is crucial for ensuring safety during maintenance or replacement of the heater. Once found, carefully turn the valve perpendicular to the pipe. This position indicates that the gas supply is completely shut off. If you are uncertain about whether the valve is indeed closed, it is wise to double-check the gas meter. Observe the meter closely for any signs of movement; if the needle remains stationary, it confirms that the gas supply has been successfully turned off, providing peace of mind as you proceed with the task at hand.
Shut Off the Water Supply
Next, locate the cold water valve that is typically positioned above the water heater. This valve is responsible for controlling the flow of cold water into the tank. To effectively shut off the water supply, turn the valve clockwise until it stops moving. This action will prevent any additional cold water from entering the heater during the draining process. It is essential to ensure that this valve is fully closed to avoid any potential leaks or water flow while you are working on the heater. Taking this precaution will help maintain a dry and safe working environment.
Turn Off Power (if applicable)
If your gas water heater is equipped with an electric igniter, it is critical to turn off the circuit breaker that supplies power to the unit. This step is vital for safety, as it eliminates the risk of electric shock or accidental ignition while you are performing maintenance or replacement. Locate your home’s electrical panel and identify the circuit breaker designated for the water heater. Flip the switch to the 'off' position, ensuring that all power is disconnected. This precautionary measure not only safeguards you during the process but also protects the integrity of the heater’s electrical components.
Drain the Old Heater
To begin the draining process of the old water heater, attach a garden hose to the drain valve located near the bottom of the tank. This valve is designed for easy draining and is typically threaded to accommodate standard hose fittings. Once the hose is securely attached, open the drain valve to allow the water to flow out into a suitable drainage area, such as a floor drain or outside. To facilitate quicker draining and to relieve pressure within the tank, it is advisable to open a nearby hot water faucet. This action allows air to enter the tank, promoting a smoother and more efficient drainage process. Keep an eye on the draining water to ensure that it is flowing freely and that the hose remains securely in place throughout the operation.
Step 2: Remove the Old Water Heater

Be careful—water can be scalding hot! It is crucial to approach any plumbing work with caution, especially when dealing with water systems, as temperatures can reach dangerously high levels, potentially leading to severe burns or injuries.
Disconnect:
Gas Line: Before you begin, ensure that the gas supply is completely shut off to prevent any leaks or accidents. When disconnecting the gas line, use two wrenches—one to hold the valve securely in place while the other is used to unscrew the connection. This method not only provides stability but also minimizes the risk of damaging the valve or the line itself. Always check for any residual gas odors after disconnection, and if you detect any, ventilate the area immediately and contact a professional.
Water Lines: When disconnecting the water lines, it's essential to have a bucket or a large container ready to catch any drips or residual water that may escape during the process. This will help keep your workspace clean and prevent water damage. Consider using towels or rags to soak up any spills. Additionally, it’s wise to turn off the main water supply to the house prior to this step to avoid unexpected flooding while you work.
Vent Pipe: Carefully unscrew and remove the venting system, ensuring that you do not damage any surrounding components. Use caution, as the vent pipe may be attached with screws or clamps that can be rusted or corroded. If you encounter resistance, apply penetrating oil to loosen the connections. Once removed, inspect the vent pipe for any signs of wear or blockage, as this could affect the efficiency of your new unit.
Pro Tip: Take photos of your existing connections before you disconnect anything. This simple step can be a lifesaver during installation, allowing you to refer back to the images to ensure that you reconnect everything correctly. It can also help identify any parts that may need replacement or adjustment.
Now, gently remove the old unit and set it aside for disposal. Be mindful of any remaining connections that may still be attached, and proceed with caution to avoid damaging your plumbing or electrical systems. Proper disposal of the old unit is essential; check with local regulations regarding the disposal of appliances, as they may contain materials that require special handling. If possible, consider recycling the unit, as many components can be repurposed or reused, contributing to a more sustainable environment.
Step 3: Position the New Water Heater
Set the new heater in place, ensuring it’s level by using a carpenter's level or a similar tool to check that both the front and back, as well as the sides, are perfectly aligned. This is crucial because an uneven installation can lead to improper functioning of the heater and may even cause damage over time. Additionally, it is vital to maintain at least 6 inches of clearance on all sides for ventilation. This clearance is necessary to allow for adequate airflow, which helps the heater operate efficiently and safely. Ensure that there are no obstructions, such as furniture or stored items, that could impede airflow around the unit, as this could lead to overheating or other safety hazards.
Furthermore, it is important to install any required drip pans to catch any potential leaks from the heater. This is particularly important in areas where water damage could occur, as a drip pan can help prevent costly repairs and maintain the integrity of your home. Be sure to check local building codes to determine the specific requirements for drip pans in your area, as these regulations can vary significantly. In addition, consider the installation of earthquake straps if you live in a region prone to seismic activity. These straps are designed to secure the heater to the wall, providing additional stability during an earthquake and reducing the risk of the unit tipping over. Again, refer to your local codes to confirm the necessity and specifications for earthquake straps, ensuring your installation meets all safety standards.
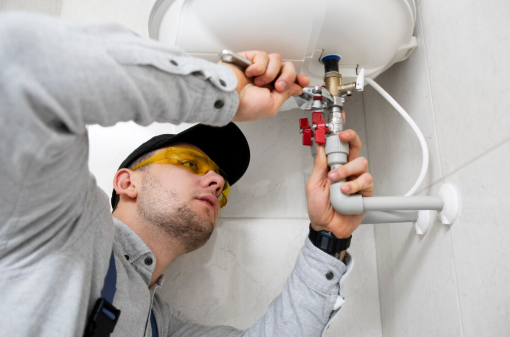
Step 4: Connect the Water Lines
Before beginning the installation process, it is essential to ensure that the threads of the water inlets are properly prepared to prevent leaks and ensure a secure connection. One effective method for achieving this is to wrap Teflon tape around the threads of the water inlets. Teflon tape, also known as plumber's tape, serves as a sealant that fills in any gaps between the threads, creating a watertight seal. When applying the tape, make sure to wrap it in the direction of the threads to ensure it adheres correctly and does not unravel when the fittings are tightened.
Connect the cold water line to the right-hand side (blue). This connection is crucial as it directs the cold water supply to the appliance. Before making the connection, ensure that the cold water supply is turned off to prevent any accidental leaks or water spillage. Once you have secured the Teflon tape on the threads, align the cold water line with the inlet and tighten it using an appropriate wrench, being careful not to overtighten, which could damage the fittings.
Connect the hot water line to the left-hand side (red). Similar to the cold water line, ensure that the hot water supply is also turned off before proceeding. Wrap Teflon tape around the threads of the hot water inlet to ensure a secure seal. Once prepared, connect the hot water line by aligning it with the inlet and tightening it carefully. As with the cold water line, take care not to overtighten the connection to avoid any potential damage to the fittings.
To facilitate an easier and more flexible installation process, it is recommended to use flexible stainless steel connectors. These connectors are designed to provide a degree of flexibility, allowing for easier alignment of the water lines to the inlets and reducing the strain on the fittings. Their durability and resistance to corrosion also ensure a long-lasting connection, making them an excellent choice for both hot and cold water lines.
Pro Tip: For added convenience and safety, consider installing a shutoff valve on the cold water line. This valve will allow you to easily turn off the water supply in the future, whether for maintenance, repairs, or in case of an emergency. Having a shutoff valve installed can save you time and effort in the long run, as it provides quick access to control the water flow without needing to shut off the main water supply to your home.
Step 5: Hook Up the Gas Line
Gas is a serious matter—don’t cut corners here. The handling of gas lines and fittings requires utmost precision and care to ensure safety and compliance with regulations. Any misstep can lead to hazardous situations, including gas leaks that can pose significant risks to health and safety.
First and foremost, it is crucial to use the appropriate materials for gas fittings. Specifically, you should use pipe compound designed for gas applications, rather than Teflon tape. The reason for this is that pipe compound provides a better seal and is specifically formulated to withstand the pressures and chemical compositions found in gas systems, ensuring a secure and leak-free connection.
Next, when connecting the flexible gas line from the gas valve to the heater’s inlet, ensure that the connection is made securely. The flexible gas line is designed to accommodate movement and vibrations, but it is essential to ensure that it is properly aligned and connected to prevent any stress on the fittings. This step is critical as it lays the groundwork for a safe and efficient gas supply to your heating system.
When tightening the connections, it is imperative to use two wrenches. This technique helps to stabilize the fittings and prevents any undue stress on the pipes. However, a crucial point to remember is to DO NOT OVERTIGHTEN. Over-tightening can damage the fittings and lead to cracks or leaks, which can be extremely dangerous. Instead, aim for a snug fit that ensures the connection is secure without compromising the integrity of the materials.
Once you have successfully made the connections, the next critical step is to check for leaks. This is a vital safety procedure that should never be skipped. Refer to Step 7 for detailed instructions on how to perform this inspection effectively, ensuring that your gas system is safe and operating correctly. Remember, when it comes to gas installations, thoroughness and caution are your best allies.
Step 6: Install the Venting System
Improper venting can lead to carbon monoxide poisoning, a serious and potentially fatal condition that occurs when carbon monoxide (CO), a colorless and odorless gas, accumulates in enclosed spaces. This can happen when appliances that burn fuel, such as gas furnaces, water heaters, or stoves, are not vented correctly. To ensure the safety of your home and its occupants, it is crucial to follow manufacturer instructions precisely, as these guidelines are designed to prevent dangerous situations and ensure optimal appliance performance.
Use UL-listed venting material. This means that the venting materials you choose have been tested and certified by Underwriters Laboratories, a recognized safety organization. Using UL-listed materials ensures that they meet strict safety and performance standards, reducing the risk of vent failure and the associated dangers of carbon monoxide buildup in your home.
Ensure a proper upward slope for exhaust gases. It is essential that the venting system is installed with a slight upward angle, allowing exhaust gases to flow freely and preventing any backdrafts that could lead to CO entering your living space. A slope of at least 1/4 inch per foot is typically recommended, but you should always refer to the specific guidelines provided by the manufacturer for the appliance you are using.
All joints should be screwed and sealed. Proper sealing of all connections in the venting system is critical to prevent leaks that could allow carbon monoxide to escape into your home. Use high-quality sealants and ensure that all screws are tightened appropriately to maintain the integrity of the venting system. Regular inspections of these joints can help identify any wear or damage that may develop over time, ensuring continued safety.
If you’re switching from a power vent to a direct vent or vice versa, additional modifications may be required. This transition can involve changes to the venting configuration, including the size and type of vent pipes, the location of the vent termination, and potentially the installation of new venting components. It is critical to consult with a qualified technician who can assess your specific situation and ensure that all modifications comply with local building codes and safety regulations. Proper installation and adherence to guidelines will help mitigate the risks associated with improper venting and protect your household from the dangers of carbon monoxide poisoning.
Step 7: Check for Leaks and Turn On the System
Gas Leak Test
To begin the gas leak test, first prepare a mixture of dish soap and water. The soap acts as a surfactant, which enhances the visibility of any potential leaks. Use a clean container to mix a solution that is approximately one part dish soap to three parts water. This ratio will create a thick enough solution that can effectively cling to surfaces while also producing bubbles in the presence of gas.
Next, take a soft-bristled brush or a sponge and apply the soapy solution generously over all gas joints and connections. This includes areas such as the fittings, valves, and any other points where gas lines are connected. Ensure that the solution is applied thoroughly to cover all possible leak points, as even the smallest leak can be hazardous.
Once the soapy solution has been applied, proceed to open the gas supply valve carefully. It is crucial to do this slowly to avoid any sudden release of gas, which could pose a danger. As the gas begins to flow through the lines, the pressure will help to reveal any leaks that may be present.
Bubbles = Leak. Observe the areas where the soapy solution has been applied. If you notice any bubbles forming, this indicates that there is a leak at that specific joint or connection. The presence of bubbles means that gas is escaping, and immediate action is required. To address the leak, tighten the fittings or connections that are bubbling. After making adjustments, reapply the soapy solution and repeat the test to ensure that the leak has been successfully sealed. This process is essential for maintaining safety and preventing gas-related incidents.
Water Pressure Test
To conduct a water pressure test, start by turning on the cold water supply to the system. This is a critical step as it initiates the flow of water through the pipes, allowing for a thorough examination of the entire plumbing system. Ensure that the water supply is fully opened to allow maximum pressure to build up within the pipes.
Next, open a hot water faucet somewhere in the system to bleed any trapped air. This step is vital because air pockets can prevent water from filling the pipes completely, which could lead to inaccurate readings during the pressure test. Allow the water to flow until a steady stream is observed, indicating that most of the air has been expelled from the system.
After ensuring that the system is filled with water and free of air, carefully inspect all connections, joints, and fittings for any signs of leaks. Pay close attention to areas where pipes are joined together, as well as around valves and fixtures. If any leaks are detected, they will typically appear as water droplets or streams emerging from the connections. Identifying and addressing these leaks promptly is essential to prevent water damage and ensure the integrity of the plumbing system.
8: Ignite the Water Heater
Most modern heating models are equipped with an electronic igniter, which serves as a crucial component in the ignition process of the heating system. This advanced feature enhances the efficiency and reliability of the unit, ensuring that it operates smoothly and effectively. To ensure optimal performance and safety, it is essential to follow your specific unit’s lighting instructions meticulously:
First, set the thermostat to a comfortable and energy-efficient temperature of 120°F. This temperature setting is not only safe for household use but also helps in preventing scalding, making it a wise choice for families with children or elderly members. Additionally, maintaining the thermostat at this level can lead to significant energy savings, as it reduces the overall energy consumption of the heating system while still providing adequate hot water for daily needs.
After adjusting the thermostat, it is important to wait for approximately 30–60 minutes to allow the system to heat the water adequately. During this time, the electronic igniter will initiate the heating process, and the water will gradually reach the desired temperature. This waiting period is crucial as it ensures that the hot water is available for use when needed, whether for bathing, cooking, or cleaning. Patience during this phase can lead to a more efficient operation of the heating system and a consistent supply of hot water.
What Pros Know That You Don’t
1. Earthquake Safety
In seismic zones, it is crucial to prioritize safety measures to protect your water heater from the damaging effects of earthquakes. One effective method is to use earthquake straps, which should be installed securely on both the top and bottom third of the tank. These straps are designed to anchor the water heater to the wall, minimizing the risk of tipping over during seismic activity. Additionally, ensure that the straps are made of durable materials that can withstand the stress of an earthquake. Regularly inspect the straps for wear and tear, and tighten them as necessary to maintain their effectiveness. Implementing this safety measure not only safeguards your property but also enhances the overall safety of your household during seismic events.
2. Install a Timer
Gas heaters equipped with recirculation pumps or timers can significantly enhance energy efficiency and lead to considerable savings on heating costs, potentially reducing expenses by up to 15%. A timer allows you to set specific heating schedules based on your household's routine, ensuring that hot water is available only when needed. This prevents unnecessary heating during times when the water heater is not in use, such as overnight or when the household is away. Furthermore, a recirculation pump can provide instant hot water at the tap, reducing water waste and improving convenience. By investing in these technologies, homeowners can not only save money but also contribute to energy conservation efforts, making their homes more eco-friendly.
3. Avoid Backdrafting
To ensure safe operation of gas appliances, it is essential to use a draft hood and regularly check that your venting system is free from obstructions. Backdrafting occurs when combustion gases, including carbon monoxide, flow back into the living space instead of being vented outside, posing a serious health risk to occupants. This silent killer can go unnoticed, making it vital to conduct routine inspections of your venting system. Look for signs of backdrafting, such as yellow flames or an unusual odor, and ensure that flue pipes are correctly installed and maintained. Installing carbon monoxide detectors in your home can provide an additional layer of safety, alerting you to any dangerous gas accumulation. Taking these precautions is essential for maintaining a safe living environment and protecting your family from harmful gases.
4. Don’t Skip the Expansion Tank
If your home has a closed plumbing system, the installation of an expansion tank is highly recommended to prevent dangerous pressure build-up. As water is heated, it expands, which can lead to increased pressure in the plumbing system. Without an expansion tank, this pressure can cause stress on pipes and fixtures, potentially leading to leaks or even bursts. An expansion tank acts as a cushion, absorbing the excess pressure and allowing for safe expansion of water. It is important to choose the right size expansion tank based on your water heater’s capacity and the specific needs of your plumbing system. Regular maintenance of the expansion tank is also necessary to ensure it functions effectively over time. By incorporating this vital component into your plumbing system, you can enhance the longevity of your pipes and fixtures while ensuring the safety of your home.
How Much Does It Cost to Install a Gas Water Heater?
If you’re doing it yourself:
Heater unit: $500–$1,200
When considering the purchase of a heater unit, it is essential to take into account the type of heater you need, whether it be a gas, electric, or another type of heating system. Prices can vary significantly based on the brand, efficiency rating, and capacity of the heater. High-efficiency models may come at a premium but can save you money on energy bills in the long run. Additionally, ensure that the unit you choose is compatible with your existing system and meets local building codes.
Parts and materials: $100–$200
The cost of parts and materials will depend on the specifics of your installation. This can include ductwork, piping, wiring, insulation, and any necessary tools you may need to purchase or rent. Additionally, consider any safety equipment, such as gloves and goggles, which are vital when working with heating systems. It's advisable to create a detailed list of all components required for your installation to avoid unexpected expenses.
Total DIY cost: ~$600–$1,400
In total, if you choose to undertake the installation yourself, you can expect to spend approximately $600 to $1,400. This range accounts for variations in heater unit prices and the materials required. While the DIY approach can be significantly cost-effective, it requires careful planning, a solid understanding of the installation process, and a commitment to safety. Make sure to research thoroughly and consider consulting online resources or instructional videos to guide you through the installation steps.
If hiring a pro:
Installation labor: $400–$1,200
When opting to hire a professional for the installation of your heating unit, the labor costs can range from $400 to $1,200. This price can vary based on the complexity of the installation, the hourly rates of the professionals in your area, and the specific requirements of your home. Hiring a licensed contractor not only ensures that the installation is performed correctly but also provides peace of mind that the work will comply with local safety regulations and standards.
Total installed cost: $1,200–$2,600+
When you factor in both the cost of the heater unit and the installation labor, the total installed cost can range from approximately $1,200 to over $2,600. This broad range reflects the differences in heater models, the intricacies of the installation process, and any additional features or modifications that may be necessary. It's crucial to obtain multiple quotes from different contractors to ensure you are getting a fair price and to inquire about warranties or guarantees on both the unit and the installation work performed.
You can save up to 60% by doing it yourself—if you’re confident in your skills. However, it's important to weigh the potential savings against the risks involved in a DIY project. Consider your level of expertise and whether you have the necessary tools and resources to complete the job safely and effectively. If you encounter challenges during the installation, it may lead to additional costs or complications, so be honest with yourself about your capabilities before deciding to take on the project.
Frequently Asked Questions (FAQs)
Is it legal to install a gas water heater myself?
Yes, in most states, but you may need to pull a permit and schedule an inspection. Check with your local building department.
How long does installation take?
DIY: 4–6 hours (if no venting/piping issues)
Pro: 2–3 hours
How long does a gas water heater last?
Most last 8–12 years, but tankless models can last 20+ years with proper maintenance.
Can I replace electric with gas?
Yes—but it requires a gas line extension and venting work. Always consult a professional for this conversion.
Final Safety Checklist
Before wrapping up, review this final checklist:
Task | Completed? |
Gas shutoff and leak test | ✔️ |
Water lines connected and leak-free | ✔️ |
Venting system securely installed | ✔️ |
Thermostat set to 120°F | ✔️ |
Expansion tank installed (if needed) | ✔️ |
Permit pulled (if required) | ✔️ |
Final Thoughts: Should You DIY or Call a Pro?
Installing a gas water heater is totally doable for a handy homeowner—but it’s not for everyone.
You’re a great candidate for DIY if:
You're comfortable using tools
You can follow detailed instructions
You understand gas safety basics
But if you’re uncertain or rushed, it’s better (and safer) to call a licensed plumber.
Bottom Line:
If done right, a DIY gas water heater installation can save you hundreds of dollars, boost your home’s energy efficiency, and give you years of reliable hot water.
Additional FAQs About Installing a Gas Water Heater
1. Do I need a permit to install a gas water heater myself?
Yes, in most cities and counties, a plumbing or mechanical permit is required—even for DIY installations. This ensures your installation meets local safety codes and passes inspection. Always check with your local building department before starting.
2. Can I reuse the old vent pipe from my previous heater?
Only if the existing vent pipe meets code and matches the venting requirements of your new unit. Older venting may be incompatible with newer, high-efficiency models. Using the wrong vent type can result in backdrafting or carbon monoxide leaks.
3. What size gas water heater should I install?
That depends on your household size:
1–2 people: 30–40 gallon
3–4 people: 40–50 gallon
5+ people: 50–75+ gallon
Also consider peak usage times—like multiple showers in the morning.
4. How do I properly dispose of my old water heater?
Many local governments or retailers offer appliance recycling programs. You can:
Schedule a curbside bulk pickup
Drop it at a metal recycling center
Ask your new water heater retailer to haul it away for a small fee
Never dump it illegally—it’s hazardous and often illegal.
5. What’s the difference between atmospheric vent and power vent heaters?
Atmospheric vent units use natural convection to expel gases upward through a vertical flue.
Power vent heaters use a fan blower to push gases horizontally or upward—ideal when venting through a wall.
Power vent units are more versatile but require electricity and cost more upfront.
6. Can I install a gas water heater in a closet or small room?
Only if it's a sealed combustion or direct vent model. Standard gas heaters need ample ventilation and clearance to operate safely. Never install one in an unventilated space—it poses a serious fire and health risk.
7. What’s the difference between a gas and tankless water heater?
A traditional gas heater stores and heats a tank of water continuously, while a tankless heater heats water on-demand, offering endless hot water and saving energy—though they require larger gas lines and higher installation costs.
8. How often should I flush the new gas water heater?
Flush your water heater at least once a year to remove sediment buildup. If you have hard water, consider flushing every 6 months. This extends the lifespan and improves heating efficiency.
9. Is it safe to install a gas water heater near electrical panels or outlets?
No. There are strict clearance requirements for gas appliances. Keep the heater at least 36 inches away from electrical panels or outlets. Check your local building codes for specific spacing guidelines.
10. Can I install a hot gas water heater in a mobile home?
Only if the water heater is HUD-approved for mobile homes. These units are specifically designed for the space limitations and ventilation systems in manufactured housing. Never install a standard residential unit in a mobile home—it’s against code.


Comments