How to Install Steel Roofing
- DreamDen AI Editorial Team
- Jan 6
- 5 min read

Steel roofing has become a popular choice across the United States, and for good reason. It lasts longer than traditional asphalt shingles, holds up better in extreme weather, and can improve your home’s energy efficiency. While hiring a professional is always an option, many homeowners want to understand how steel roofing is installed, whether to do it themselves or to make better decisions when working with a contractor.

What Is Steel Roofing?
Steel roofing is a type of metal roofing made from coated steel panels. These panels are designed to resist rust, handle heavy rain and snow, and protect homes for decades. Most steel roofs last 40 to 70 years when installed correctly.
Steel roofing commonly comes in two styles:
Exposed fastener panels where screws are visible
Standing seam panels where fasteners are hidden
Both can work well for residential homes, but the installation process is slightly different.\
Pros and Cons of Steel Roofing
Before installing steel roofing, it helps to understand what you’re getting into.
Pros
Long lifespan compared to asphalt shingles
Resistant to fire, wind, and hail
Lightweight and easy on the roof structure
Reflects heat and improves energy efficiency
Low maintenance
Cons
Higher upfront cost
Installation must be precise to avoid leaks
Can be noisy during heavy rain without proper insulation
Panels expand and contract with temperature changes
Tools and Materials You’ll Need

Installing steel roofing requires proper tools. Having everything ready before you start saves time and prevents mistakes.
Tools
Tape measure
Chalk line
Tin snips or metal cutting saw
Drill or impact driver
Roofing hammer
Utility knife
Ladder and safety harness
Work gloves and safety glasses
Materials
Steel roofing panels
Underlayment (synthetic or felt)
Drip edge
Closure strips
Screws with rubber washers
Ridge cap
Flashing (for vents, chimneys, valleys)
Step 1: Check Local Building Codes and HOA Rules
Before you begin, check local building codes and neighborhood rules. Some areas require permits for roof replacement. Others have rules about roof color or panel type.
Skipping this step can lead to fines or forced removal later.
Step 2: Measure the Roof Carefully
Accurate measurements are critical. Measure:
Roof length and width
Roof pitch (slope)
Overhang requirements
Order slightly more material than needed to allow for trimming and mistakes. Running short can delay the project.
Step 3: Remove the Old Roofing (If Needed)

Some steel roofs can be installed over existing shingles, but this depends on local code and roof condition.
Remove the old roof if:
The decking is damaged
There are multiple layers of shingles
The roof surface is uneven
Inspect the decking and replace any rotten or soft wood.
Step 4: Install the Underlayment
Underlayment acts as a moisture barrier and protects the roof deck.
How to Install Underlayment
Start at the bottom edge of the roof
Roll it horizontally across the roof
Overlap seams by at least 4 inches
Secure it with cap nails or staples
In colder regions, use ice and water shield along the eaves and valleys.
Step 5: Install Drip Edge and Flashing
Drip edge directs water away from the fascia and prevents rot.
Install drip edge along eaves first
Install underlayment over the eave drip edge
Install rake edge on the sides over the underlayment
Add flashing around chimneys, vents, skylights, and valleys before installing panels.
Step 6: Plan the Panel Layout
Before installing panels, plan the layout carefully.
Use a chalk line to mark straight reference lines
Start from the squarest corner of the roof
Make sure panels overhang the eaves slightly
A crooked starting line can cause major alignment issues later.
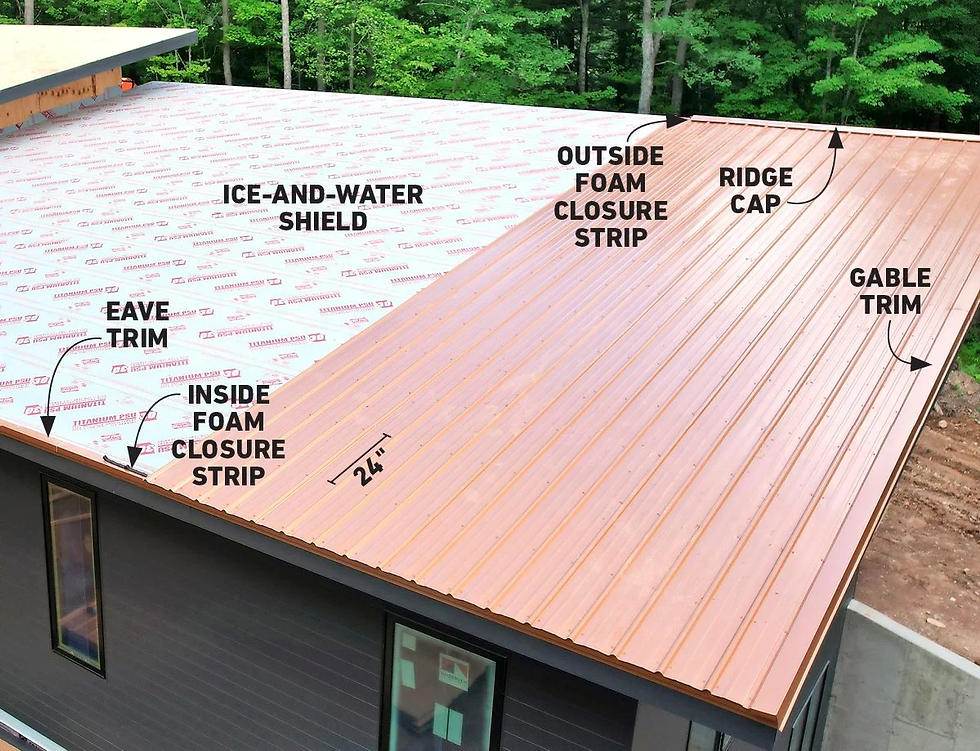
Step 7: Install Closure Strips
Closure strips seal gaps between the panel ribs and the roof.
Place them at the eaves before the first panel
Install them again at the ridge before the ridge cap
This step helps prevent water, insects, and debris from entering the roof system.
Step 8: Install the Steel Roofing Panels
This is the most important step.
General Panel Installation Steps
Start at the bottom corner of the roof
Lay the first panel square and straight
Secure panels using manufacturer-recommended screws
Do not overtighten screws
Overlap panels according to design
Screw Placement Tips
Screws go through flat areas, not ribs (for exposed fastener panels)
Rubber washers should compress slightly, not flatten completely
Follow spacing guidelines exactly
Step 9: Cutting Panels to Fit
Panels often need trimming near:
Valleys
Ridges
Chimneys
Roof edges
Use tin snips or a metal cutting saw. Avoid abrasive blades that damage protective coatings.
Always wear gloves. Cut metal edges are sharp.
Step 10: Install Ridge Cap
The ridge cap seals the top of the roof.
Install closure strips first
Place ridge cap over the peak
Secure with screws through the flat areas
Overlap ridge cap sections as required
Proper ridge installation prevents wind-driven rain from entering the roof.
Step 11: Seal and Finish Details
Check all penetrations and seams.
Apply sealant where required
Double-check flashing
Ensure all screws are secure
Remove metal shavings from the roof
Metal shavings can rust and stain panels if left behind.
Step 12: Inspect the Roof
Walk the roof carefully and inspect:
Panel alignment
Screw tightness
Flashing seals
Ridge and edge details
A thorough inspection helps catch small issues before they turn into leaks.
Safety Tips for Installing Steel Roofing
Roof work can be dangerous. Always prioritize safety.
Use a harness on steep roofs
Wear non-slip footwear
Avoid working in wet or windy conditions
Never work alone
Keep tools secured
Common Mistakes to Avoid
Many steel roof problems come from small mistakes.
Avoid:
Starting panels out of square
Overtightening screws
Skipping underlayment
Using the wrong fasteners
Ignoring expansion and contraction
Taking your time prevents costly repairs later.
Can You Install Steel Roofing Yourself?
Yes, many homeowners install steel roofing themselves, especially on simple roof designs like barns, garages, or single-story homes. However, complex roofs with valleys, dormers, or steep slopes may be better left to professionals. If you’re unsure, consider hiring a contractor for installation and handling prep work yourself.
How Long Does Installation Take?

Small roof: 1 to 2 days
Medium home: 2 to 4 days
Large or complex roof: 4 to 7 days
Weather, experience level, and roof design all affect timing.
Maintenance After Installation
Steel roofing is low maintenance, but not maintenance-free.
Inspect annually
Check screws every few years
Clean debris from valleys
Touch up scratches if needed
Proper care helps your roof reach its full lifespan.
Final Thoughts
Installing steel roofing is a manageable project with the right preparation, tools, and patience. When installed correctly, a steel roof offers long-lasting protection, energy efficiency, and peace of mind. Whether you plan to install it yourself or simply want to understand the process, knowing how steel roofing works helps you make smarter decisions and avoid costly mistakes.


Comments