Transform Your Home: The Ultimate Guide to Painting a Tin Roof
- DreamDen AI Editorial Team
- Sep 19, 2025
- 18 min read

Updated: Oct 8, 2025
Is Painting a Tin Roof Right for You?
Benefits of Painting Metal Roofing
Painting your metal roof offers several compelling advantages beyond simple aesthetics. Firstly, a fresh coat of high-quality roof paint significantly extends the lifespan of your roofing system. In our experience, properly painted metal roofs can last 10-15 years longer than unpainted ones, easily recouping the initial investment in paint and labor. This longevity is particularly crucial in harsh climates, where UV exposure and extreme temperatures can quickly degrade unprotected metal. A common mistake we see is neglecting proper surface preparation, leading to premature paint failure.
Beyond longevity, painting provides superior protection against the elements. High-quality metal roof coatings offer enhanced resistance to rust, corrosion, and weathering. This translates to reduced maintenance costs and fewer costly repairs down the line. For example, we recently worked on a project where the client’s painted tin roof withstood a severe hailstorm with minimal damage, unlike their neighbor’s unpainted roof which required extensive repairs. Furthermore, strategically selecting a reflective paintcan help lower energy costs by reducing heat absorption, keeping your home cooler in the summer months. This energy efficiency benefit is particularly noticeable in warmer climates.
Drawbacks and Considerations
Painting a tin roof offers aesthetic benefits, but it’s crucial to weigh the drawbacks. A common mistake we see is underestimating the prep work. Proper cleaning, including removing rust and loose paint, is labor-intensive and requires specialized equipment like pressure washers. Furthermore, the cost of quality metal roof paint, along with the necessary tools and safety gear (including fall protection), can be significant. In our experience, failing to adequately address these upfront costs often leads to project delays and budget overruns.
Another critical consideration is the long-term maintenance. While a fresh coat of paint enhances curb appeal, painted tin roofs typically require repainting every 5-7 years, depending on climate and paint quality. This recurring expense, coupled with the potential for peeling or blistering, should factor into your decision. For instance, a coastal home might necessitate more frequent repainting due to salt spray damage. Ultimately, the decision to paint your tin roof depends on a careful evaluation of these factors against the desired aesthetic improvements and your budget for both initial investment and ongoing maintenance.
Assessing Your Roof's Condition
Before even considering paint, a thorough roof inspection is paramount. In our experience, many homeowners underestimate this crucial step. A simple visual inspection from the ground can reveal obvious issues like missing or damaged panels, significant rust, or signs of leaking. However, a more comprehensive assessment—ideally by a qualified roofing professional—is necessary. This often involves a close-up examination of the roof’s surface, looking for subtle signs of deterioration that might not be visible from below. We’ve seen instances where seemingly minor surface imperfections become major problems after painting, leading to premature paint failure.
Consider these key areas during your assessment: Check for loose or improperly fastened panels, which can lead to wind damage and premature paint degradation. Look for evidence of corrosion beyond simple surface rust; deeply pitted or weakened metal is a sign the roof may need repair or replacement before painting. Finally, examine the existing paint (if any). Peeling or flaking paint indicates poor adhesion and requires addressing before applying a new coat. Addressing these issues proactively prevents costly repairs down the line and ensures a long-lasting, attractive finish. A common mistake we see is assuming a simple cleaning is sufficient; often, more substantial repairs are required for a successful paint job.
When to Replace Instead of Paint
Severe corrosion is the most obvious reason to replace, not repaint, your tin roof. In our experience, if more than 20% of the panels exhibit significant rusting—defined as pitting beyond the paint’s protective layer, or substantial flaking—a full replacement offers better long-term value than a costly paint job. Simply painting over extensive damage will only mask the underlying problem, leading to premature failure and potentially costly repairs down the line. A common mistake we see is homeowners attempting to patch extensive rust damage, which rarely provides a durable solution.
Consider the roof’s overall condition. A tin roof with significant dents, punctures, or loose panels may be beyond economical repair. While painting can improve aesthetics, it won’t address structural integrity issues. For example, a roof compromised by hail damage often requires panel replacement, even if the damage isn’t visually extensive. Assess whether the cost of painting plus necessary repairs approaches or exceeds the cost of a full replacement. This calculation should include the potential for future issues and the lifespan of a new roof versus a painted, but structurally compromised one. Factor in material costs, labor, and any associated permits or inspections. A thorough professional inspection can help you weigh the pros and cons to make an informed decision.
Preparing Your Tin Roof for Painting

Cleaning and Surface Preparation
Thorough cleaning is paramount before painting any tin roof. Begin
by removing loose debris like leaves, twigs, and nesting materials using a stiff-bristled broom or a leaf blower. A common mistake we see is neglecting this initial step, leading to a less-than-perfect paint adhesion. In our experience, a pressure washer is invaluable for removing ingrained dirt, mildew, and algae—but proceed cautiously! Too much pressure can damage the metal surface. Opt for a lower-pressure setting and maintain a safe distance to avoid pitting or gouging. Always test a small, inconspicuous area first.
After pressure washing (or if you’re skipping this step due to roof fragility), allow the roof to dry completely. This is crucial for proper paint adhesion. Next, address any rust spots. Minor rust can often be managed with a wire brush and rust remover. For more extensive rust, consider using a specialized rust-inhibiting primer before applying the final coat. Remember to carefully scrape away any loose paint or flaking material using a scraper. Finally, inspect the entire surface for any dents or holes requiring repair, patching them with appropriate sealant to ensure a smooth, even finish for your new paint job. This meticulous preparation will significantly extend the lifespan of your paint and enhance its aesthetic appeal.
Repairing Damaged Areas
Before applying any paint, addressing existing damage is crucial for a long-lasting, attractive finish. In our experience, neglecting even minor imperfections leads to premature paint failure. A common mistake we see is homeowners attempting to paint over rust or dents, resulting in a blotchy, uneven appearance within months. Thorough repair is paramount.
Start by assessing the extent of the damage. For rust, use a wire brush to remove loose particles, then apply a rust converter to neutralize further corrosion. This chemical reaction transforms the rust into a stable, paintable surface. For dents, carefully straighten them using a mallet and a wooden block to avoid further damage. Fill any significant holes or gouges with a high-quality, exterior-grade metal filler, allowing ample drying time before sanding smooth. Remember to prime repaired areas with a metal primer specifically designed for exterior applications before beginning the painting process. This ensures optimal adhesion and prevents future rust. Always wear appropriate safety gear, including gloves, eye protection, and a respirator, when working with these materials.
Choosing the right Primers and Paints
Primer selection is critical for successful tin roof painting. In our experience, choosing a high-quality alkyd-based primer specifically designed for metal is paramount. These primers offer superior adhesion to the often-smooth tin surface, preventing peeling and chipping, a common issue we see with improper preparation. Avoid oil-based primers, as they can take excessively long to dry, especially in humid climates. Consider the color of your chosen topcoat; a tinted primer can reduce the number of topcoat layers needed, saving time and materials.
For the topcoat, acrylic-alkyd blends offer a compelling balance of durability and flexibility. These paints typically provide excellent UV protection and are formulated to withstand extreme temperatures and weather conditions. While 100% acrylic paints are popular for their ease of application, their longevity on tin roofs can be less impressive than the acrylic-alkyd hybrids. Remember that color choice influences heat absorption; lighter colors reflect more sunlight, keeping your home cooler and potentially extending the paint’s lifespan. Always check the manufacturer’s specifications for drying times, recoating intervals, and warranty information before starting your project.
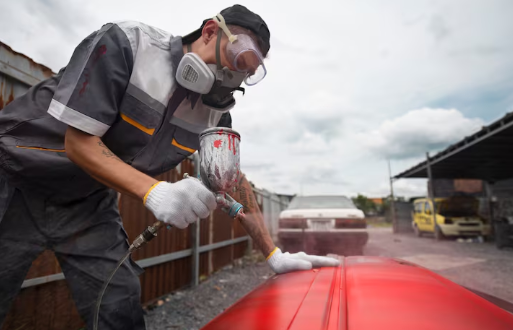
Essential Tools and Safety Equipment
Before you even think about picking up a paintbrush, assembling the right tools and safety equipment is paramount. In our experience, neglecting this step often leads to delays, accidents, and an uneven, unprofessional finish. You’ll need more than just brushes and paint. Essential tools include a high-quality pressure washer for thorough cleaning (consider a unit with at least 2000 PSI for effective grime removal), a scraper to remove loose paint and rust, and wire brushes (both handheld and potentially a rotary brush attachment for your drill) to prepare the metal surface for optimal paint adhesion. Don’t forget sandpaper (various grits for smoothing) and tack cloths to remove dust. For application, consider using both brushes and a roller for larger areas – a long-handled roller is particularly useful for tin roofs.
Safety should be your top priority. Working at heights inherently carries risks. A common mistake we see is underestimating the need for fall protection. Investing in a safety harness and appropriate anchorage points is non-negotiable, especially for steep-pitched roofs. Beyond falls, always wear eye protection (safety glasses or goggles) to prevent paint splashes and debris from injuring your eyes. A dust mask is vital to protect your respiratory system from paint fumes and dust generated during surface preparation. Furthermore, consider rubber gloves to prevent skin irritation from paint and cleaning agents. Finally, appropriate workwear—long sleeves, long pants, and sturdy closed-toe shoes—will shield you from scratches and other hazards. Remember, safety is not an expense, it’s an investment in your health and the successful completion of your project.
Choosing the Best paint for Your Tin Roof

Types of Metal Roof Paints
Several paint types cater specifically to the unique challenges of metal roofing. Acrylic paints, for example, are a popular choice due to their flexibility and excellent adhesion, crucial for withstanding expansion and contraction of the metal in varying temperatures. In our experience, acrylics offer a good balance of durability and ease of application, making them suitable for DIY projects. However, they may not offer the same longevity as other options in extreme climates.
Alternatively, 100% acrylic paints provide superior UV resistance and significantly longer lifespans, often exceeding 20 years, especially when correctly primed. A common mistake we see is underestimating the importance of proper surface preparation before application. This includes thorough cleaning to remove any dirt, rust, or mildew and potentially applying a specialized metal primer for enhanced adhesion. For high-performance applications, particularly in coastal regions or areas with heavy industrial fallout, consider epoxy-based paints. While more expensive, these offer exceptional durability and resistance to corrosion, making them a worthwhile investment for long-term protection. The choice ultimately depends on your budget, climate, and the specific needs of your roof.
Acrylic vs. Alkyd Paints: A Detailed Comparison
Acrylic and alkyd paints both offer excellent protection for tin roofs, but their properties differ significantly. In our experience, acrylic paints are generally preferred for their faster drying time and low odor, making them a more convenient choice for DIYers. They also tend to be more flexible, better accommodating the expansion and contraction of metal roofing in varying temperatures. However, alkyd paints often boast superior durability and UV resistance, leading to a longer lifespan, particularly in harsh climates.
A common mistake we see is choosing paint solely based on initial cost. While acrylics might have a lower upfront price, their shorter lifespan can lead to more frequent repainting, potentially negating any savings in the long run. Alkyd paints, although initially more expensive, often offer better value due to their extended durability. Consider the specific climate and your budget when making your decision. For example, in regions with intense sunlight, the superior UV protection of an alkyd paint might be the more cost-effective option in the long term, despite the higher initial investment. Ultimately, the best choice depends on your individual needs and priorities.
Color Selection and Considerations
Color significantly impacts your tin roof’s lifespan and aesthetic appeal. In our experience, lighter colors, such as light gray, beige, or pale blues, reflect more sunlight, reducing heat absorption and potentially extending the paint’s life. Darker colors, while aesthetically pleasing to some, absorb more heat, leading to faster paint degradation. This can result in a shorter lifespan and potentially increased maintenance costs. Consider your climate; in hotter regions, a lighter color is almost always the more practical choice.
A common mistake we see is neglecting the surrounding environment. For instance, a vibrant red roof might clash jarringly with a traditional Victorian home, while a subtle green might blend seamlessly with a woodland setting. Think about your home’s architecture, the surrounding landscape, and even your neighborhood’s color palette. Before committing to a color, consider testing several options on a small, inconspicuous area of your roof. This allows you to assess how the color appears in different lighting conditions throughout the day. Ultimately, the best color is one that complements your home and enhances its curb appeal while being practical for your climate and budget.
Understanding Paint Sheen and Durability
The sheen of your paint significantly impacts both aesthetics and durability. High-gloss paints, for example, reflect more light, making them ideal for hotter climates and visually minimizing imperfections. However, in our experience, they can show scratches and imperfections more readily than lower-sheen options. Conversely, matte or eggshell finishes offer excellent hiding power, masking surface irregularities, but they are generally less durable and require more frequent cleaning. choosing the right sheen is a balancing act between appearance and longevity. Consider the level of wear and tear your roof experiences; a high-traffic area might benefit from a more durable, higher-gloss finish.
Durability is paramount when painting a tin roof, exposed to the elements year-round. A common mistake we see is opting for cheaper paints that promise quick coverage but lack UV resistance. This leads to premature fading, cracking, and peeling, negating your investment. Look for paints specifically formulated for exterior metal, often boasting superior UV protection and resistance to chalking and corrosion. We highly recommend acrylic-alkyd blends; these provide excellent adhesion and weather resistance. Always check the manufacturer’s specifications for warranted longevity. For instance, a paint boasting a 10-year warranty signifies a significant investment in long-term protection against the weathering effects on your metal roof. Remember, proper surface preparation, including cleaning and priming, is just as critical for maximizing paint durability.
Step-by-step guide to Painting a Tin Roof
Applying Primer Correctly
Primer application is crucial for a long-lasting, aesthetically pleasing tin roof paint job. In our experience, neglecting this step significantly reduces paint adhesion and longevity, leading to premature peeling and costly repainting. A common mistake we see is using too little primer, resulting in uneven coverage and compromised protection against rust. Always follow the manufacturer’s recommended application rate, typically found on the product label. For optimal results, apply two thin coats rather than one thick coat, allowing each coat to dry completely before applying the next. This ensures proper penetration and prevents sagging or runs.
Consider the type of primer best suited for your tin roof. For rust prevention, a zinc-rich primer is highly recommended. It provides superior corrosion resistance compared to standard primers. If dealing with significant rust, consider using a rust-inhibitive primer first, followed by a top coat of zinc-rich primer. Remember to use the appropriate tools; a high-quality airless sprayer provides even coverage, especially on large roofs, but a good quality brush or roller can work well for smaller areas or hard-to-reach spots. Always protect your eyes and skin with appropriate safety gear. Proper primer application is an investment that significantly extends the lifespan and beauty of your painted tin roof.
Techniques for Painting Metal Roofs
Choosing the right painting technique for your metal roof is crucial for a long-lasting, aesthetically pleasing finish. In our experience, the most effective approach combines meticulous preparation with the application of high-quality, metal-specific paint. This isn’t a project for a standard brush; using a high-pressure sprayer provides a more even coat, crucial for preventing rust and ensuring consistent color, especially across larger surfaces. A common mistake we see is underestimating the importance of surface preparation. Thoroughly cleaning the roof to remove all dirt, debris, and existing loose paint is paramount. Failing to do so leads to poor adhesion and premature peeling.
Consider the type of metal roofing. For instance, corrugated metal benefits from the use of a back-rolling technique, where the paint is applied to the back of the corrugation first, ensuring complete coverage. This is followed by a second coat applied to the face. Alternatively, for standing seam metal roofing, a combination of brushing and rolling might be more suitable, carefully working the paint into the seams to prevent water ingress. Remember, always follow the paint manufacturer’s instructions regarding drying times and recoating. Proper ventilation and weather monitoring are also essential for optimal results. Proper planning and the right technique will guarantee a durable and beautiful finish for years to come.
Dealing with Hard-to-Reach Areas
Reaching every inch of a tin roof, especially complex ones with valleys, dormers, or intricate designs, requires a strategic approach. In our experience, neglecting these hard-to-reach areas is a common mistake, leading to uneven paint coverage and a less professional-looking finish. For high points, extending rollers on poles can significantly increase reach, but for truly inaccessible areas, a high-quality paint sprayer becomes invaluable. Consider a HVLP (high-volume, low-pressure) sprayer for optimal control and minimal overspray, ensuring even distribution in tight spots.
Remember safety first! Working at heights presents inherent risks. Never attempt to reach precarious areas without appropriate safety gear, including a harness, safety rope, and sturdy scaffolding where necessary. We’ve seen countless DIY projects hampered by safety oversights. For particularly challenging areas, like narrow valleys between roof sections, a smaller, more maneuverable brush might be necessary for precise application. Don’t hesitate to utilize a combination of tools – a roller for larger surfaces, a brush for detailed work, and a sprayer for efficient coverage of the most difficult-to-reach sections—to achieve a flawless, uniformly painted tin roof.
Ensuring Even Coverage and Avoiding Streaks
Achieving a uniform paint finish on a tin roof requires meticulous technique. In our experience, the most common cause of streaks is inconsistent application. Avoid overloading the roller or brush; this leads to dripping and uneven saturation. Instead, aim for thin, even coats, allowing each coat to dry thoroughly before applying the next. We recommend using a high-quality exterior paint formulated for metal surfaces, and applying two to three coats for optimal coverage and longevity. Remember that environmental conditions such as temperature and humidity can impact drying time, potentially leading to unevenness.
A common mistake we see is failing to properly prepare the surface. Thorough cleaning – removing dirt, rust, and existing flaking paint – is crucial for ensuring the new paint adheres properly and provides even color. Using a power washer can be effective but needs careful handling to avoid damaging the metal. Consider pre-priming the surface, especially on older roofs or areas with significant rust, to improve adhesion and minimize the number of coats needed. For optimal results, we advise using a back-and-forth motion with your roller or brush, ensuring consistent overlap between passes to avoid visible lines. This process minimizes the risk of streaking and creates a professional, smooth finish.
Maintaining Your Newly Painted Tin Roof

Regular Cleaning and Inspection
Regular maintenance is crucial for preserving your newly painted tin roof’s beauty and longevity. In our experience, neglecting this aspect can lead to premature paint failure and costly repairs. A common mistake we see is homeowners waiting until significant issues arise before cleaning their roof. Instead, aim for at least two thorough cleanings per year, ideally in spring and fall. This removes accumulated debris like leaves, twigs, and moss that can trap moisture and damage the paint. Consider using a soft-bristled brush and a low-pressure garden hose; high-pressure washing can damage the paint or even the metal itself. For stubborn stains, a mild detergent solution can be effective, but always rinse thoroughly afterwards.
Beyond cleaning, regular inspections are equally vital. During your cleaning, take the opportunity to visually inspect the roof for any signs of damage, such as peeling paint, rust spots, or loose panels. Pay close attention to areas prone to water pooling. Early detection of problems like these allows for prompt repairs, preventing more extensive (and expensive) damage down the line. Remember to prioritize safety; use a sturdy ladder and wear appropriate safety gear, or hire a professional roofing inspector for a thorough evaluation, especially if your roof is difficult to access. Documenting these inspections with photos is also a great way to track your roof’s condition over time.
Addressing Minor Repairs and Touch-Ups
Minor imperfections are inevitable, even with the most meticulous tin roof painting job. In our experience, addressing these promptly prevents larger issues. Small scratches or chips are easily handled with touch-up paint. Always use the same paint type and color as the original coat to ensure a seamless blend. Before applying, gently clean the affected area with a wire brush to remove any loose debris or rust. A common mistake we see is neglecting proper surface preparation, leading to poor adhesion and premature paint failure.
For more significant repairs, such as dents or larger areas of damage, consider patching. This often involves using a specialized metal filler designed for exterior applications, followed by sanding and repainting. Remember to allow adequate drying time between each step. If you’re unsure about a specific repair, contacting a professional roofing contractor is always a worthwhile precaution. They can assess the damage accurately and recommend the most effective and lasting solution, preventing costly future issues. Remember, regular inspection and timely touch-ups are key to maximizing the lifespan of your beautifully painted tin roof.
Long-Term Protection and Prevention
Regular maintenance is crucial for extending the lifespan of your newly painted tin roof. In our experience, neglecting this can lead to premature paint failure, costing you significantly more in the long run. A common mistake we see is infrequent cleaning; accumulated debris, such as leaves and moss, traps moisture, accelerating corrosion and paint degradation. We recommend at least two thorough cleanings annually, using a soft-bristled brush and a pressure washer set to a low pressure to avoid damaging the paint.
Consider adding a protective sealant every 2-3 years, depending on your climate and the paint type. This creates an additional barrier against UV rays, moisture, and other environmental stressors. For instance, in coastal areas with high salinity, a specialized sealant designed to resist salt damage is essential. Furthermore, promptly addressing any minor damage, such as scratches or dents, is key to preventing larger, more costly repairs. Regular inspections, ideally twice a year, will allow you to catch and address these issues before they escalate. Remember, proactive roof maintenance is an investment that yields substantial long-term savings and protects your home’s structural integrity.
When to Repaint Your Metal Roof
Assessing when to repaint your metal roof involves careful observation and understanding of various factors. In our experience, relying solely on a fixed schedule (e.g., every 5 years) is inadequate. Instead, pay attention to the condition of the paint. Are you seeing noticeable fading, chalking (a white powdery residue), or peeling? These are clear signs that your roof’s protective coating is deteriorating and requires attention. We've encountered many cases where early repainting was avoided by promptly addressing minor imperfections—a small, localized repair is much more economical than a complete repaint.
In addition to visual inspection, take your climate into account. Severe weather conditions, such as extended sun exposure, extreme temperature changes, and heavy rainfall, can greatly hasten paint degradation. For instance, coastal homes often need more frequent repainting due to the corrosive effects of saltwater. A common oversight we observe is neglecting preventative maintenance, like regular cleaning to remove dirt, debris, and moss, which can hold moisture and damage the paint. By proactively managing these issues and closely monitoring your roof’s condition, you can prolong the lifespan of your paint job and avoid costly, premature repainting.
Real-World Examples and Case Studies
Before & After Photos of Painted Tin Roofs
The impact of a fresh coat of paint on a tin roof is truly transformative. In our experience, reviewing before-and-after photos reveals a consistent theme: the revitalization of curb appeal. A faded, rusty tin roof often looks neglected, detracting from the overall aesthetic of a home. However, a strategically chosen paint color—often a lighter shade for heat reflection—can dramatically increase the property’s value and visual appeal. Consider the difference between a dull, reddish-brown roof and a crisp, clean white or a sophisticated grey. The transformation is often described as “night and day.”
A common mistake we see is neglecting proper surface preparation. Before-and-after photos highlighting poorly prepared surfaces showcase uneven paint application and shorter lifespan. High-quality images reveal the crucial steps: thorough cleaning, rust removal, and the application of a quality primer. These details, often overlooked, are critical for achieving a professional finish that lasts. For instance, a comparison of two projects—one with proper prep work and one without—clearly demonstrates the superior longevity and aesthetic outcome of the former. We’ve observed that properly prepared surfaces show a paint job lasting 10-15 years versus 5-7 for a poorly prepped surface. Always prioritize careful surface preparation for optimal results visible in your before-and-after documentation.
Common Mistakes to Avoid
In our experience, neglecting proper surface preparation is a cardinal sin of tin roof painting. Failing to thoroughly clean the roof—removing rust, mildew, and loose paint—leads to poor adhesion and premature paint failure. We’ve seen countless projects where a rushed cleaning resulted in peeling paint within months. Invest the time in a comprehensive cleaning, using a pressure washer and appropriate cleaning solutions. Don’t underestimate this crucial step.
Another common mistake is choosing the wrong paint. Oil-based paints, while durable, often require specialized primers and can be more environmentally impactful. While water-based acrylics might seem less robust, advancements in acrylic technology have resulted in paints with exceptional longevity and UV resistance. A poor paint choice can lead to color fading, chalking, and a shorter lifespan, ultimately costing you more in the long run. Always consult with a paint professional to select a product specifically designed for metal roofing, considering your climate and roof’s condition. Remember to consider the appropriate primer to ensure optimal adhesion.
Expert Tips from Professional Roofers
From our experience, adequately preparing a tin roof for painting is essential for achieving a durable finish. A frequent error is failing to clean thoroughly. Using a low-pressure nozzle for power washing is vital to eliminate dirt, mildew, and loose paint, which ensures the new coat adheres properly. Skipping this step can cause early peeling and shorten the lifespan, ultimately costing more time and money. We've observed significant project delays due to inadequate prep work.
Another important tip from experienced professionals is choosing the right primer. Not all primers are suitable for metal surfaces. Zinc-based primers provide excellent corrosion protection, which is crucial given the tin roof's exposure to the elements. We often suggest a high-quality acrylic-alkyd primer for its durability and adhesion. Be sure to apply thin, even coats, as thick coats are more likely to crack and peel. Lastly, choosing a paint specifically designed for metal roofing is essential for optimal performance and longevity. Overlooking this factor often leads to paint failure within a few years.
Case Studies of Various Roof Types and Paint Choices
In our experience, the success of painting a tin roof hinges heavily on both the roof’s profile and the paint selected. Consider a corrugated, galvanized steel roof in a coastal environment. Here, a high-quality acrylic alkyd paint with excellent UV resistance and mildew resistance is crucial. We’ve found that failing to account for these factors often leads to premature paint failure, requiring costly repainting within a few years. A common mistake we see is using a paint not specifically formulated for metal roofing.
Conversely, a standing seam metal roof on a more sheltered building might benefit from a different approach. For instance, a fluoropolymer coating, while more expensive initially, provides superior longevity and color retention. We’ve witnessed fluoropolymer-coated roofs maintaining their vibrant appearance for over 15 years in various climates. Choosing the right paint isn’t solely about color; consider the reflectivity (important for energy efficiency), durability, and the manufacturer’s warranty to make an informed decision. Proper surface preparation, including thorough cleaning and priming, remains critical regardless of the paint system chosen.


Comments