DIY Basement Renovation: How One Couple Did It for Under $10K
- DreamDen AI Editorial Team
- Nov 5, 2025
- 7 min read

Updated: Mar 25

Basements often get a bad rap—damp, dark, and generally uninviting. But with the right vision and a bit of elbow grease, even the creepiest basement can be turned into a stunning, functional space. In this post, we’ll walk you through how one DIY couple turned their dingy basement into a beautifully finished room that’s both livable and stylish—without breaking the bank.
Here’s how they did it, step by step, and managed to stay under the $10,000 budget, or not quite.
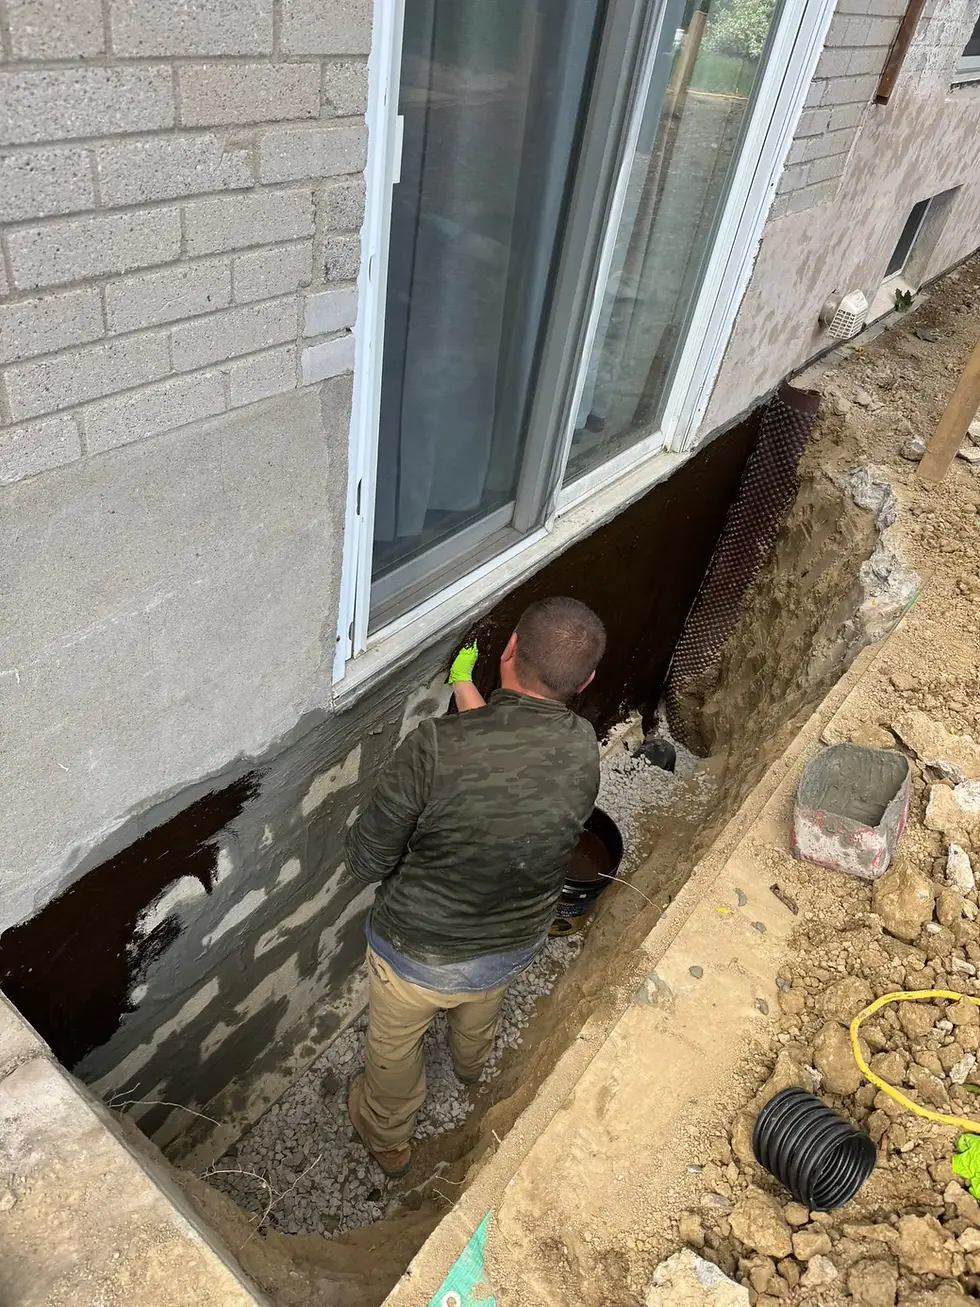
A Damp, Moldy Start
When this couple purchased their home, the basement was far from the dream space they envisioned. The walls were damp, moldy, and full of debris. The first step in the transformation was removing all the old materials and junk that had accumulated over the years, followed by excavating the back of the foundation to install a proper drainage system.
Thanks to the new drainage system, the basement remained dry, but before the transformation could truly begin, the walls needed to be damp-proofed to ensure the space remained comfortable and moisture-free.
Damp-Proofing and Wall Prep
The next task was sealing the concrete block walls. The couple used a concrete mortar repair caulking to fill any gaps or voids in the walls, followed by a concrete damp-proof paint. While this paint wouldn't stop water from entering the basement entirely, it was designed to prevent water vapor from diffusing through the concrete and creating a damp, musty atmosphere.
With the walls damp-proofed, the couple began framing out the space, starting with the perimeter walls and insulating the rim board. This step ensured that the basement would be energy efficient and that cold air wouldn’t leak through the walls. They used foam board insulation and R-13 insulation to boost the room's insulation value, resulting in an R-21 rating with continuous insulation against the block walls.
Framing and Electrical Work
Once the damp-proofing and insulation were in place, framing could begin. The couple had help from a friend and started by framing out the bathroom in the basement, which they had always planned for. One unexpected challenge came with the existing toilet flange in the concrete slab. The flange was meant for an old structure, so it was a bit too deep, and they had to saw cut through the concrete to adjust it.
While that job was loud and difficult, it was necessary to ensure proper plumbing for the new bathroom. With that hurdle cleared, the couple moved on to electrical work. They had some wiring to install for the bathroom lights, fan, and the new outlets. Despite a few challenges and using a tool or two they hadn’t tried before, they made good progress.
The Elephant in the Room: Self-Leveling the Concrete Floor
One of the most daunting tasks in the basement renovation was dealing with the uneven concrete floor. The old slab had some sections that were higher than others, leaving the couple with an almost one-inch gap over the span of just a foot. To resolve this, they decided to try self-leveling concrete, a product that would fill in the low spots and provide a smooth, even surface for the new flooring.
Though neither of them had worked with self-leveling concrete before, they mixed it up, poured it into the room, and used a spiked roller to help it spread evenly. The result was a surprisingly well-leveled floor that provided the perfect foundation for the next steps.
Budgeting for Supplies
Like any renovation project, staying within budget is always a priority, and this basement build was no exception. While the couple had some supplies left over from previous projects, they also made sure to search for budget-friendly options. They managed to find a deal for a kitchen island with a granite waterfall edge on Facebook Marketplace, as well as flooring materials for a great price.
Despite some minor setbacks, including some tense moments regarding the fragile granite, they secured what they needed without blowing the budget. After all, even though a home renovation can be costly, it’s about getting creative with your resources.
Adding Comfort: HVAC and Lighting
In addition to all the framing, plumbing, and electrical work, the couple also installed a ceiling cassette mini-split system. This system, which provides both heating and cooling, was a perfect solution for their basement, as it could be mounted between the studs in the ceiling, remaining almost completely concealed. The couple installed it with ease using the DIY-friendly Quick Connect valves, ensuring that the system was pre-charged and ready to go without needing any special equipment.
Lighting was another key addition to the space. The couple installed 12 LED puck lights that they clipped into the drywall. These lights are IC-rated for direct contact with insulation, making them an energy-efficient and space-saving choice.
Flooring and Trim
With the big tasks behind them, the couple moved on to the more decorative elements. The flooring they selected came with an underlayment already built in, making it easy to install by simply clicking the planks together. A jigsaw borrowed from a friend made the job even quicker, and they were soon laying down beautiful, modern flooring.
For the trim, they decided to go with baseboards and horizontal panels, creating a sleek and modern look for the walls. They spent time carefully installing the trim and securing the heavy mirrors to the walls, even facing some challenges with stud placement and securing the panels. Despite a few minor disagreements along the way, they were happy with how everything came together.
The Final Touches
As the project neared completion, the couple moved on to the finishing touches: installing doors, adding the vanity to the bathroom, and touching up the paint. The bathroom, in particular, was an area of focus, with a stunning glass shower door being the most expensive item in the room. With everything installed and looking fantastic, the couple was left with a functional, stylish space.
The Final Reveal: A Stunning Transformation
After 10 days of hard work, the basement had been completely transformed. The damp, creepy space had been turned into a bright, modern, and comfortable area. With new flooring, fresh drywall, a fully functional bathroom, and a beautiful living area, the couple was thrilled with the result.
However, despite their best efforts to stay within the $10,000 budget, the final cost came in at around $10,081. Though they slightly exceeded their budget, they still achieved incredible results for a relatively low cost.
Key Takeaways for Your Own DIY Basement Renovation
Plan Ahead: Proper planning and organization are essential for keeping costs low and progress on track.
Use DIY-Friendly Products: Opt for products that are designed for DIYers, like the ceiling cassette mini-split system and self-leveling concrete.
Look for Deals: Don’t be afraid to hunt for budget-friendly materials through secondhand sources like Facebook Marketplace.
Embrace the Learning Curve: Even if you’ve never done something before, with a little patience and research, you can tackle most tasks.
If you’re looking to renovate your own basement on a budget, follow these steps, and with hard work and creativity, you can achieve amazing results
Here are 10 related FAQs about basement renovations, specifically focused on DIY projects like the one described in the blog:
1. What are the most important steps to take before starting a basement renovation?
Before beginning any basement renovation, it's crucial to address any moisture issues. Ensure that the basement is dry by installing proper drainage systems and damp-proofing the walls. Then, evaluate the foundation and structure to ensure it's safe to build on. Afterward, you can move on to framing, insulation, and other finishing tasks.
2. How do I properly insulate a basement for year-round comfort?
Start by insulating the rim board and exterior walls with foam board insulation. For added thermal resistance, use batt insulation like R-13 or R-21. This combination helps keep the basement warm in winter and cool in summer, contributing to energy efficiency.
3. Can I install a bathroom in my basement?
Yes, but it's essential to make sure the plumbing works for your basement space. If there’s an existing toilet flange, you might need to adjust it. You'll also need to ensure proper drainage, particularly for a shower, which may involve cutting through concrete floors to install the necessary plumbing.
4. How do I fix uneven basement floors?
If your basement floor is uneven, consider using self-leveling compound to fill in low spots and create a flat surface. This product can flow into low areas and naturally level itself, creating a smooth base for flooring.
5. What is the best type of flooring for a basement?
When selecting flooring for a basement, it's important to choose materials that are moisture-resistant. Vinyl planks or tiles with built-in underlayment work well, as they are easy to install and can handle potential moisture. Avoid carpet, as it can absorb moisture and promote mold growth.
6. How do I make a basement more energy-efficient?
In addition to insulating the walls and ceiling, make sure to seal any gaps in the windows, doors, and around plumbing pipes. You can also install energy-efficient lighting, like LED lights, and choose HVAC systems that are suitable for basements, such as a mini-split system.
7. Is it safe to do electrical work in a basement myself?
If you have experience or are familiar with basic electrical work, you can do it yourself, but always adhere to local building codes. For complicated systems or when working with wiring that involves heavy-duty circuits, it's best to hire a licensed electrician to ensure safety and compliance with regulations.
8. How do I handle ventilation in a basement?
Proper ventilation is essential to avoid moisture buildup and mold growth. Installing an exhaust fan in the bathroom, a ceiling cassette air conditioner for climate control, or a dehumidifier will help keep the air fresh and comfortable.
9. What should I do about basement windows?
If your basement has windows, consider installing egress windows if you plan to use the basement as a living space or bedroom. These provide emergency exits and enhance natural light, which is important for making the space feel more open and inviting.
10. Can I convert my basement into a home gym or additional living space?
Absolutely! Many homeowners convert basements into home gyms, playrooms, or even home theaters. Focus on functional flooring (such as rubber mats for a gym) and ensuring there’s enough ventilation. You may also need to install additional electrical outlets to accommodate gym equipment or entertainment systems.


Comments