Unlock the Secret to Perfect Paint Jobs: Your Ultimate Guide to Drying Times Between Coats
- DreamDen AI Editorial Team
- Sep 19, 2025
- 14 min read

Updated: Sep 23, 2025

Understanding Paint Drying Times: more than just Waiting
Paint drying isn’t a simple process of waiting; it’s a complex interplay of evaporation and curing. Evaporation, the initial phase, involves the solvent in the paint—water in latex paints, or mineral spirits in oil-based paints—releasing into the air. This process is significantly influenced by factors like temperature, humidity, and airflow. Higher temperatures accelerate evaporation, while high humidity can slow it down considerably. In our experience, a poorly ventilated room can lead to longer drying times and potentially a sticky, uneven finish.
The second, and often more crucial, stage is curing. This is the chemical process where the paint’s binder—the substance that holds the pigment particles together—hardens and forms a durable film. This process can take significantly longer than evaporation, often several days or even weeks, depending on the paint type and environmental conditions. A common mistake we see is assuming the paint is fully dry just because it’s no longer tacky to the touch. Proper curing ensures the paint’s full hardness, durability, and resistance to chipping and scratching. Understanding this distinction between evaporation and curing is vital for achieving a professional-quality paint job with the appropriate drying time between coats.

Factors Affecting Drying Time: Temperature, Humidity, and Paint Type
Temperature plays a crucial role in paint drying. Higher temperatures, ideally between 60-75°F (15-24°C), accelerate the evaporation process, leading to faster drying times. Conversely, colder temperatures significantly slow down drying, potentially leading to issues like uneven finishes or longer cure times. In our experience, projects undertaken in unheated spaces during winter months often require significantly extended drying periods.
Humidity is another critical factor. High humidity levels reduce the rate of evaporation, as the air is already saturated with moisture. This means longer drying times and a higher risk of moisture trapping within the paint film, potentially causing blistering or peeling.
Conversely, low humidity can lead to paint drying too quickly, resulting in a less even finish. A common mistake we see is ignoring humidity levels, especially in coastal regions or during summer months. Aim for moderate humidity levels for optimal drying. Finally, remember that different paint types, such as oil-based versus water-based paints, have drastically different drying times. Oil-based paints generally require significantly longer to dry and cure completely, sometimes taking days, while water-based paints, like latex, usually dry much quicker, often within hours. Always consult the manufacturer’s specifications for precise drying times for your chosen paint.
Common Mistakes that Prolong Drying Time and Compromise Results
In our experience, rushing the process is a primary culprit in prolonged drying times and subpar paint finishes. Applying subsequent coats before the previous one is fully cured leads to re-emulsification, where the new coat lifts the still-wet undercoat, creating an uneven texture and potentially compromising adhesion. This is especially true with high-gloss paints, which often require longer drying times. We’ve seen countless projects where impatience resulted in a patchy, uneven finish requiring extensive rework.
Another common mistake we see is ignoring environmental factors. High humidity significantly slows drying, as the water in the paint takes longer to evaporate. Conversely, excessively high temperatures can cause the paint to dry too quickly, leading to cracking and a less durable finish. Proper ventilation is crucial; a poorly ventilated space traps moisture, extending drying times and compromising the paint’s integrity. Remember to check the paint manufacturer’s instructions for recommended temperature and humidity ranges to avoid these pitfalls. Failing to properly prepare the surface, leaving dust or grease, also impacts drying, as the paint struggles to adhere correctly.
Recommended Drying Times Between Coats: A Comprehensive Guide

Drying Times for Different Paint Types: Latex, Oil-Based, and Specialty Paints
Latex paints, popular for their low odor and quick drying times, typically require a minimum of 2-4 hours of drying time between coats, depending on factors like temperature and humidity. In our experience, applying a second coat too soon leads to uneven surfaces and paint lifting. However, a fully cured latex paint job, ready for cleaning or heavy use, often needs 24-72 hours.
Oil-based paints, while offering superior durability, dry much slower. Expect a dry-to-the-touch time of 6-24 hours, but a full cure can take several days, even up to a week. A common mistake we see is underestimating this extended drying time, resulting in smudges and imperfections. Specialty paints, such as those designed for high-moisture environments or those containing specific additives, may have vastly different drying requirements. Always refer to the manufacturer’s instructions for precise drying times and application recommendations. Failing to do so could compromise the performance and longevity of your paint job.

Surface-Specific Drying Times: Wood, Metal, Walls, and More
Different surfaces require vastly different drying times between paint coats. Wood, for instance, often absorbs paint more readily than metal, leading to quicker initial drying but potentially slower curing times deep within the wood grain. In our experience, applying a second coat to wood within 4-6 hours is often acceptable for oil-based paints in moderate temperatures and humidity. However, for water-based paints, we recommend waiting at least 2-4 hours, sometimes longer depending on the wood type and its porosity. A common mistake we see is ignoring the curing time – while the surface might feel dry, the underlying layers may still be wet, leading to peeling or cracking.
Metal surfaces, conversely, tend to dry faster due to their non-porous nature. Oil-based paints on metal might be ready for a second coat in as little as 2-4 hours, while water-based paints generally need 1-2 hours. However, always check the manufacturer’s instructions on the specific paint you are using as formulations vary. For walls, the type of paint (latex, acrylic, etc.), the temperature, and the humidity are critical factors. Typically, latex paints on walls require a drying time of at least 4 hours before recoating, but ideally, waiting 6-8 hours provides a more durable finish. Remember, proper drying time prevents common issues like lap marks, uneven texture, and poor adhesion. Always err on the side of caution and allow for sufficient drying, prioritizing a high-quality, long-lasting paint job.
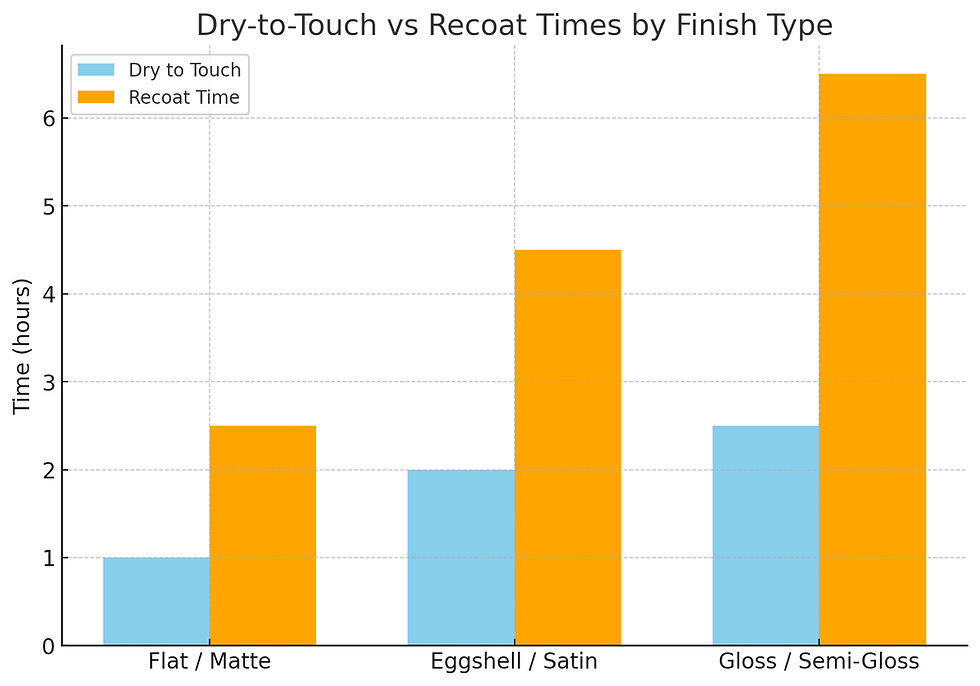
Understanding the difference Between Dry-to-the-Touch and Recoat Time
Dry-to-the-touch and recoat time are two distinct stages in the paint drying process, often confused by DIY enthusiasts. Dry-to-the-touch, as the name suggests, indicates when the paint’s surface feels dry to the fingertip. This can occur within minutes to a few hours, depending on the paint type, environmental conditions (temperature and humidity), and paint thickness. However, this doesn’t mean the paint is fully cured.
In our experience, a common mistake is applying a second coat prematurely, before the underlying layer has reached its recoat time. Recoat time refers to the period after application when the paint has sufficiently cured to allow for the application of another coat without compromising adhesion, appearance, or durability. This typically takes much longer – ranging from several hours to even a full day, often specified on the paint can. For instance, while a low-VOC latex paint might be dry-to-the-touch in an hour, its recoat time could be 4-6 hours. Failing to wait for the proper recoat time can lead to peeling, cracking, or an uneven finish. Always prioritize the manufacturer’s recommended recoat time over the dry-to-the-touch timeframe.
Optimizing Your Painting Process for Faster Drying
Improving Ventilation and Temperature Control for Faster Drying
Proper ventilation significantly accelerates drying time. In our experience, a well-ventilated room, ideally with cross-breezes, can reduce drying time by up to 50% compared to a stagnant environment. This is because moving air helps to evaporate the solvents in the paint more efficiently. A common mistake we see is relying solely on open windows; consider using fans to actively circulate the air, especially in larger rooms or when working with high-VOC paints. For optimal airflow, position fans to gently push air across the painted surfaces.
Temperature plays a crucial role. Higher temperatures generally lead to faster evaporation. However, excessively high temperatures can cause the paint to dry too quickly, leading to a less smooth finish and potential cracking. The ideal temperature range is typically between 60°F and 75°F (15°C and 24°C). Maintaining consistent temperature is also vital; drastic fluctuations can negatively impact drying. Consider using a thermostat to regulate the room temperature, and avoid painting in direct sunlight, which can create localized hot spots. Remember that humidity also affects drying times; lower humidity accelerates the process.
Using Paint Additives to Speed Up Drying Time (Benefits and Cautions)
Paint additives designed to accelerate drying time can significantly reduce project timelines. In our experience, these additives, often containing drying agents like metallic soaps or silicates, work by lowering the surface tension of the paint, allowing the solvent to evaporate more quickly. This can be particularly beneficial in high-humidity environments or when working with slow-drying paints like alkyds. However, using too much additive can lead to undesirable consequences.
A common mistake we see is over-application, resulting in a compromised finish. Rushing the process can cause pinholing or cracking as the paint dries too rapidly. Furthermore, some additives might subtly alter the paint’s final color or sheen. Always follow the manufacturer’s instructions carefully and perform a test application in an inconspicuous area to assess the impact. Remember that while speed is a benefit, prioritising a quality finish is paramount. Consider factors like temperature, humidity, and ventilation before adding any drying agents to determine whether it’s truly necessary.
Pro Techniques for Faster Drying: Thin Coats and Proper Application
Applying paint in thin, even coats is paramount for faster drying. In our experience, thick coats trap solvents, significantly extending drying time and potentially leading to runs and sags. Aim for a wet film thickness no more than 25-50 microns; this requires practice. A common mistake we see is applying too much paint at once, believing it will provide better coverage – this is counterproductive. Multiple thin coats, allowing each to dry thoroughly between applications, yield a superior finish.
Proper application techniques also drastically reduce drying times. Using high-quality brushes or rollers with the appropriate nap length for your surface ensures even distribution and minimizes the amount of paint needed. For instance, a smooth surface benefits from a short-nap roller, while a textured surface requires a longer nap. Always maintain a “wet edge” to avoid lap marks – keep your strokes overlapping while the previous stroke remains wet. Remember, consistent pressure and smooth, controlled movements are key. Overworking the paint leads to uneven drying and a less-than-perfect finish.
Troubleshooting Common Paint Drying Issues

Tacky or Sticky Paint: Identifying and Solving the Problem
Tacky or sticky paint after drying is a frustrating problem often stemming from insufficient drying time between coats, especially in humid conditions. In our experience, this frequently happens when painters disregard the manufacturer’s recommended drying time, opting for speed over quality. A common mistake we see is applying a second coat before the initial layer is fully cured, resulting in a surface that remains soft and gummy, easily marred by fingerprints or other damage. This is exacerbated by low temperatures or high humidity, slowing the evaporation process.
To rectify this, you must first identify the underlying cause. Is the paint itself faulty? Poor quality paints are more prone to stickiness. Secondly, environmental factors play a crucial role. Was the room poorly ventilated, resulting in slow evaporation? Was the humidity level high, preventing the solvents from escaping properly? If the paint is truly tacky, light sanding of the affected area might be necessary before repainting, followed by a thorough cleaning to remove dust particles. Remember to allow adequate drying time – at least 24 hours, but consult the paint’s specific instructions which often recommend longer durations for certain conditions. Finally, ensure proper ventilation and ideal temperature and humidity levels for optimal drying. Applying thin coats also helps to prevent this issue.
Uneven Drying: Causes, Prevention, and Solutions
Uneven paint drying often stems from inconsistent application or environmental factors. In our experience, a common mistake is applying paint too thickly in certain areas, leading to prolonged drying times and a patchy finish. This is exacerbated by high humidity, which slows evaporation and can cause wrinkling or bubbling. Conversely, applying paint too thinly can result in areas drying too quickly, revealing brush strokes and causing an uneven sheen. Proper surface preparation is also critical; dust, grease, or old, flaking paint will disrupt the drying process and create inconsistencies.
Preventing uneven drying requires a multi-pronged approach. Maintain consistent paint thickness using even strokes and controlled pressure. Aim for thin, even coats; multiple thin coats are preferable to one thick coat. Control environmental factors as much as possible; ideally, paint in a well-ventilated area with moderate temperature and humidity (ideally between 60-75°F and 40-60% humidity). Always thoroughly clean and prime the surface before applying paint to ensure proper adhesion and even drying. If uneven drying occurs despite these precautions, lightly sanding the affected areas after the paint is fully dry and re-coating can often solve the issue. Remember, patience is key – rushing the process invariably leads to subpar results.
Paint that never Seems to Dry: Diagnosing and Addressing Persistent Issues
Persistent paint wetness is frustrating, but often stems from preventable issues. In our experience, high humidity exceeding 65% significantly slows drying, sometimes indefinitely. A common mistake we see is ignoring the paint manufacturer’s recommended drying time and temperature, leading to tacky surfaces and poor adhesion. Always check the label for specifics, as variations exist between latex, alkyd, and oil-based paints. For example, oil-based paints, known for their durability, require considerably longer drying periods than water-based acrylics.
Addressing this problem involves tackling the root cause. First, ensure proper ventilation to reduce humidity; open windows and use fans. Second, confirm the paint’s suitability for the surface and conditions. Applying too thick a coat prevents proper curing. A thin, even layer is always best. If the underlying surface remains damp or oily, the paint simply won’t dry properly. Consider using a primer designed for problem surfaces to create a suitable foundation. Finally, remember that environmental factors, such as colder temperatures, can extend drying times. Patience is key, but persistent tackiness after a reasonable period, considering environmental conditions, often points to an underlying problem needing attention.
Advanced Techniques for Professional Results
The Importance of Proper Surface Preparation for Optimal Drying
Proper surface preparation is paramount to achieving optimal paint drying times and a flawless finish. In our experience, neglecting this crucial step is a leading cause of extended drying times, uneven paint adhesion, and ultimately, a subpar paint job. A common mistake we see is insufficient cleaning; dust, grease, or old paint residues create a barrier that prevents proper bonding between the new coat and the surface, leading to longer drying times and potential peeling. Thoroughly cleaning the surface with a suitable degreaser and allowing ample drying time is essential.
Beyond cleaning, the level of surface smoothness significantly impacts drying. Rough surfaces require more paint to achieve adequate coverage, increasing drying time. For instance, a porous, unprimed wall will absorb significantly more paint than a properly primed and sanded one. Therefore, priming is a crucial step – it provides a uniform, smooth surface for the paint to adhere to, resulting in quicker drying and a more even finish. Consider the surface material; wood requires sanding and potentially a wood filler, while metal surfaces may necessitate rust removal and a specialized primer. Remember, the goal is to create a clean, smooth, and consistent surface that will facilitate efficient paint drying and enhance the overall longevity and quality of your paint job.

Advanced Coating Techniques for a Smooth, Even Finish
Achieving a flawlessly smooth finish requires more than just adhering to drying times. In our experience, the application technique itself significantly impacts the final result. A common mistake is applying coats too thickly, leading to sagging, runs, and an uneven texture. Instead, aim for multiple thin coats, each applied with even, overlapping strokes. This “wet-on-wet” technique, when timed correctly with the drying process of the previous coat, minimizes brush marks and allows for a self-leveling effect, creating a smoother surface.
Consider the type of paint and its inherent properties. For example, high-gloss paints, while visually stunning, tend to reveal imperfections more readily than matte finishes. This necessitates a particularly meticulous application, potentially requiring even more thin coats and increased attention to drying times. Conversely, using a high-quality brush or sprayer minimizes brush strokes, allowing for a smoother finish. Experimenting with different application methods – from back-and-forth to cross-hatching – can be crucial in achieving a truly professional-looking paint job. Always remember: patience and precision are paramount in advanced coating techniques.
Maintaining Your Tools and Equipment for Consistent Results
Proper tool maintenance is paramount for achieving consistent, professional paint finishes. In our experience, neglecting this crucial step is a leading cause of uneven application and subpar results. A common mistake we see is failing to thoroughly clean brushes and rollers immediately after use. Dried paint dramatically reduces the lifespan of your tools, making them less effective and potentially introducing imperfections into your next project. Always rinse brushes and rollers in the appropriate solvent (water for water-based paints, mineral spirits for oil-based) until the water runs clear, then reshape bristles and allow them to air dry completely. For stubborn paint, consider a dedicated brush cleaner for superior results.
Beyond brushes and rollers, maintaining your paint sprayer (if using one) is vital. Regularly cleaning the nozzle and filter prevents clogs and ensures a smooth, even spray pattern. Furthermore, consider the storage of your tools. Improper storage—leaving brushes in paint or storing rollers loosely—can lead to damage and wasted materials. Invest in quality brush covers or storage containers to prolong the life of your equipment. This preventative maintenance not only saves money in the long run but also guarantees that your tools are always ready to deliver the consistent, high-quality results you expect.
Real-World Examples and Case Studies: Expert Insights

Case Study 1: A challenging exterior paint project and its solutions
We recently tackled a challenging exterior repaint of a Victorian-era home clad in textured clapboard. The project presented unique drying time challenges due to the high humidity typical of the region and the porous nature of the aged wood. A common mistake we see in such situations is underestimating the impact of environmental conditions on drying time. We initially planned for standard drying intervals, but quickly realized we needed a more flexible approach. Our experience showed that simply adhering to the manufacturer’s suggested timeframe wasn’t sufficient.
To address the slower-than-expected drying, we implemented several key adjustments. First, we meticulously monitored the dew point and only painted during periods of low humidity and ideal temperatures. Second, we employed a high-quality primer designed for optimal adhesion and moisture control, significantly reducing the risk of peeling. Finally, and crucially, we extended the inter-coat drying time by several hours, allowing for complete curing before applying subsequent coats. This resulted in a superior finish free from wrinkling or other common issues related to insufficient drying. By adapting our schedule based on daily weather conditions, we ensured a smooth, long-lasting paint job—a testament to the importance of carefully assessing environmental factors when planning any painting project.
Case Study 2: Troubleshooting a tricky interior paint job
In our experience, high-humidity conditions significantly impact paint drying times, often leading to issues like uneven finishes and poor adhesion. One client recently painted their bathroom—a notoriously humid space—with a low-VOC paint, expecting faster drying due to its marketing. However, ignoring the manufacturer’s specified drying times, which were longer than expected due to the humidity, they applied the second coat too soon. The result? A sticky, uneven finish requiring a complete repainting. This highlights the crucial role environmental factors play. Always carefully consider the relative humidity and temperature when planning your paint project.
A common mistake we see is neglecting the importance of proper surface preparation. Before even thinking about drying times, ensure the surface is clean, dry, and properly primed. In the above bathroom case, despite the repainting, the initial problem persisted slightly due to insufficient surface cleaning. We learned that residues from an old silicone sealant reacted with the paint, affecting drying time and leading to uneven adhesion. This reinforces the need for thorough preparation – including the use of a quality primer tailored to the surface, and proper cleaning to remove dirt, dust, and old coatings — *before* you even open your first can of paint. This preventative measure often saves both time and money in the long run.
Expert Tips from Professional Painters: Advice and Best Practices
In our experience, achieving a flawless paint job hinges on meticulously managing drying times between coats. A common mistake we see is rushing the process, leading to peeling, cracking, and an uneven finish. We’ve found that consistently adhering to the manufacturer’s recommended drying times, often specified on the paint can, is paramount. This recommendation accounts for factors like temperature, humidity, and paint type. Ignoring these guidelines can compromise the paint’s adhesion and overall durability.
For instance, one client insisted on a quick turnaround, disregarding our advice on waiting the full 24 hours for the primer to dry before applying the top coat in a humid environment. The result? We had to sand back and repaint, adding significant time and cost to the project. Remember, patience is key. Proper drying time allows the paint to cure completely, ensuring a superior, long-lasting result. Always opt for a second coat once the first is fully dry to the touch and no longer tacky. This will avoid dragging or smearing the previously-applied layer, enhancing the final finish’s quality.


Comments