Ceiling Design for Basements
- DreamDen AI Editorial Team
- Oct 16, 2025
- 5 min read

Updated: Oct 18, 2025

When people think of remodeling a basement, they often zero in on flooring, walls, lighting, or furniture. The ceiling, however, is a critical part of completing the space. In many basements, it’s the “fifth wall” — often neglected, underutilized, or simply hidden. But a smart ceiling design can:
Hide mechanicals (HVAC ducts, plumbing, wiring) in a clean, intentional way
Provide acoustical control (quieting footfalls, trapping sound)
Improve aesthetics and mood
Help balance proportions (especially in low-ceiling basements)
Allow for creative lighting effects
Contribute to the value and appeal of the finished space
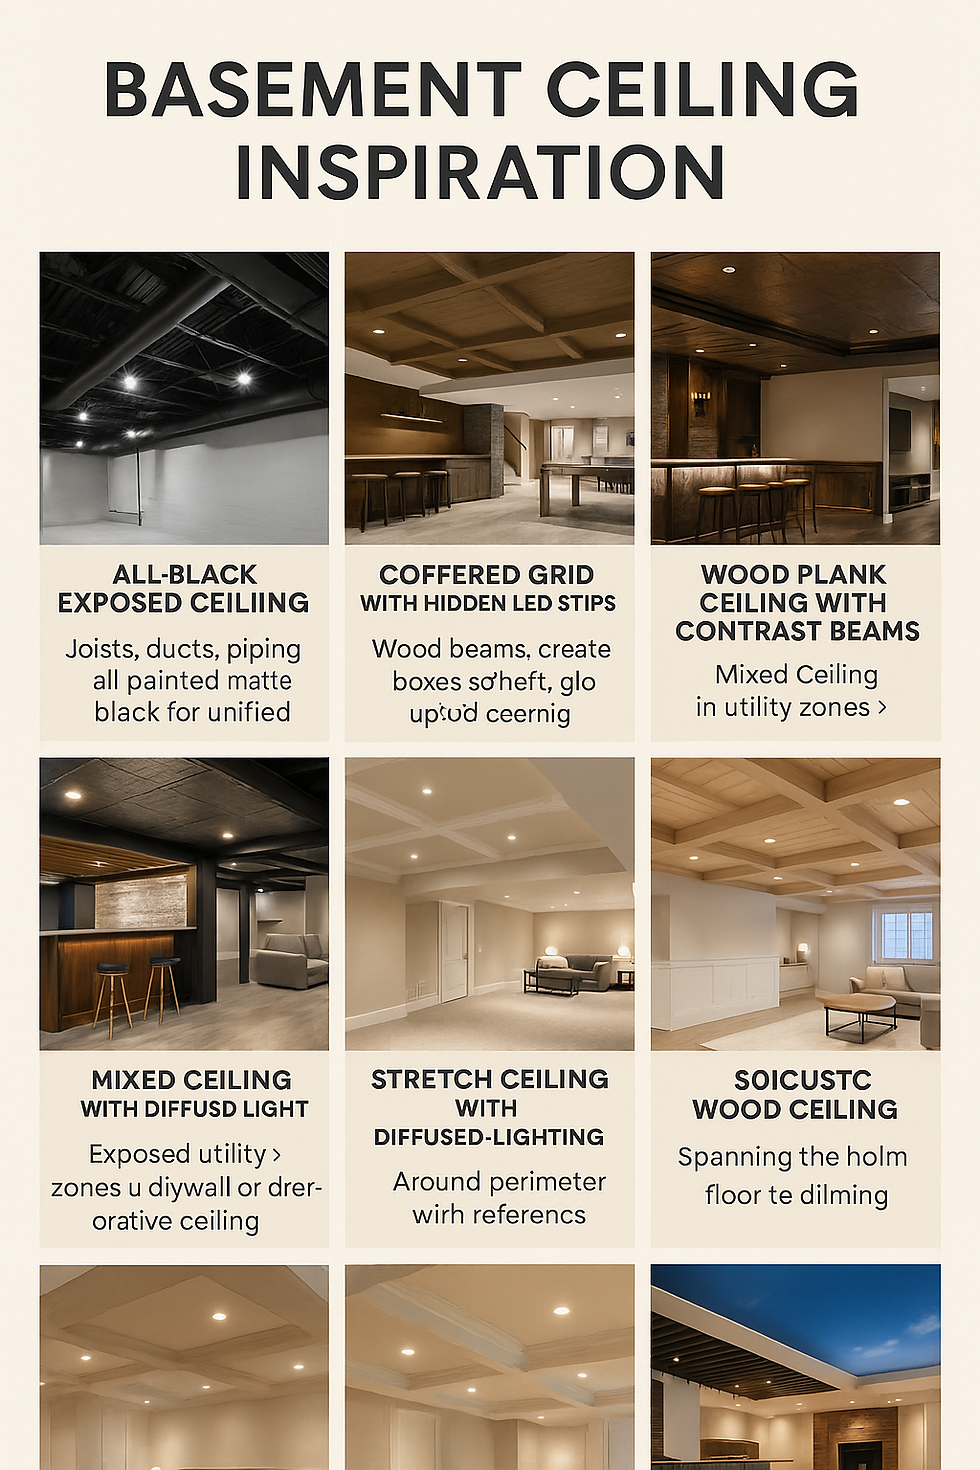
Major Ceiling Design Types for Basements
Below are the main ceiling design strategies you’ll see. Each has advantages, trade-offs, and ideal use cases.
Design Type | Description / Features | Pros | Drawbacks / Considerations | Best Suited For |
Exposed / Industrial-style | Leave joists, beams, ducts exposed; paint them or tint them to appear cohesive | Minimal depth usage, no separate ceiling assembly; cost-effective; industrial character | May look unfinished if not done well; must paint utilities to blend; lack of insulation or acoustics unless additional layer added | Workshops, game rooms, casual spaces, mid-ceiling height basements |
Drywall / Plaster | A continuous, “finished” ceiling — gypsum board or plaster on framed structure | Clean, polished finish; can hide everything; good acoustic control | Requires framing, which reduces headroom; harder to access utilities; more cost & labor | Guest rooms, bedrooms, formal spaces |
Suspended or Drop Ceiling | A grid hung from joists, with ceiling tile panels or decorative tiles | Easy access to utilities, flexibility, many style options | Must keep thickness minimal; standard tile may look cheap; need quality tiles for aesthetics | Basements with generous height, utility rooms, multi-use spaces |
Coffered / Beamed Ceilings | A framework of beams creating sunken “coffers” or reveal patterns | Adds architectural interest, depth, texture | Needs space, precise planning; may complicate access or plumbing above | Living spaces, entertainment rooms, formal basements |
Wood / Plank / Tongue-and-Groove | Wooden boards, planks, or panels across the ceiling | Warm, textured, natural look | Wood may expand/contract with moisture; care in rating for basement conditions | Rustic, cabin, traditional styles |
Metal / Corrugated / Tin | Metal or tin panels (pressed tin, corrugated steel, aluminum) | Unique industrial or vintage look; durable; reflective properties | Cold feel, possible noise unless backed; cost; needs support | Bars, wine cellars, industrial loft basements |
Stretch Ceiling / Architectural Membranes | A membrane (e.g. PVC, fabric) stretched across a frame | Ultra-slim installation; smooth finish; can integrate lighting; sound control | Price; may feel “unnatural” in certain styles; repair can be tricky | Modern basements, theaters, creative designs |
Mixed / Hybrid Ceilings | Combining two or more of above (e.g. exposed beams plus drywall inset; drop grid around perimeter, wood center) | Custom looks, flexibility | More complexity in design and installation | All-purpose basements where function zones vary |

Design Strategies & Tricks to Overcome Constraints
Even with the right ceiling type, you’ll need smart design strategies to make your basement feel good. Here are tips and “tricks of the trade.”
4.1 Visual Tricks for Tallness
Monochromatic ceiling & walls: Using the same paint color for ceiling and walls makes the break between them fade, visually raising the ceiling. The Great Egress Company USA+1
Reflective surfaces: Gloss or semi-gloss finishes or reflective panels can bounce light, making space feel taller.
Vertical lines: Use visual elements (light strips, wood slats, vertical bar lighting) to draw the eye upward.
Light colors: White or light shades make ceilings recede; avoid dark colors if ceiling is low.
Low-profile lighting: Recessed “wafer” LED lights or slim downlights keep fixtures flush, avoiding hanging elements that draw attention downward.
Shadow gaps: Leaving a small reveal or shadow line around the perimeter softly separates ceiling from wall and makes the ceiling “float.”
4.2 Zoning & Layered Heights
If your basement has varied ceiling heights (say beams or ductwork zones), accentuate them. Drop the ceiling in low-utility zones but leave others exposed. This layering adds visual interest and avoids a monotonous flat ceiling.
4.3 Lighting Integration
Lighting is often the magic that brings a ceiling to life.
Recessed downlights: Cleanest for most ceiling types
Cove / indirect lighting: Use in coffers or perimeter reveals to softly glow upward
Track or adjustable fixtures: Especially useful in exposed ceilings
Accent or spot lighting: For artwork or focal zones
Backlit panels: For stretch ceilings or translucent elements
4.4 Acoustic Control
Add acoustic panels (fabric-wrapped, felt, wood with slots) between or under beams
Use sound-absorbing insulation above ceiling layers
Decouple surfaces (resilient channels, isolation clips) so the ceiling doesn’t act as a sound bridge
4.5 Access & Maintenance
Plan early for access:
Incorporate removable panels or hatches in drywall or ceilings
Use modular ceiling tiles in drop systems
Ensure that pipe runs, junction boxes, HVAC zones are foreseen before ceiling closure
Material & Component Guide
Here are some of the key materials you’ll commonly encounter.
Component | Common Materials / Options | Key Specs & Tips |
Grid / Frame | Metal T-grid, aluminum, furring strips, resilient channel | Use rust-resistant metal; properly anchor to structure |
Panels / Boards | Gypsum board, moisture-resistant drywall, MDF, plywood, OSB, engineered wood, decorative tiles, tin, PVC | Choose moisture-rated and fire-rated where required |
Insulation / Acoustics | Mineral wool, fiberglass batts, compressed acoustic panels, perforated wood | Need to fit above ceiling or behind panels |
Fasteners | Screws, nails, hangers, clips, adhesive (as appropriate) | Use correct anchors; maintain fire separation |
Finishes | Paint, stain, veneers, lacquer, powder-coating, laminates | Allow for curing time; seal joints against moisture |
Lighting / Electrical | Junction boxes, re-entrant wiring, LED modules, tracks, driver boxes | Plan lighting runs before installing ceiling |
Access Hardware | Removable panels, access doors, hinge systems | Keep them flush, discretely placed |
Make sure all materials comply with local building and fire safety codes.
Step-by-Step Planning & Installation Workflow
Here’s a typical workflow. Adjust order or overlap tasks depending on your project’s constraints.
Survey & Documentation Measure ceiling height at various points. Mark positions of beams, ductwork, pipes. Note access areas, vents, wiring junctions.
Select Ceiling Type & Design Based on style, height constraints, function, and budget. Draw a ceiling plan showing layout, access points, lighting.
Coordinate UtilitiesGet HVAC, plumbing, electrical rough-in in place. Plan for routing and future service.
Install Framing / Support StructureHang grid, furring, channels, or ceiling framework. Check for level.
Acoustic / Insulation Layer (if required)Place insulation or acoustic batts in cavities or above panels.
Install Ceiling Panels / Boards— Drop in tiles / panels (for grid)— Screw / fasten drywall, wood, metal panels— Leave access zones as per plan
Finish WorkTape, fill, sand, paint, stain. Install trim, access doors.
Lighting & Electrical FinalMount fixtures, connect junctions, test circuits.
Test & Adjust Inspect for sagging tiles, loosened screws, alignment. Adjust panels, fix gaps or leaks.
Final Clean & Closing Seal edges, caulk, touch up paint. Clean debris.
Cost, Maintenance & Lifespan
Costs vary greatly depending on materials, design complexity, local labor rates, and moisture/fireproof requirements. Here’s a rough guide (for reference, U.S. scale; adjust for your region):
Simple exposed ceiling (painted): low cost (painting & masking work)
Drop ceiling (mid-grade acoustic tiles + grid): mid cost
Drywall ceiling (framing + drywall + finishing): higher cost
Coffered, custom wood, metal, stretch ceilings: premium cost
Because you asked for a blog-length piece, you might estimate cost per square foot, factors affecting cost (materials, labor, height, access). Some sources quote tray or coffered ceilings at USD 3 to 7 per sq ft inclusive (materials + labor) in U.S. markets.
Maintenance
Inspect periodically for sagging, warping, water stains
Clean dust, especially on exposed ceilings
Repaint or touch up finish areas as needed
Access panels should remain functional
Replace warped or water-damaged tiles or panels
Lifespan
A well-installed drywall or wood ceiling can last decades. Drop ceiling tiles may need replacement every 10–20 years, especially in humid environments. Metal or stretch ceiling systems often have longer life if maintained.
Inspiration & Design Ideas


Comments