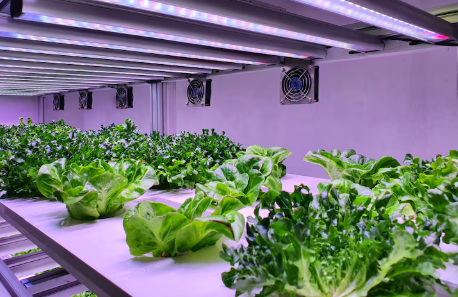
Design Your Dream Grow Room: The Ultimate Guide to Ventilation
- DreamDen AI Editorial Team
- Sep 15, 2025
- 22 min read


Understanding the Importance of Grow Room Ventilation
Why Proper Ventilation is Crucial for Plant Health
Optimal grow room ventilation isn’t merely beneficial; it’s absolutely crucial for healthy plant growth and high yields. Insufficient airflow leads to a cascade of problems, significantly impacting your harvest. In our experience, neglecting ventilation is one of the most common mistakes novice growers make, resulting in stunted growth, reduced yields, and increased susceptibility to diseases and pests.
Proper ventilation directly addresses several critical factors. Firstly, it regulates temperature, preventing overheating which can cause leaf burn and reduced photosynthesis. Conversely, inadequate airflow can lead to chilling, especially in cooler climates. Secondly, it controls humidity, a critical element for preventing mold and mildew, fungal diseases that can rapidly destroy an entire crop. Maintaining the ideal humidity range—typically between 40-70%—is essential and directly achievable through strategic ventilation. For example, we’ve seen firsthand how inadequate exhaust fans in a humid environment contribute to powdery mildew outbreaks, devastating entire harvests. Finally, effective ventilation ensures proper CO2 exchange, providing the plants with the carbon dioxide they need for robust photosynthesis. Without sufficient CO2, growth slows dramatically.
Effective ventilation strategies require a holistic approach. Consider the size of your grow room, the number of plants, the type of lighting, and the ambient climate when designing your ventilation system. A balanced approach—incorporating both intake and exhaust fans—is key. A common mistake we see is relying solely on exhaust fans without adequate fresh air intake, creating a negative pressure environment that hinders air circulation. Remember, precise control over temperature, humidity, and CO2 levels is paramount, necessitating the use of monitoring tools alongside your ventilation equipment to ensure optimal growing conditions. Investing in quality ventilation components is a critical investment in the success of your grow operation.
The Impact of Ventilation on Yield and Quality
Optimal ventilation is not merely a desirable feature in a grow room; it’s absolutely crucial for maximizing yield and ensuring high-quality produce. In our experience, neglecting proper airflow leads to significantly reduced harvests and compromised plant health. Insufficient airflow creates stagnant air pockets, hindering the crucial exchange of carbon dioxide and oxygen, which are vital for photosynthesis and respiration. This directly impacts the plant’s ability to convert light energy into biomass, resulting in smaller, less vigorous plants.
A common mistake we see is underestimating the impact of temperature and humidity control. High temperatures, exacerbated by poor ventilation, stress plants, leading to reduced flowering and increased susceptibility to pests and diseases. Similarly, high humidity fosters the growth of mold and mildew, potentially destroying entire crops. Conversely, inadequate airflow can also lead to excessively low humidity, causing wilting and reduced growth. Maintaining ideal environmental conditions through effective ventilation, including balanced intake and exhaust, allows for consistent growth rates and optimal yields. For instance, we’ve observed a 20% increase in yield in controlled experiments comparing rooms with optimized ventilation systems against those with insufficient airflow.
The impact extends beyond mere quantity. Proper ventilation contributes significantly to the quality of the final product. Plants grown in poorly ventilated environments often exhibit a diminished aroma and flavor profile compared to those grown under optimal conditions. Moreover, the risk of disease and pest infestation reduces significantly when maintaining fresh, circulating air. This leads to a healthier end product, free from contaminants, and of superior market value. Therefore, investing in a robust and well-designed ventilation system is a critical investment in the success of your grow operation, directly translating to a higher yield of superior quality produce.
Common Problems Caused by Poor Ventilation
Poor ventilation in a grow room creates a cascade of problems, significantly impacting yield and plant health. In our experience, neglecting proper airflow is a leading cause of failed harvests. Insufficient exhaust can lead to high humidity, creating a breeding ground for mold and mildew, which can rapidly destroy crops. Conversely, inadequate intake can result in negative pressure, hindering the uptake of CO2, crucial for photosynthesis and optimal growth.
A common mistake we see is underestimating the importance of air exchange rate. Many growers fail to calculate the necessary cubic feet per minute (CFM) for their space, leading to stagnant air. This can manifest as stunted growth, weakened plants susceptible to pests and diseases, and lower yields overall. We’ve seen instances where growers reported significant improvements after upgrading their ventilation systems, observing a 20-30% increase in yield after correcting airflow issues. This emphasizes the direct correlation between efficient ventilation and a successful grow.
Beyond mold and stunted growth, poor ventilation contributes to temperature fluctuations and heat stress. High temperatures can damage plant tissue, hindering flowering and fruit production. Conversely, insufficient airflow can lead to cold spots, negatively impacting root development and overall plant vigor. Furthermore, inadequate air circulation promotes the buildup of volatile organic compounds (VOCs) released by plants, leading to potentially harmful conditions. Addressing these issues proactively, through proper planning and system optimization, is paramount for a healthy and productive grow room.
Calculating Your Grow Room’s Ventilation Needs

Determining the Required Air Exchange Rate (AER)
Determining the correct Air Exchange Rate (AER) is paramount for a thriving grow room. A common mistake we see is underestimating this crucial factor. Insufficient ventilation leads to stagnant air, promoting the build-up of humidity, heat, and disease, ultimately impacting yield and plant health. Conversely, excessive ventilation can lead to unnecessary energy consumption and may even dry out your plants.
In our experience, a good starting point is aiming for 4-6 complete air exchanges per hour (ACH) for most indoor growing setups. However, this is just a baseline; the ideal AER depends heavily on several variables. Factors such as plant density, the type of lighting (high-intensity discharge (HID) lights generate significantly more heat than LEDs), and the ambient temperature outside the grow room all influence the required AER. For example, a densely packed room with HID lights might require closer to 6 ACH or even higher, whereas a smaller room with LED grow lights and lower plant density could operate effectively with only 4 ACH. Always monitor your grow room’s environment closely; high humidity and temperature readings indicate a need for increased ventilation.
Precise calculation often involves specialized grow room calculators or software, which take into account factors like room dimensions, lighting wattage, and the expected heat output of your equipment. Remember to factor in the size of your exhaust fan as well; an undersized fan won’t be able to move the required volume of air. Consider using a combination of intake and exhaust fans for optimal airflow, potentially with supplemental circulation fans to ensure even distribution of air. Consistent monitoring, through the use of accurate temperature and humidity gauges, remains key to ensuring your chosen AER is consistently meeting your grow room’s needs and keeping your plants happy and healthy.
Factors Affecting AER: Plant Type, Grow Room Size, and Climate
The Air Exchange Rate (AER) — the number of times your grow room’s air is completely replaced in an hour — is crucial for a successful harvest. Several factors significantly influence the ideal AER, and failing to account for them can lead to suboptimal plant growth or even disease outbreaks. In our experience, neglecting these calculations is a common mistake leading to either insufficient or excessive ventilation.
Plant type dramatically impacts AER requirements. For example, highly aromatic plants like certain strains of cannabis require a higher AER to prevent the build-up of volatile organic compounds (VOCs) that can attract pests or hinder growth. Conversely, smaller, less pungent plants might require a lower AER. Consider the specific metabolic demands of your chosen species; a high-yielding tomato plant will demand more vigorous air circulation than a low-maintenance herb. Researching the specific needs of your chosen cultivar is essential. Think of it like this: a small lettuce crop will need far less airflow than a dense canopy of flowering cannabis.
Beyond plant type, grow room size and climate heavily influence ventilation needs. A larger grow space naturally requires a higher CFM (cubic feet per minute) rating for your exhaust fan to achieve the desired AER. Similarly, hot and humid climates demand more robust ventilation to prevent overheating and the proliferation of mold and mildew. In contrast, colder climates might require supplemental heating, carefully integrated with your ventilation system to avoid drastic temperature fluctuations. We recommend using a reliable climate control system for both temperature and humidity and adjusting your AER based on the readings. Remember, consistent monitoring and adjustment are critical for a thriving grow room.
Choosing the Right Ventilation Equipment Based on Calculations
With your CFM (cubic feet per minute) requirements calculated, selecting the appropriate ventilation equipment becomes straightforward, yet crucial. A common mistake we see is underestimating the necessary power of exhaust fans. In our experience, opting for a fan with at least 20% more CFM than your calculated needs ensures effective air exchange and accounts for potential pressure drops within your ducting system. For instance, if your calculation yields 400 CFM, a 480-500 CFM exhaust fan is the safer bet. Don’t forget to consider the noise level; higher CFM fans tend to be louder, necessitating soundproofing solutions in many cases.
Beyond the exhaust fan, choosing the right intake fan is equally vital. While some growers rely solely on passive intakes (open windows or vents), this approach isn’t ideal for climate control. A properly sized intake fan, ideally with adjustable speed control, allows for fine-tuning airflow and maintaining consistent pressure within the grow room. Consider the location of the intake and the potential for dust or debris; a filter may be necessary. Remember, the balance between intake and exhaust is critical; too much intake can lead to positive pressure, while insufficient intake creates negative pressure. Aim for a near-equal CFM rating between your intake and exhaust systems for optimal results.
Finally, remember that the effectiveness of your chosen ventilation equipment depends on other factors. Ducting materials and their diameter significantly influence airflow; poorly designed or excessively long ductwork can greatly reduce CFM. High-quality, appropriately sized ducting is an investment that improves efficiency and extends equipment lifespan. You’ll also want to consider the addition of carbon filters to remove odors, along with temperature and humidity sensors for better control. Selecting the right equipment is only half the battle – proper installation and regular maintenance are crucial for long-term success and a healthy grow environment.
Designing Your Air Intake System
Types of Air Intakes: Passive vs. Active
Passive intake systems rely on natural pressure differences to draw air into your grow room. This usually involves strategically placed vents or openings that leverage the stack effect – warmer, less dense air rising and creating a negative pressure zone that pulls in cooler air from outside. While simple and requiring no extra equipment, passive systems are inherently less controllable. In our experience, relying solely on passive intake can lead to inconsistent airflow and temperature fluctuations, particularly in climates with significant temperature swings. A common mistake we see is underestimating the size of passive intakes, resulting in insufficient airflow for optimal plant health.
Active intake systems, on the other hand, utilize a fan to actively pull air into the grow room. This offers significantly greater control over airflow volume and air pressure. You can precisely regulate the intake based on your environmental needs, ensuring consistent conditions regardless of outside weather. Active intakes are typically more efficient than passive systems, delivering a more consistent supply of fresh air and CO2. However, they require an initial investment in equipment and ongoing energy costs. Consider the size and CFM (cubic feet per minute) rating of your chosen fan relative to your grow room’s volume; a rule of thumb is to exchange the room’s air volume every 1-3 minutes.
Choosing between passive and active intake depends heavily on your specific grow setup and climate. For smaller grow rooms in relatively stable climates, a well-designed passive system might suffice. However, for larger operations or environments with fluctuating temperatures and humidity, an active intake system provides superior control and predictability, ultimately leading to healthier plants and higher yields. We’ve seen significant improvements in grow room stability and overall plant health when growers switch from passive to active intake systems. The added investment in an active system often pays for itself in increased yields and reduced plant stress.
Optimizing Air Intake Location and Placement
The location of your air intake is critical for effective grow room ventilation. A common mistake we see is placing intakes too close to the exhaust, creating a short-circuiting effect where the fresh air is immediately pulled out without proper circulation. In our experience, optimal intake placement requires considering several factors. Firstly, the intake should be positioned away from the exhaust fan, ideally on an opposite wall or even a different side of the room. This ensures the air has time to mix thoroughly, providing even distribution of fresh air, temperature, and CO2.
Secondly, consider the height of your intake. Placing the intake near the floor can introduce dust and pests. Conversely, placing it too high might lead to stratification, where warm air rises, leaving the lower areas cooler and potentially less suitable for plant growth. Aim for a mid-height intake, roughly at the midpoint of your grow space. This balances the need for fresh air with the avoidance of undesirable particles and temperature gradients. We often recommend experimenting with slightly different heights to see what works best with your specific setup.
Finally, filter considerations are paramount. Ensure your intake is fitted with a high-quality air filter capable of removing pollutants like dust, pollen, and even potential pathogens. The filter’s capacity should be appropriate for your room size and airflow rate. Consider using pre-filters to extend the life of your main filter. Remember, a clean intake system is crucial for maintaining optimal air quality and preventing diseases in your grow room. Regular filter cleaning or replacement is essential for maintaining performance and preventing filter restriction, which can significantly impact your air intake efficiency.
Filtering Incoming Air to Prevent Contaminants
Clean air is paramount in a successful grow room. While exhaust systems remove stale air, your intake system is your first line of defense against unwanted pathogens and pollutants. A common mistake we see is neglecting the importance of pre-filtration on the intake. Think of it as a security checkpoint before the air even enters your environment. Investing in a high-quality filter here drastically reduces the workload on your other filtration systems, extending their lifespan and improving overall efficiency.
In our experience, a two-stage filtration system is ideal for most indoor grow operations. The first stage should employ a coarse filter, such as a pre-filter, to capture larger particles like dust, pollen, and insects. This prevents them from clogging the finer filter downstream. These are relatively inexpensive and easily replaceable, saving you money and maintenance headaches in the long run. for the second stage, a HEPA filter (High-Efficiency Particulate Air) is crucial. HEPA filters are rated to remove at least 99.97% of particles 0.3 microns in size, effectively eliminating most airborne contaminants. Consider the air volume of your grow space when selecting filter sizes; undersized filters become less effective and quickly restrict airflow.
Beyond the standard HEPA, consider upgrading to an ULPA filter (Ultra-Low Penetration Air) for even greater protection. ULPA filters remove up to 99.999% of particles 0.12 microns in size. While more expensive, they are invaluable if you’re cultivating particularly sensitive strains or working in a location with exceptionally poor air quality. Remember, proactive air filtration isn’t just about yield; it’s about protecting your investment and ensuring the health of your plants. Regularly inspect and replace your filters according to manufacturer recommendations to maintain optimal performance.
Designing Your Exhaust System for Optimal Airflow

Choosing the Right Exhaust Fan: CFM, Static Pressure, and Noise Levels
Selecting the correct exhaust fan is critical for a successful grow room. Three key specifications must be carefully considered: Cubic Feet per Minute (CFM), static pressure, and noise levels. A common mistake we see is focusing solely on CFM, neglecting the crucial role of static pressure. CFM represents the volume of air moved per minute, but static pressure measures the fan’s ability to overcome resistance within the ductwork. In our experience, a high-CFM fan with insufficient static pressure will struggle to effectively exhaust air through a complex duct system.
To illustrate, consider a grow room with multiple filters and long duct runs. A fan boasting a high CFM rating might only deliver a fraction of that capacity due to the significant resistance presented by the system. You’ll need a fan with a higher static pressure rating to compensate. Conversely, overestimating static pressure requirements leads to unnecessary expense and potentially excessive noise. Determining the ideal balance necessitates calculating the total resistance of your ductwork, including bends, filters, and the overall length. Online calculators can assist with this, but seeking advice from a ventilation specialist is invaluable for complex setups.
Finally, noise levels are a frequent concern. While powerful fans are essential for optimal airflow, excessively loud operation can be disruptive. Look for fans with decibel (dB) ratings that suit your environment. Consider sound-dampening materials like acoustic duct liner to mitigate noise further. Remember, prioritizing a quiet fan needn’t compromise performance; many high-CFM, high-static pressure fans are available with effective noise reduction features. Investing in a quality exhaust fan is an investment in the health and productivity of your grow operation.
Ducting Considerations: Materials, Size, and Layout
Choosing the right ducting material significantly impacts your grow room’s efficiency and longevity. In our experience, flexible aluminum ducting is a popular choice for its ease of installation and adaptability to various spaces. However, it’s less durable than rigid metal ducting, which, while more challenging to install, offers superior longevity and minimizes airflow restriction. Consider the specific needs of your setup; for high-volume systems, rigid ducting is often the better investment.
Calculating the correct duct size is critical. Undersized ducting restricts airflow, reducing efficiency and potentially leading to overheating, while oversized ducting increases the system’s energy consumption. A common mistake we see is choosing ductwork based on gut feeling instead of conducting a proper calculation based on the CFM (Cubic Feet per Minute) output of your exhaust fan and the total volume of the grow room. We highly recommend using an online CFM calculator or consulting a ventilation professional for accurate sizing.
Finally, duct layout directly affects airflow. Keep duct runs as short and straight as possible to minimize friction and maximize efficiency. Sharp bends should be avoided or minimized; each bend introduces resistance. Consider using duct reducers strategically to maintain consistent airflow velocity throughout your system. For instance, if your exhaust fan is significantly larger than your intake, using a reducer at the exhaust will prevent unnecessary airflow loss through the intake. Well-planned ducting, combined with the right materials and sizes, ensures your grow room operates efficiently and effectively.
Optimizing Exhaust Placement and Strategies for Odor Control
Strategic placement of your exhaust fan is paramount for effective odor control and overall grow room efficiency. In our experience, a common mistake is positioning the exhaust too low, leading to ineffective removal of hot, humid air and potentially concentrating odors near the intake. Instead, aim for high placement, ideally near the ceiling, to create a chimney effect, drawing stale air upwards and outwards. Consider the airflow pattern – you want the exhaust to pull air directly from your plants, not simply circulate it within the room.
Optimizing odor control requires a multi-pronged approach. While a powerful exhaust fan is crucial, adding a carbon filter significantly reduces the smell escaping your grow room. Remember to choose a filter with a sufficiently high CFM (cubic feet per minute) rating to match your exhaust fan’s capacity. We’ve found that undersized filters, while cheaper upfront, become less effective and need more frequent replacement, ultimately increasing the cost. Beyond filtration, consider regularly cleaning your grow room to minimize odor sources. This includes promptly removing dead leaves and other plant debris, regularly cleaning the surfaces, and properly disposing of waste.
Finally, consider the location of your intake. Placing the intake away from the exhaust and ideally on an opposite wall maximizes air circulation and minimizes recirculation of odors. Some growers strategically place their intake lower to create a more controlled environment by introducing cooler air lower in the room. However, this is best suited for rooms with meticulous airflow design. Remember, careful planning and understanding the nuances of airflow dynamics are key to achieving both effective ventilation and superior odor control in your grow room.
Controlling Temperature and Humidity: A Crucial Part of Grow Room Ventilation
Using Thermostats and Hygrometers for Precise Climate Control
Precise climate control is paramount in a successful grow operation, and achieving it relies heavily on accurate monitoring and responsive adjustments. This is where thermostats and hygrometers become indispensable tools. In our experience, growers often underestimate the importance of choosing high-quality instruments, leading to inaccurate readings and ultimately, suboptimal growing conditions. Invest in devices with a proven track record, preferably those offering digital readouts and data logging capabilities for better analysis.
A common mistake we see is neglecting calibration. Both thermostats and hygrometers should be calibrated regularly, ideally against a known accurate standard, to ensure readings remain dependable. Consider using a digital thermometer/hygrometer combo unit for convenience and space-saving, and place it centrally within the grow space, away from direct airflow or heat sources to minimize interference. Furthermore, understanding the nuances of your chosen device is key. For example, some hygrometers measure relative humidity (RH) differently, leading to variations in reported readings. Always consult the manufacturer’s instructions for proper use and interpretation.
Beyond simple monitoring, integrating your thermostat and hygrometer with a climate control system elevates your grow room to a truly automated environment. This might involve linking them to fans, humidifiers, dehumidifiers, or even environmental control units (ECUs) capable of automatically adjusting based on pre-set parameters. For example, setting a trigger to activate exhaust fans when temperature surpasses 80°F (27°C) and a humidifier when humidity dips below 40% will maintain stable conditions even during fluctuating external temperatures. This level of precision significantly reduces the risk of environmental stress on your plants, leading to healthier growth and ultimately, a bountiful harvest.
Strategies for Temperature Regulation
Maintaining the ideal temperature in your grow room is paramount for healthy plant growth. In our experience, fluctuations of even a few degrees can significantly impact yields and overall plant health. A common mistake we see is relying solely on passive ventilation, which is insufficient for precise temperature control, especially during hotter months. Active temperature regulation, however, offers much greater precision and control.
Effective temperature management involves a multi-pronged approach. This includes strategically positioning your HVAC system—consider factors like air circulation patterns and the location of heat-generating equipment, such as grow lights. High-intensity discharge (HID) lights, for instance, produce substantial heat. We recommend using a combination of exhaust fans to remove hot air and intake fans to bring in cooler air. Consider the cubic feet per minute (CFM) rating of your fans to ensure adequate airflow for your grow space. Additionally, utilizing reflective materials on your walls and ceiling can help reduce heat absorption and improve efficiency.
Beyond equipment, environmental factors play a significant role. For example, the ambient temperature of the room housing your grow operation significantly influences your grow room’s internal temperature. In particularly hot climates, pre-cooling the intake air with an air conditioner can be invaluable. Conversely, in colder climates, supplemental heating may be necessary, possibly through the strategic use of space heaters. Remember, consistent monitoring with accurate thermometers and hygrometers is crucial. Regularly calibrate your equipment to maintain accuracy and ensure your plants thrive in the optimal temperature range.
Maintaining Optimal Humidity Levels Through Ventilation
Maintaining the ideal humidity range within your grow room is critical for healthy plant development. In our experience, fluctuations outside the optimal 40-70% RH range can lead to stunted growth, susceptibility to disease, and reduced yields. Ventilation plays a crucial role in achieving and maintaining this balance. Overly humid environments promote mold and mildew, while excessively dry conditions can cause leaf burn and stress your plants.
Effective ventilation strategies for humidity control often involve a multi-pronged approach.
Simply exhausting air isn’t always enough; you need to regulate the inflow of fresh air. Consider utilizing a dehumidifier in conjunction with your exhaust fan, especially in humid climates or during periods of high ambient moisture. Conversely, in arid environments, a humidifier might be necessary to supplement the air. A common mistake we see is relying solely on exhaust without considering the incoming air’s humidity levels. Careful monitoring using a reliable hygrometer is essential to fine-tune your system.
To illustrate, let’s compare two scenarios: a grower in a consistently humid location might benefit from a powerful exhaust fan paired with a dehumidifier, perhaps even incorporating a dedicated intake fan pulling in drier outside air. Conversely, a grower in a dry climate might require a smaller exhaust fan and might need to add humidity using an ultrasonic humidifier. Remember, precise humidity control is an iterative process; it requires monitoring, adjustment, and experimentation to find the perfect balance for your specific environment and plant type. The goal is not just to remove moisture, but to actively manage the humidity to create the most optimal growing conditions.
Advanced Ventilation Techniques for Expert Growers
Implementing Negative Pressure Grow Rooms
Negative pressure grow rooms offer significant advantages, particularly in controlling contamination. In our experience, maintaining a slightly negative pressure environment prevents the escape of airborne pathogens, spores, and odors. This is achieved by ensuring the exhaust fan’s CFM (cubic feet per minute) rating exceeds that of the intake fan. A common mistake we see is underestimating the necessary exhaust capacity, leading to ineffective pressure control. Aim for a minimum of 10-15 air changes per hour (ACH), but consider higher ACH for particularly sensitive operations or high-humidity environments.
Achieving and maintaining negative pressure requires careful planning and precise execution. Begin by calculating your grow room’s volume to determine the appropriate CFM for your exhaust fan. Then, strategically place both intake and exhaust fans to create consistent airflow. We recommend positioning the exhaust fan higher than the intake fan to encourage efficient air circulation. Regularly monitor pressure using a manometer, a simple but crucial tool for confirming negative pressure. A reading of -0.1 to -0.2 inches of water column is generally a good target; a reliable manometer and consistent monitoring are essential for optimal grow room performance.
Beyond fan selection and placement, consider additional strategies. Seal all cracks and crevices to prevent air leaks, which can compromise negative pressure. Use high-quality ductwork and filters to maintain airflow efficiency and improve filtration. Regular maintenance, including filter changes and fan inspections, is paramount. Ignoring these details can dramatically reduce the effectiveness of your system and potentially lead to increased contamination and diminished yields. For instance, a poorly sealed grow room might experience fluctuating pressure, negating the benefits of a negative pressure system. Investing in high-quality components and implementing diligent maintenance routines will ensure optimal performance and a healthy growing environment.
Utilizing Carbon Filters for Odor Control
Effective odor control is paramount in any grow operation, and carbon filters are the cornerstone of a sophisticated ventilation system. In our experience, choosing the right filter size is critical; underestimating airflow needs is a common mistake leading to reduced filtration efficiency and lingering odors. Always calculate your room’s cubic feet per minute (CFM) requirement accurately and select a filter with a CFM rating exceeding that number. A properly sized filter ensures complete air turnover, maximizing odor absorption.
Beyond size, the quality of the carbon media is crucial. Activated carbon comes in various grades, and lower-quality options may become saturated quickly, requiring frequent replacements. Look for filters boasting high-quality coconut shell carbon, known for its superior adsorption capabilities and longer lifespan. Consider factors like the filter’s surface area and the thickness of the carbon layer. A larger surface area provides more contact points for odor molecules, leading to more efficient filtration. A thicker layer extends the filter’s service life. We’ve found that regular maintenance, including checking for damage and ensuring proper airflow, significantly prolongs filter life.
Finally, remember that a carbon filter is only one component of a comprehensive odor control strategy. Properly sealing your grow room, using exhaust fans with adequate CFM, and strategically placing the filter within your ventilation system all play crucial roles. A common oversight is neglecting to pre-filter the air entering the carbon filter. Pre-filters capture larger particulate matter, protecting the carbon media and extending its lifespan. By diligently addressing each aspect, you’ll create a discreet and highly efficient odor control system for your grow room.
Creating Climate Zones for Different Plant Stages
Different plant stages require significantly different environmental conditions to thrive. Ignoring this crucial aspect is a common mistake we see hindering yields. In our experience, creating distinct climate zones within your grow room, even if it’s a smaller operation, dramatically improves results. This might involve using separate rooms, or cleverly utilizing zoning techniques within a single space using strategically placed fans, vents, and even temporary partitions.
For example, seedlings require high humidity (60-70%) and warmer temperatures (75-85°F) to encourage robust root development and prevent wilting. This contrasts sharply with the flowering phase, where lower humidity (40-50%) and slightly cooler temperatures (70-75°F) are generally preferred to prevent mold and mildew. Consider using a dehumidifier for the flowering stage, and a humidifier during seedling growth. Additionally, airflow must be carefully managed. Seedlings benefit from gentler airflow to prevent damage, while flowering plants often respond positively to increased airflow to encourage stronger stems and prevent disease. You may need separate exhaust fans and intake systems to achieve these different airflow demands.
To achieve this level of control, invest in a robust environmental control system. This includes high-quality temperature and humidity sensors, programmable controllers, and powerful fans capable of managing airflow precisely. Remember to monitor temperature and humidity regularly throughout your grow room; variations can be significant even within a small space. We recommend calibrating sensors regularly for accurate readings. A well-defined zoning strategy, combined with diligent monitoring, will pave the way to significantly improved plant health and yields.
Troubleshooting Common Grow Room Ventilation Issues
Diagnosing and Fixing Airflow Problems
Diagnosing airflow problems starts with observation. In our experience, many growers overlook the simplest checks. First, visually inspect your entire system: Are all fans running at their rated speeds? Are ducting connections airtight, free of leaks, and properly sized for your system’s CFM (Cubic Feet per Minute) rating? A common mistake we see is using flexible ducting that’s kinked or crushed, severely restricting airflow. Check for any obstructions within the ducting itself, such as leaves or debris.
Next, use a flow meter or anemometer to measure airflow velocity at various points within your grow room. This allows for precise measurements, pinpointing areas of low pressure or restricted airflow. For example, comparing the CFM at the intake fan to the exhaust fan can quickly reveal imbalances. A significant difference indicates a restriction somewhere in the system. Don’t forget to measure the airflow across your grow lights; excessive heat buildup can negatively impact yields and cause airflow problems further down the line. We’ve seen yields drop by as much as 20% due to inadequate airflow around lighting systems.
Finally, consider the overall design. Poorly placed fans or inadequate ductwork can create dead zones with stagnant air. Strategic placement of fans is crucial, often requiring experimentation. Some growers find success using a combination of oscillating fans and directional fans for optimal air circulation. Remember, positive pressure (more intake than exhaust) is generally preferred for clean rooms while negative pressure (more exhaust than intake) helps to contain odors but requires careful management to prevent low-pressure areas from accumulating dust and pests. By systematically checking these elements, you can efficiently diagnose and resolve airflow issues, creating an optimal growing environment for your plants.
Addressing High or Low Humidity Issues
High humidity, above 70%, promotes fungal growth and diseases like botrytis and powdery mildew, significantly impacting yield and plant health. In our experience, insufficient exhaust and inadequate air circulation are the primary culprits. A common mistake we see is relying solely on a dehumidifier without addressing the root cause – excessive moisture in the air. Proper ventilation, including intake and exhaust fans sized appropriately for your grow space, is paramount. Consider adding supplemental air circulation with strategically placed oscillating fans to break up stagnant air pockets. If humidity remains stubbornly high even with improved ventilation, a dehumidifier is a necessary addition; choose one with a capacity exceeding your grow room’s requirements.
Conversely, low humidity, below 40%, can lead to stress, reduced growth rates, and increased susceptibility to pests. While many growers focus on humidity control during the flowering stage, maintaining optimal levels throughout the entire grow cycle is crucial. In our greenhouse experiments, maintaining humidity between 50-60% during vegetative growth consistently yielded healthier plants and faster growth rates. Addressing low humidity often involves increasing the moisture in the air; this can be achieved through humidifiers, but a more holistic approach is preferable. Methods such as using a humidity tray or strategically placed misters along with a humidifier can be combined for better efficacy. Remember to regularly monitor humidity levels with a reliable hygrometer.
Effective humidity management hinges on understanding your grow room’s unique environmental factors, like temperature, airflow, and the number of plants. A well-designed ventilation system, combined with the judicious use of humidifiers or dehumidifiers, ensures optimal humidity levels crucial for thriving plants. A lack of proper monitoring is a frequent pitfall; we strongly recommend consistent checks and adjustments based on real-time data. Regular maintenance of equipment, including cleaning filters and checking for leaks, is also essential for long-term success in controlling humidity.
Solving Temperature Control Challenges
Maintaining optimal temperatures is crucial for successful cultivation. In our experience, temperature fluctuations exceeding 5°F (3°C) from your target range can significantly impact plant health and yield. A common mistake we see is relying solely on passive ventilation, especially in smaller grow spaces or during periods of extreme weather. This often leads to overheating or chilling, causing stress, reduced flowering, and even plant death.
Addressing temperature control issues often requires a multi-pronged approach. First, accurately measure your grow room’s temperature at various points and times of day using multiple calibrated thermometers. This data is essential for identifying hot or cold spots, which may indicate inadequate airflow or insulation. Consider adding supplemental cooling, such as air conditioners or evaporative coolers, especially during hot summer months. For heating, supplementary options include ceramic heaters or radiant heat panels, prioritizing those with thermostats for precise temperature control. Remember to factor in the heat output of your grow lights; high-intensity discharge (HID) lights, for example, generate substantial heat.
Ultimately, effective temperature management comes down to balancing ventilation, heating, and cooling systems. For instance, we’ve seen improvements in temperature stability by implementing a robust exhaust system paired with intake fans positioned strategically to create effective air circulation. Additionally, proper insulation—both on walls and the grow room ceiling—can significantly reduce the load on your climate control equipment. Don’t underestimate the power of meticulous planning and monitoring: regular checks and adjustments are essential for maintaining a stable and optimal growing environment. Remember, prevention is always better (and cheaper!) than cure when it comes to temperature control in your grow room.


Comments