Transforming a Bathroom into a Wet Room
- DreamDen AI Editorial Team
- Nov 5, 2025
- 5 min read


A bathroom renovation is one of the most satisfying and impactful home improvement projects you can undertake. Whether you want to update an outdated space or turn your standard bathroom into something unique, transforming your bathroom into a wet room can be an exciting project. A wet room not only makes the space feel more modern but also maximizes the functionality of your bathroom by turning the entire room into a shower space, eliminating the need for a shower enclosure or tub.
In this post, we’ll break down a full bathroom wet room renovation from start to finish, based on a project that takes you through every step—from demolition to installation. If you’re considering creating a wet room or renovating your bathroom, follow along to get an in-depth look at what the process involves!
Step 1: Demolition and Prep Work
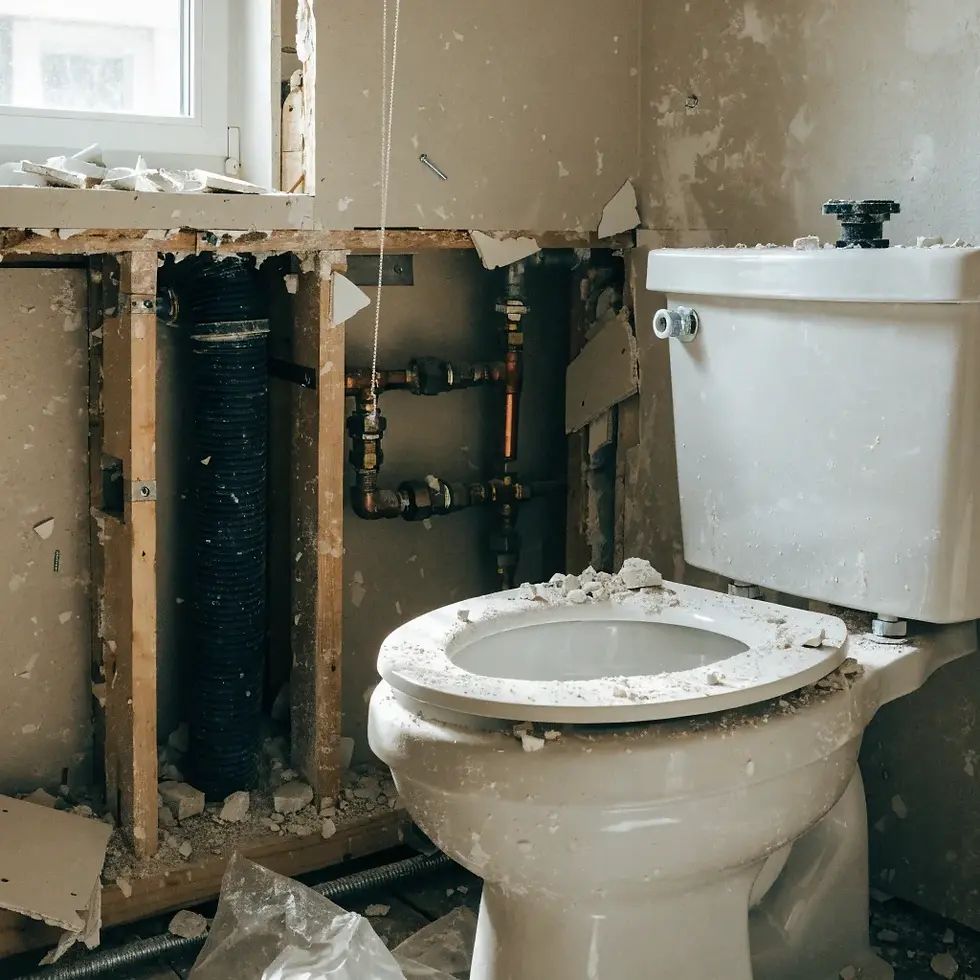
The first phase of any renovation is demolition. While it may sound like a fun part of the project, it’s crucial to proceed carefully to avoid damaging anything that might need to stay in place or be reused.
Shut off the Water: Start by turning off the water supply to the bathroom, especially if you’re working with plumbing elements like the toilet, tub, or sink.
Remove the Toilet and Vanity: Start by removing the toilet. This involves turning off the water supply, draining the toilet, unscrewing the bolts, and lifting it out of place. Next, tackle the vanity—remove all drawers, tape up the mirror (just in case it breaks), and disconnect the plumbing before dismantling the unit.
Remove the Flooring and Tiles: The flooring removal process is one of the more challenging tasks in a bathroom renovation. Sometimes tiles come off easily, and other times, you’ll need a SDS drill or 3ft pry bar to work through old adhesives and staples that may have been used in the past.
Identifying Unseen Problems: Once you get everything removed, you may uncover some unwelcome surprises, such as hidden dead space. But occasionally, you might be lucky and find an opportunity to expand your wet room by removing unnecessary barriers.
Step 2: Plumbing and Electrical Reworking
Creating a wet room often involves major plumbing rework, as you're turning the entire space into a shower area. This includes rerouting the drainage system and water lines to accommodate the changes.
Rework the Stack and Drainage System: If you’re expanding the wet room, you’ll need to reroute the plumbing stack, ensuring the slope is maintained for proper drainage. New drains are installed for both the toilet and shower, connecting to a vent system that leads up into the attic for proper ventilation.
Move HVAC Ducts: In some cases, like the one shown, the existing air register (heating duct) may also need to be moved out of the wet area, ensuring that it doesn’t interfere with the functionality of the new bathroom setup.
Step 3: Building the Wet Room Foundation
The wet room requires special attention to the floor because of its waterproofing and drainage needs.
Recess the Subfloor for the Shower Area: To create a curbless shower, the subfloor in the shower area must be recessed to allow for the required slope. This involves sistering 2x4s to the existing floor joists, adding plywood, and ensuring that everything is securely glued and screwed in place to support the shower pan.
Install PEX Plumbing: For flexibility, PEX plumbing is often used in these projects as it can easily be rerouted and customized for the new bathroom layout.
Rework Closet Areas: If your bathroom has an attached closet, like in this renovation, this might also get reworked into a larger hallway linen closet, offering better use of space.
Step 4: Water Proofing the Wet Room
Waterproofing is an essential step in the wet room renovation. Without proper waterproofing, the shower area would quickly succumb to mold and damage.
Install CIE Board: The CIE board (a lightweight, easy-to-install material) is used to create a solid waterproof surface. This material is attached to the studs, with special washers to secure the board in place.
Add Waterproofing Banding and Silicone: After the CIE board is installed, the seams are sealed using a waterproof banding material to prevent water leakage. Special silicone is applied to the edges to ensure a secure bond and to prevent water from penetrating the corners.
Flood Test: After the waterproofing is complete, the floor is checked using a flood test. A temporary barrier (like a 2x4) is added, and buckets of water are used to ensure the room holds water without any leaks. If the flood test is successful, the room is cleared for further work.
Step 5: Framing and Structural Adjustments
Before tiling can begin, any additional framing and structural work needs to be completed.
Create a Niche for the Shower: One of the main features of this bathroom is the large shower niche. The wall studs are cut and reworked to allow for a spacious storage niche. Once the framing is in place, additional drywall work is done to support the tiling around the niche.
Install Floating Vanity Wall: Since the vanity needs to be floating, a small false wall is built to house the water lines that can’t be run through an exterior wall (as it may freeze in cold climates). This ensures the vanity stays secure and functional.
Step 6: Tile Installation
The tile installation process is arguably the most involved part of the wet room transformation.
Prepare for Large Format Tile: For the bathroom’s main tile surface, large format tiles are used for a sleek, modern look. The first row is installed with precision, ensuring it’s level and straight. Tile profiles, like Schluter Deco SG, are added to help transition between different materials, like the tile and the glass wall.
Cutting Tiles for Niche and Window: For the shower niche and window area, tile is custom cut to fit the spaces. The use of tile miters ensures the corners look seamless, and epoxy is applied to secure the edges.
Use of Thinset and Wedge Systems: Thinset is applied using a half-inch square-notch trowel, and a wedge system ensures that the grout lines remain uniform and free of lippage. This is a crucial step in large tile installations.
Step 7: Grouting and Finishing
Once the tiles are laid, it’s time for grouting, sealing, and final touches.
Grouting the Tiles: Two colors of grout are used to match the tile patterns and create a seamless look. The grout is applied, allowed to set, and then wiped away with a damp sponge. After the grout sets, a microfiber towel is used to remove any leftover haze.
Applying Silicone Seals: In all corners and seams, silicone sealant is used to ensure the space remains waterproof and flexible. The silicone is applied and smoothed out with a popsicle stick for a clean, professional finish.
Step 8: Installing Fixtures and Final Touches
Install the Freestanding Tub: The freestanding tub is placed in position, ensuring it’s level and that all feet are balanced. The tailpiece is connected with silicone seals and tightened to ensure no leaks.
Finishing the Glass Wall: The custom glass wall is installed, using a laser level to ensure that it fits perfectly with the tiled surfaces.
Add Final Touches: Once all fixtures and installations are completed, the bathroom vanity, mirror, and other fixtures are added, giving the bathroom its final form.
Step 9: Enjoying Your New Wet Room
Once the project is finished, you can enjoy your brand-new wet room—a space that feels open, clean, and incredibly modern. A wet room can also increase the overall value of your home, providing a luxurious touch to your bathroom while offering both functionality and aesthetic appeal.
Conclusion: A Worthwhile Investment
Transforming a bathroom into a wet room is no small task, but the rewards are worth it. From better space utilization to improved bathroom functionality and design, a wet room brings a lot of value to your home. Whether you're tackling a DIY renovation or hiring professionals, this step-by-step guide provides insight into how to approach the transformation successfully. Happy renovating!


Comments