DIY Bathroom Remodel for Under $2,500
- DreamDen AI Editorial Team
- Nov 5, 2025
- 5 min read


A bathroom remodel can feel like a daunting project, especially when you're trying to stick to a budget. Professional contractors often charge tens of thousands of dollars for a full remodel. However, with careful planning, the right materials, and a bit of elbow grease, it’s entirely possible to transform your bathroom into a beautiful, functional space without breaking the bank.
In this blog, we’ll walk you through a bathroom remodel on a budget, using a real-life example of how it’s done for under $2,500. We’ll break down the steps, materials, and tips to achieve this look without hiring expensive contractors.
Step 1: Planning the Budget and Priorities
The first step to any successful remodel is setting a clear budget. For our example project, let us aim for a total cost of under $2,500, which is significantly lower than the typical $10,000+ cost of hiring a professional contractor.
Here’s how to approach planning your remodel on a budget:
1.1 Set Your Priorities
Start by determining which aspects of the bathroom are most important to you. You might want to upgrade the flooring, install a new vanity, or add new lighting fixtures. Identifying your top priorities helps focus your budget and ensures you spend money where it matters most.
1.2 Break Down Your Budget
In this example, the remodel was broken down into several key areas:
Plumbing and Fixtures: The plumbing (including shower valve, faucet, etc.) was replaced for around $100.
Flooring: Luxury vinyl plank (LVP) tiles were chosen for their easy installation and durability, costing around $220.
Drywall and Paint: For drywall, mud, and paint, the cost was $266.
Vanity and Hardware: The new vanity, mirror, faucet, and lighting came to $960.
Miscellaneous Supplies: Additional hardware and small tools were budgeted at $100.
The total cost for the remodel was $2,443, which is just under the $2,500 target.
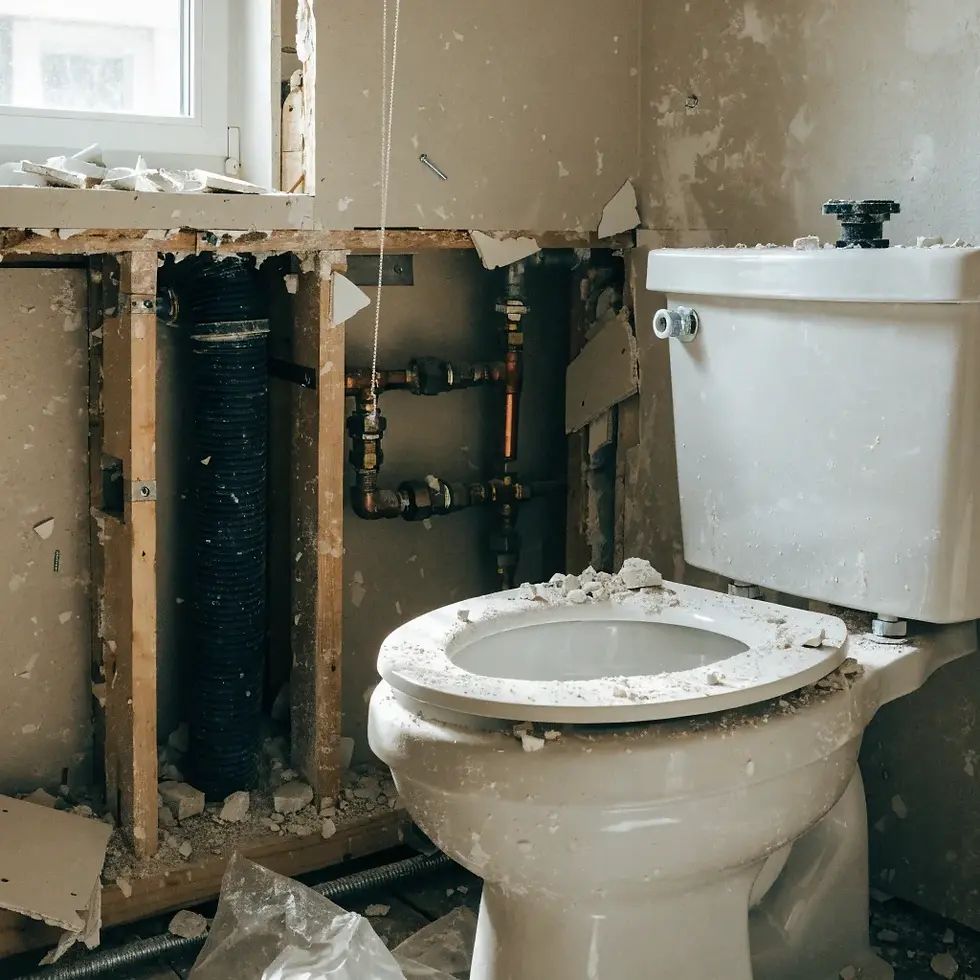
Step 2: Demolition and Removal
The next phase in any remodel is demolition—removing outdated or damaged fixtures, flooring, and walls. This phase can be messy but is essential for starting fresh. In our example, we started by removing the old vanity, toilet, and flooring.
2.1 Vanity Removal
Before pulling out the vanity, make sure to turn off the water supply. Use a wrench to disconnect the plumbing and remove any screws holding the vanity in place. If you plan to replace the vanity with something new, there’s no need to be too careful with the removal process. However, if you want to save the vanity for reuse, be sure to carefully disconnect the plumbing and keep it intact.
2.2 Flooring and Wall Removal
If your bathroom has old tile or damaged flooring, it's time to remove it. In this case, the existing floor was covered in cracked ceramic tiles set into a mortar bed. The removal process involved using a wrecking bar and hammer to lift the tiles and mortar. The subfloor underneath was in good condition, which saved us time and money in replacing it.
Walls may also need to be removed, especially if they’re outdated or damaged. In our example, the walls were covered in old, almond-colored tiles, which were not only unsightly but also poorly installed. It made sense to tear out the old tiles and replace the drywall, which helped give the space a fresh, modern look.
Step 3: Replacing the Plumbing Fixtures
Once the old fixtures were removed, we moved on to replacing the plumbing. In our example project, the bathroom featured an outdated shower valve that was in need of replacement. A new shower valve was installed with PEX piping for quick, solderless connections.
3.1 Installing a Shower Valve
Replacing a shower valve involves removing the old valve and installing the new one. In this case, the new valve was placed at 36 inches from the floor, which is a comfortable height for most users. The connections were made using PEX tubing and SharkBite connectors, which eliminated the need for soldering and made installation faster and easier.
3.2 Reconnecting the Toilet
Once the flooring was installed, we moved the toilet flange to sit on top of the new LVP flooring. This is a key step, as installing the flooring after the toilet flange ensures a cleaner, more professional look.
Step 4: Drywall Installation and Mudding
With the plumbing done, it was time to focus on the walls. The drywall needed to be replaced in areas where the old tiles were removed.
4.1 Installing New Drywall
New drywall was installed where necessary, especially in areas around the shower and tub. The new drywall was taped, mudded, and sanded to create a smooth surface. While drywall mudding can be tricky, using the right tools and applying thin coats of mud helped achieve a professional-looking result.
4.2 Sanding and Painting
After the drywall mud dried, sanding was necessary to smooth out any imperfections. While sanding can be labor-intensive, the result is worth it. Once the sanding was done, the bathroom was painted with a fresh coat of paint in a light, neutral color.
Step 5: Installing the Tub and Shower Surround
Once the walls and plumbing were in place, the next big step was installing the bathtub and shower surround.
5.1 Installing the Bathtub
The tub was installed on a bed of mortar to provide stability and support. This step is important because the tub needs to remain level and secure when it’s in use. The mortar also ensures that the tub doesn’t shift over time.
5.2 Installing the Shower Surround
The tub surround was a three-piece system that locked into place without requiring additional caulking or seam sealing. This made the installation process quicker and less messy.
Step 6: Installing the Flooring
For the flooring, luxury vinyl plank (LVP) tiles were used for their durability, ease of installation, and modern aesthetic.
6.1 Choosing the Layout
We opted for a lengthwise layout to make the most of the room’s dimensions. This decision ensures the tiles run along the longest wall, creating a seamless look. The first few rows were easy to install, but as we reached the toilet flange, we had to make some adjustments.
6.2 Cutting and Fitting Tiles
LVP tiles are easy to cut with a utility knife or tile cutter. We used a tapping block to fit the tiles into place and avoid damaging the edges. Once the tiles were cut to fit around the toilet flange and other obstacles, the rest of the flooring went in smoothly.
Step 7: Final Touches
The final phase of the remodel involved adding all the finishing touches. This included:
Vanity Installation: A new oak vanity was installed with a black faucet and black hardware for a modern, stylish look.
Lighting and Mirror: A new black lighting fixture was added, along with a simple, elegant mirror that complemented the vanity.
Caulking and Sealing: To seal the edges around the tub, we used color-matched silicone caulk, ensuring a watertight finish that looked professional.
Final Thoughts and Cost Breakdown
This bathroom remodel, from start to finish, came in at just under $2,500. The breakdown of costs is as follows:
Plumbing and Fixtures: $97
Flooring (LVP + Subfloor): $220
Drywall, Mudding, and Paint: $266
Vanity, Faucet, and Lighting: $960
Miscellaneous Supplies: $100
Total Cost: $2,443
By doing the work yourself, you can save a significant amount of money compared to hiring a contractor. The key is careful planning, choosing budget-friendly materials, and taking your time with each step. With a little patience and effort, you can achieve a beautiful bathroom remodel for a fraction of the cost.


Comments