How to Recolor and Restore a Block Paved Driveway
- DreamDen AI Editorial Team
- Nov 6, 2025
- 8 min read

Updated: Apr 7
A block paved driveway can make your home look amazing, but over time, the color fades, weeds grow through, and it starts to look old. The good news? You don’t have to replace it. You can clean, treat, and recolor it yourself — and give your driveway a completely new look in a few days.
In this blog, we’ll walk you through how to do it properly. We’ll cover what you need, how to prepare the surface, and the right way to apply color sealer so you don’t end up with patchy or uneven results.
Why Recolor a Driveway?
Over the years, sunlight, rain, moss, and oil can dull the color of your block paving. It can start to look tired and patchy. Recoloring your driveway can:
Make old paving look brand new
Cover mismatched blocks (common if you’ve replaced sections)
Match your driveway to your home’s exterior or fencing
Add protection from weather, oil stains, and fading
It’s also much cheaper than replacing the paving.Most people can restore and recolor a standard driveway for a few hundred pounds in materials — compared to thousands for a new one.
What You’ll Need
Before you start, make sure you have all the tools and materials ready. Here’s a simple list:
Materials
Block paving sealer with color tint (like SmartSeal Block Magic)
Weed killer or moss remover
Jointing sand (for refilling gaps)
Cleaning detergent or chemical treatment
Tools
Pressure washer
Medium-nap paint rollers and trays
Paintbrush (for edges and corners)
Protective gloves and mask
Bucket or paddle mixer (for mixing the sealer)
Masking sheets or drop cloths (for walls and fences)
Stiff broom
Measuring tape
Garden sprayer or watering can (for rinsing)
Optional:
Airless paint sprayer (for large areas — but rolling is usually easier)
Angle grinder (if you’re cutting replacement blocks or borders)
Step 1: Clean the Driveway Properly
Cleaning is the most important part of this project. If the surface isn’t clean, the new color won’t stick properly and you’ll end up with uneven results.
Remove debris – Sweep away leaves, dirt, and loose sand.
Kill weeds and moss – Use a moss and weed killer. Wait a few days for it to work.
Pressure wash the blocks – Clean every part of the paving, including joints. Move slowly so the water removes all dirt and grime.
Rinse and let dry – After washing, rinse with clean water and allow the driveway to fully dry.
If the blocks are damp, the sealer can trap moisture underneath and turn cloudy.
Drying can take 24–48 hours depending on the weather.
Step 2: Refill the Joints
Once the paving is clean and dry, you’ll notice some gaps between the blocks. These need to be filled again before sealing.
Use kiln-dried sand (jointing sand).
Sweep it into the joints using a broom.
Fill all gaps until the sand is just below the block surface.
Lightly mist with water to settle it, but don’t soak it.
Proper jointing sand helps prevent movement and weed growth later.
Step 3: Choose and Mix Your Color Sealer
There are different types of driveway sealers, but for recoloring, you need a solvent-based sealer with pigment — not just a clear one.
Popular choices include:
SmartSeal Block Magic
Resiblock Color Restorer
Everbuild Drive Sealer
Pick a shade that complements your home — dark grey, charcoal, or natural stone colors are common.
Mixing the sealer
This step is vital for an even finish.
Open the container and stir the contents thoroughly.
Use a paddle mixer attached to a drill — not just a stick.
Mix for 2–3 minutes to blend the color evenly.
Keep mixing every 10–15 minutes while you work so pigment doesn’t settle.
If you skip this step, you’ll get patchy or streaky color once it dries.
Step 4: Protect the Edges
Before applying the sealer, protect the areas around your driveway — like walls, doors, or fencing.
You can use:
Masking tape (only on smooth surfaces like PVC)
Drop cloths or old sheets
Cardboard or plywood boards to shield walls and grass edges
Avoid light plastic sheeting outdoors — it often doesn’t stick to brick or wood and can blow away.
Step 5: Apply the First Coat
Now it’s time to apply the color sealer. Most people roll it on — spraying works too but can be messy and tricky.
Rolling method
Pour the sealer into a tray.
Dip the roller and roll off the excess.
Start from the farthest corner and work toward the exit so you don’t step on wet sealer.
Roll in straight lines, keeping even pressure.
Use a brush to get into corners, kerbs, and edges.
Go slowly and make sure the coverage is even. If it looks thin in spots, go back over it gently before it dries.
Spraying method
If you’re using a sprayer:
Keep the nozzle 6–8 inches from the surface.
Move steadily to avoid heavy patches.
Don’t spray on windy days.
Always wear a mask — the fumes are strong.
Let the first coat dry for 2–4 hours (check the product label). The surface should look dry before you start the next coat.
Step 6: Apply the Second Coat
A second coat gives the driveway richer color and stronger protection.
Make sure the first coat is dry and not tacky.
Apply the second coat in the same way — thin and even.
Don’t over-roll or you’ll create shiny patches.
Usually, one coat works for newer or uniform blocks, but two coats are best for older driveways or where color differences exist.
Let the second coat cure for at least 24 hours before walking or driving on it.
Step 7: Do the Borders and Kerbs
If you want a more professional finish, paint your borders and kerbs in a darker shade.
Use a small roller or brush for precision.Take your time — neat edges make a big difference to the final look.
Step 8: Allow to Cure and Protect from Weather
After sealing, make sure:
No one walks or drives on it for at least 24 hours.
It stays dry — no rain during curing.
Avoid parking heavy vehicles for a few days.
Weather is important. The best time to do this job is in spring or early autumn, when it’s mild and dry (around 10–20°C).
If it’s too cold, the sealer won’t cure properly.If it’s too hot, it can dry too fast and go patchy.
Step 9: Inspect and Fix Patchy Areas
After the driveway dries, inspect it under daylight.If you notice light patches, it usually means:
The sealer wasn’t mixed evenly.
Some areas absorbed more product than others.
The roller missed small spots.
You can fix this easily:
Lightly sand glossy or uneven spots.
Reapply a thin layer of well-mixed sealer.
Blend it gently into the surrounding area.
If you have larger patchy areas, you may need to roll a thin coat over the entire section again.
Step 10: Maintenance After Recoloring
A recolored driveway is low-maintenance but not maintenance-free. Here’s how to keep it looking great:
Sweep regularly to remove debris.
Clean oil stains quickly before they soak in.
Top up sealer every 3–5 years to keep color fresh.
Avoid harsh chemicals or bleach-based cleaners — they can dull the finish.
Re-sand joints every year if they start to wash out.
Simple care helps your driveway stay strong and vibrant for years.
Troubleshooting Common Problems
Problem | Cause | Fix |
Patchy color | Poor mixing or uneven coat | Apply a second well-mixed coat |
White or cloudy patches | Applied on damp surface | Strip and reseal once dry |
Sticky surface | Too much product or humid weather | Allow more curing time |
Fumes too strong | Poor ventilation | Wear a respirator, work outdoors only |
Weeds coming back | Missed pre-treatment | Lift and clean area, apply weed killer, reseal |
Safety Tips
Working with sealers is safe if you follow basic precautions.
Wear gloves and goggles.
Always use a respirator or mask when using solvent-based sealers.
Don’t smoke or light fires nearby — the products are flammable.
Keep pets and children off the driveway until it’s completely dry.
Wash hands and tools thoroughly afterward.
If you spill sealer on walls or fences, wipe it off immediately with a cloth and solvent cleaner.
How Long Does It Last?
A good recoloring job lasts 3 to 5 years depending on:
Weather conditions
How much traffic the driveway gets
Quality of the sealer used
After that, you can apply another light coat to refresh the color — you don’t need to redo everything from scratch.
When Not to Apply Driveway Sealer
Timing matters. Avoid applying sealer if:
It’s about to rain within 6 hours
The surface is damp or wet
It’s below 10°C or above 25°C
You’re expecting frost overnight
Waiting for the right conditions saves time and prevents wasted product.
Example Driveway Color Ideas
Here are a few popular color combinations to consider:
Main Area | Border | Looks Best With |
Light grey | Dark charcoal | Modern homes, black fencing |
Sandstone | Brown | Brick or traditional homes |
Red | Black | Classic look with red brick |
Charcoal | Silver grey | Minimalist or contemporary style |
Always test a small section first before committing to the full color.
Professional vs DIY — Which Is Better?
You can recolor a driveway yourself if you have patience and follow the steps carefully.However, hiring a professional can save time and give more consistent results.
DIY | Professional |
Cheaper overall | Costs more (£400–£800 typical) |
Takes 2–3 days | Done in 1–2 days |
Learning curve | Experienced with products |
You control timing | No mess or mistakes on you |
If you’re doing a large area (200+ m²), consider hiring help for the cleaning and rolling. It’s a big job on your own.
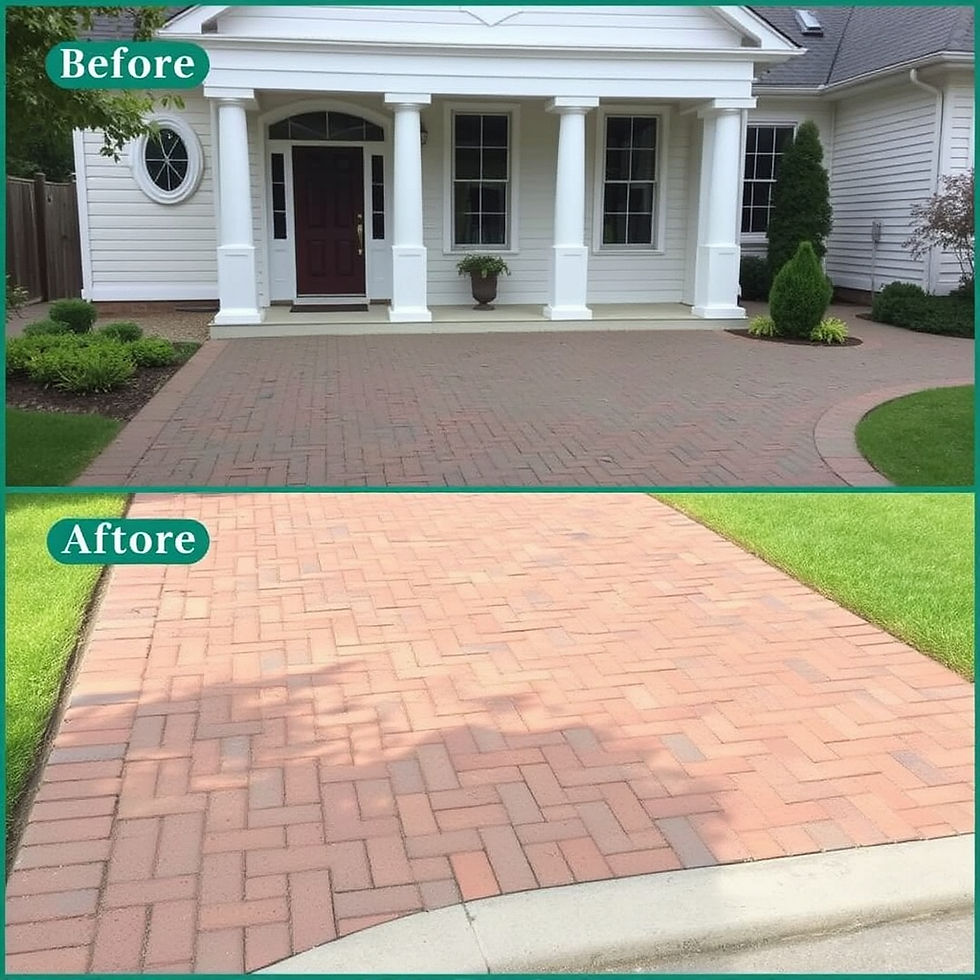
Before and After: What to Expect
After recoloring:
The driveway will look darker and richer in color.
The surface will have a slight sheen (depending on product).
Blocks will appear new, clean, and uniform.
The driveway will resist stains and weather better.
It’s one of the most satisfying home upgrades you can do in a weekend.
Simple Recap: The 10-Step Process
Clean the driveway thoroughly.
Kill weeds and moss.
Let it dry completely.
Refill the joints with sand.
Mix the color sealer properly.
Protect walls and edges.
Apply the first coat evenly.
Let it dry, then apply the second coat.
Check for patchy areas and fix them.
Allow 24 hours to cure before using.
Follow these steps carefully and your driveway will look brand new again.
Final Thoughts
Recoloring a block paved driveway isn’t complicated — it just takes time and attention to detail. The key is preparation. Clean thoroughly, dry completely, and mix your sealer properly. The actual application is the easy part once you’ve done the groundwork.
When done right, you’ll transform an old, dull surface into a clean, modern driveway that adds instant curb appeal to your home. If you want to save money, enjoy DIY work, and see a dramatic before-and-after change, this project is absolutely worth it.
Quick FAQ
How long should I wait before driving on it?
At least 24 hours. 48 is safer if the weather is cool.
Can I use a water-based sealer instead?
You can, but solvent-based sealers usually last longer and give better color results.
Can I change from red to grey?
Yes, strong colors like grey or charcoal can cover red or brown blocks.
What happens if it rains right after sealing?
It may turn milky or patchy. Wait for dry weather before starting again.
Do I need to strip old sealers first?
If the old surface is glossy or peeling, yes — strip it with a sealer remover first.


Comments