Search Results
4668 results found with an empty search
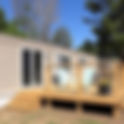
- DIY Roof Addition to a Mobile Home Deck
Adding a roof to your existing deck not only improves the aesthetics but also increases the functionality of your outdoor living space. Whether you're looking for some shade or protection from the elements, building a roof over your deck is a great way to extend your living area. In this blog, we’ll walk you through the steps of building a roof over a back deck attached to a single-wide mobile home. Follow along for a comprehensive DIY guide, complete with tips, materials, and techniques! Step 1: Initial Planning and Deck Inspection Before diving into the project, it's essential to ensure your deck can handle the additional load of a roof. Start by inspecting the existing structure to make sure the deck is solid and that there’s enough support for the posts that will hold the roof. For this project, we were able to take advantage of the large, doubled-up two-by-ten rim joists that were already in place, which provided the extra support needed to mount the posts. If your deck doesn't have this kind of solid structure below the deck boards, you might need to reinforce it with additional deck joist blocking. This will help make sure the posts are securely attached to a stable foundation. Step 2: Installing the Post Base Brackets For this project, we chose Simpson 4x6 post base brackets to attach the posts to the deck. These brackets are easy to install and provide a secure foundation for the posts. We attached the brackets to the deck first, which was relatively simple and quick. Tip: If you don't have strong framing members below the deck boards, consider adding additional blocking for added stability. This could save you time and labor compared to mounting posts in the ground, which would require digging and pouring concrete. Step 3: Cutting and Installing the Posts Next, we cut 4x6 posts to the required height for the roof. Though 4x4 posts would have sufficed, we opted for the 4x6 posts to provide more strength and support for the triple-laminated beam that would span the width of the deck. Using a speed square and a cordless circular saw , we made precise cuts to the posts to ensure they were square and even. The posts were then clamped into place to ensure stability while we continued with the project. Step 4: Mounting the Beam The next step involved installing the triple-laminated beam that would span across the posts. The beam was made from two-by-sixes , and we installed them one at a time to ensure that everything lined up perfectly. We attached Simpson strong-tie AC4Z post-to-beam brackets to hold the posts and beam together securely. These brackets are designed to wrap around a 4x4 post and hold the beam in place firmly. To ensure the beam was stable, we also added a few screws and tightened everything down, checking that the posts were level before moving forward. Step 5: Attaching the Ledger Board The ledger board was then attached to the side of the mobile home to create a secure connection between the new roof and the house. We used six-inch lag screws to attach the board to the home's existing roof structure. Tip: Attaching the roof to the house is optional, but it can add additional security and strength to the roof structure. However, if you're unsure or uncomfortable with this step, you can build a separate freestanding roof structure. Step 6: Installing the Rafters Once the ledger board was attached, we installed the rafters . We started by measuring and cutting each rafter to fit properly, ensuring that they were evenly spaced and aligned. Hurricane brackets were used to secure the rafters to the beam and the ledger board, adding extra support and preventing the rafters from shifting over time. Tip: When cutting the rafters, check for any bowing or crown in the wood to ensure that the rafters are straight and level when installed. This will prevent any sagging in the future. Step 7: Installing Purlins for Additional Support After the rafters were installed, we moved on to adding the purlins , which are the boards that run perpendicular to the rafters and provide additional support for the roofing material. We used treated one-by-four lumber for the purlins, attaching them to the rafters using two-and-a-half-inch deck screws . The purlins should be spaced properly to ensure that the roofing material is supported evenly across the structure. We made sure to place the purlins at regular intervals, which helps prevent sagging and ensures a strong roof frame. Step 8: Measuring and Cutting the Metal Roofing Now that the frame was ready, it was time to install the metal roofing . We selected charcoal gray roofing sheets that matched the existing roof of the mobile home. The roofing panels were 3 feet wide, and we had to carefully measure the roof frame to ensure that the panels would fit correctly. We placed the first panel at the edge of the roof and screwed it into place, ensuring it was square. Tip: The manufacturer recommends installing roofing screws on the flats of the metal panels, not on the ridges. This prevents the panels from moving or bowing over time and ensures that the screws stay tight and secure. Step 9: Installing the Transition Trim After the main roofing panels were in place, we moved on to the transition trim that connects the new porch roof to the existing home roof. This piece of trim is crucial for keeping water flowing properly and preventing leaks where the two roofs meet. We slid the trim piece under the existing roof and screwed it into place, ensuring that it fit snugly. This transition trim helps seal the gap between the two roofs and adds a neat, finished look to the junction. Step 10: Final Touches and Trim With the roofing panels installed and the transition trim in place, we moved on to the final touches, such as installing the facial board to finish off the roof's edges. We also made sure to clean up any mess, including removing any excess screws or debris from the work area. Conclusion: The Completed Roof After a few days of hard work and careful attention to detail, the roof on our mobile home's back deck was complete. The finished product exceeded our expectations, and the deck now has a sturdy and secure roof to provide shade and protection from the elements. This project was an incredibly rewarding DIY experience. While there were some challenges along the way, such as working with existing roof structures and ensuring the frame was properly aligned, the final result was well worth the effort. We not only saved money by doing the work ourselves, but we also gained valuable skills that we can apply to future projects. If you're considering adding a roof to your own deck, don't hesitate to give it a try. With the right tools and a little bit of patience, you can achieve similar results and transform your outdoor space into a comfortable and functional area. Thanks for following along with our project, and we hope this guide helps you with your own DIY roof addition!
- Building a Shipping Container Storage Solution
In this blog post, we’ll explore the journey of transforming two shipping containers into a functional and sturdy storage solution for firewood, equipment, and more. This project took a little over a year to complete, primarily due to the challenges of managing the vast amount of firewood, dealing with the long winters, and working with shipping containers. Despite the delays, the outcome is a solid, secure, and effective storage space. Here’s a breakdown of the entire process, along with the challenges and adjustments made along the way. Why Shipping Containers for Storage? Shipping containers are an increasingly popular choice for creating storage spaces, sheds, or even small homes. Their durability, security, and versatility make them an ideal solution for anyone looking to create additional storage. They are weather-resistant, provide solid protection from pests, and are generally easier to modify than other types of structures. For this project, the goal was to build a storage space for firewood and other tools using two shipping containers. The plan also included creating additional functionality such as a hidden door for easy access. Step 1: Preparing the Site and Positioning the Containers The first step in this storage solution project was preparing the site for the containers. This meant clearing the area and ensuring that it was level to prevent the containers from being unstable. Clearing the Space Before positioning the containers, the area needed to be cleared. This included moving any debris, rocks, or other obstacles that might interfere with the placement of the containers. Since the area was a little sloped, it was crucial to ensure that the containers would sit level and stable. Container Placement Once the site was clear, the containers were placed. The aim was to position them with enough space between them to allow for easy access on both sides. A foot or so of space on either side was left, and they were also placed in a way that would allow for a future plan of double-stacking crates inside. The containers were also positioned in such a way that the doors faced the most practical direction, ensuring ease of access without a large drop-off on the ground. Step 2: Preparing the Containers for Use Once the containers were in place, it was time to modify them for storage purposes. This involved a series of modifications, including the installation of racks, painting, and the creation of a hidden access door. Painting the Containers The first significant modification was painting the containers. To protect the metal from rust and to give the containers a more aesthetically pleasing look, they were painted black. The team chose a semi-gloss finish, which provided a balance between a matte and a high-gloss finish. Initially, the team bought just one gallon of paint to see how far it would go. After testing, they decided to purchase a few more gallons, bringing the total to four. The containers were painted on all visible sides, including the door end, long side, and back. For now, the interior of the containers was left as is. Creating a Hidden Door One of the more unique features of this storage setup was the creation of a secret door. This door provides easy access to the contents of the container while maintaining a clean and uniform exterior. The door was created by cutting a portion of one of the container walls, and it operates with a simple latch. While it’s currently held shut by a stick, a proper latch will be added later. Step 3: Building and Installing the Storage Racks With the containers painted and the secret door in place, it was time to focus on the interior setup, specifically the racks for firewood storage. Constructing the Racks The racks used in this project were custom-built using 2x6 and 1x6 lumber. The back support of the racks was reinforced with 1x4s for added strength. The idea was to create a sturdy structure capable of holding crates of firewood, which can be quite heavy. Double-Stacking the Firewood Crates The team wanted to maximize storage by experimenting with stacking the firewood crates. They designed the racks in such a way that they could double-stack the crates, providing an efficient use of vertical space. The goal was to fit as many crates as possible while maintaining easy access to each one. The team also thought ahead and made sure to allow enough room for the crates to slide in and out of the racks smoothly. This meant measuring carefully to ensure that the crates would fit snugly but not be difficult to move in and out. Step 4: Installing the Roof and Finishing Touches The next step was installing the roof and adding the final touches to ensure the containers were fully functional and weatherproof. Installing the Roof The containers were equipped with a new roof to ensure that the contents inside were protected from rain and snow. The trusses for the roof were ordered and arrived later in the project. The team took their time lifting each truss into place, working slowly to ensure everything was secure. The roof would be essential for keeping the interior of the containers dry, especially considering the heavy rainfall and snowfalls typical in Nova Scotia. Final Adjustments After the roof was in place, the team continued to make minor adjustments, including adding the foam strips to seal the edges and prevent water from leaking into the containers. The foam strips are designed to fit together to create a weatherproof seal, ensuring the contents of the container remain protected year-round. Step 5: Securing the Doors and Finalizing the Interior With the structural elements in place, the last step was to secure the doors and finalize the interior of the containers. The team installed additional weather strips to ensure that the doors closed tightly and no moisture could get inside. Latching and Securing the Doors The doors were equipped with a latch and hook system. This allows the homeowner to easily open and close the doors without worrying about them swinging open or closed unexpectedly. The latch system was placed on the inside, ensuring that the door stays secure when not in use. Additionally, the team took extra care to ensure that the firewood crates were stable and wouldn’t tip over when moved in and out of the container. Challenges and Solutions Weather Delays One of the major challenges during this project was dealing with the harsh Nova Scotia winters. The project stretched over the course of a year, primarily because of the weather. The team had to pause work during the colder months and pick up where they left off in the spring. Material Sourcing and Supply Issues Another challenge was sourcing the materials needed for the project. While the shipping containers were readily available, other materials, such as trusses, took longer to arrive. In some cases, the team had to make do with what they had and adjust plans accordingly. Adjusting to the Site’s Slopes Since the site was slightly sloped, adjustments had to be made to ensure that the containers were level. This meant digging and moving dirt around to create a more stable base for the containers to rest on. Fortunately, the final placement allowed for an easy and secure installation process. Conclusion The shipping container storage project was a great success, resulting in a durable and secure solution for storing firewood and other materials. With careful planning, creativity, and a little patience, the team was able to transform two containers into a fully functional storage space that will serve them for years to come. While the project took longer than expected, the outcome was well worth the wait. The containers are now ready for any weather that comes their way, and the storage solution is both practical and aesthetically pleasing. If you're considering a similar project, remember to account for delays and material shortages, and always plan for the long term. With the right preparation, a shipping container storage solution can be a perfect way to protect your goods while adding functionality to your property.
- How to Build a Double Drive Cedar Gate
Building a double drive cedar gate is a fantastic DIY project that can enhance the security and aesthetics of your property. Whether you're replacing an old gate or installing a brand-new one, this project can be rewarding and add value to your home. In this guide, we'll walk you through the entire process of building a double-drive cedar gate, from post setup to the final finishing touches. Why Choose a Cedar Gate? Before we dive into the project details, let’s take a moment to discuss why cedar is a preferred material for gate construction. Cedar is a durable, naturally resistant wood that thrives in outdoor conditions. It is naturally resistant to decay and pests, making it an ideal material for gates and fences. Cedar also has a beautiful grain pattern, which gives the gate an attractive, rustic appearance. The wood ages well, maintaining its beauty while developing a silver-gray patina over time. For those looking for a low-maintenance, long-lasting gate, cedar is a perfect choice. Materials Needed Cedar wood for posts and pickets (quantity depends on gate size) 2x4 lumber for gate framing and support rails T-hinges for better gate adjustment Galvanized chain-link drop rod for additional support Deck screws (3-inch screws recommended) Nailer strips for picket installation Lumber for bracing (2x4s) Concrete mix for setting posts Screws for hinge and latch installation Wood saw (Circular saw preferred) Drill and drill bits for pre-drilling screw holes Measuring tape Level Square or carpenter's square Angle grinder (for trimming) Paint or wood sealant for finishing Anti-sag kit to prevent gate sagging Step 1: Preparing the Gate Location Choosing the Right Spot for Your Double Drive Gate The first step in building your double-drive cedar gate is selecting the appropriate location. You’ll need to ensure that the area is level and free from obstacles like large rocks or trees. If the ground is sloping, consider how the gates will open. Ideally, the gates should open outward without dragging along the ground. Start by measuring the width of the opening where the gates will be installed. A typical double drive gate consists of two gate leaves, each roughly 4 feet wide, making the total width around 8 feet. However, the size can be adjusted based on your needs and the space available. Setting the Posts Once you've chosen your location, you’ll need to set your gate posts. Begin by digging two post holes, ensuring they are deep enough to support the weight of the gates. The depth of the hole should be at least 2 feet for a sturdy base, especially in areas where heavy snow or ice can accumulate. Next, place your posts in the holes and ensure they are level. You may want to use a level or plumb bob to make sure the posts are perfectly vertical. Once the posts are positioned correctly, fill the holes with concrete, ensuring the posts stay straight while the concrete sets. After the concrete has dried (usually about 24 hours), cut the posts to the desired height. If you live in an area with heavy snow, consider adding an extra 2 inches to your post height to ensure that the gates have enough clearance when they swing open. Step 2: Assembling the Gate Frame Cutting and Preparing the Rails Now that your posts are set and secure, it’s time to build the frame for your gates. The frame consists of horizontal rails that will hold the pickets in place. For this project, we're using 2x4s for the rails. Begin by measuring the width between your posts, accounting for a small gap between the gate and the posts for smooth opening and closing. Once you have your measurements, cut the rails to length. You'll need two rails for each gate: one for the top and one for the bottom. If you’re building a gate wider than 8 feet, you’ll need a center support rail to prevent sagging. Make sure to check the fit of the rails before securing them. The rails should be positioned slightly above the ground to prevent them from dragging, and they should be level to ensure the gates swing properly. Installing the Rails Once the rails are cut, it’s time to attach them to the posts. Begin with the top rail, which should be positioned 27 inches from the bottom of the posts. Secure the top rail with screws, making sure the rail is level. Next, attach the bottom rail 54 inches from the top of the posts. This measurement can vary depending on the size of the gate, but this placement ensures that the bottom rail is sturdy enough to support the gate’s weight. Step 3: Installing the Pickets Selecting the Right Pickets The pickets are the vertical slats that make up the bulk of the gate’s appearance. Cedar pickets are a great choice because they are durable, weather-resistant, and visually appealing. Choose pickets that are about 5 inches wide, or adjust based on your personal preference. You can opt for a classic style with evenly spaced pickets, or for a more unique look, consider overlapping pickets for added privacy. Cutting the Pickets to Size Once you've decided on the spacing for your pickets, it’s time to cut them to size. To avoid wasting material, measure the width of the gate and determine how many pickets you’ll need to cover the frame. For a standard 8-foot gate, you'll need around 18 pickets. You can either leave the pickets at their full length or trim them to fit perfectly within the frame. When trimming the pickets, it’s important to measure carefully to avoid gaps or an uneven look. If necessary, rip the pickets to a consistent width using a table saw. Attaching the Pickets Now that the pickets are cut, it’s time to attach them to the gate frame. Start with the top picket and use a level to make sure it’s perfectly vertical. Attach it to the top rail with screws, then move on to the remaining pickets. Maintain a consistent gap between each picket, typically around 1 inch. If you find that the pickets are too tight or too loose, make adjustments to ensure the spacing is uniform. For a clean look, make sure the pickets are securely fastened to both the top and bottom rails. Step 4: Installing the Hinges Choosing the Right Hinges For this project, we're using T-hinges, which are ideal for heavy gates and allow for easy adjustment. T-hinges are designed to bear the weight of the gate and provide stability. They are perfect for double-drive gates where each gate leaf needs to swing independently. Measure and mark where the hinges will be placed on the gate and the posts. Typically, the hinges are installed about 10 inches from the top of the gate and 10 inches from the bottom. Attaching the Hinges Before installing the hinges, it’s important to ensure that the gate frame is fully square and level. Once you’re satisfied with the gate’s positioning, attach the hinges to the posts first. Then, attach the other side of the hinge to the gate. Ensure that the gate swings open and closed without obstruction. Step 5: Installing the Drop Rod and Latch Adding the Drop Rod A drop rod is essential for securing one side of the double drive gate when it is closed. This rod slides into a receptacle embedded in the ground, keeping the gate stationary. To install the drop rod, measure the desired position on the gate and attach a galvanized bracket. Secure the rod in place, making sure it’s long enough to reach the ground easily. A heavy-duty drop rod will provide added security and durability compared to standard models. Installing the Latch Next, install the latch on the stationary gate. Be sure to leave enough space for the latch to function smoothly, and always account for hardware clearance. A properly installed latch ensures that your gate remains securely closed when not in use. Step 6: Final Adjustments and Finishing Touches Checking for Alignment Once everything is installed, check the alignment of the gates. They should swing freely without dragging on the ground. Adjust the hinges if necessary to ensure proper function. You may need to slightly raise or lower one side of the gate to ensure both gates align evenly. Sealing the Gate To protect the cedar wood from the elements, it’s important to apply a wood sealant or stain. This will help preserve the natural beauty of the wood while providing protection against moisture, UV rays, and other environmental factors. Apply the sealant evenly across all surfaces, allowing it to dry completely before use. Conclusion Building a double drive cedar gate is a rewarding project that can enhance both the functionality and beauty of your property. By following the steps outlined in this guide, you'll be able to create a durable and attractive gate that lasts for years to come. With careful planning, attention to detail, and the right materials, your cedar gate will be a perfect addition to your home.
- Transforming a Bathroom into a Wet Room
A bathroom renovation is one of the most satisfying and impactful home improvement projects you can undertake. Whether you want to update an outdated space or turn your standard bathroom into something unique, transforming your bathroom into a wet room can be an exciting project. A wet room not only makes the space feel more modern but also maximizes the functionality of your bathroom by turning the entire room into a shower space, eliminating the need for a shower enclosure or tub. In this post, we’ll break down a full bathroom wet room renovation from start to finish, based on a project that takes you through every step—from demolition to installation. If you’re considering creating a wet room or renovating your bathroom, follow along to get an in-depth look at what the process involves! Step 1: Demolition and Prep Work The first phase of any renovation is demolition. While it may sound like a fun part of the project, it’s crucial to proceed carefully to avoid damaging anything that might need to stay in place or be reused. Shut off the Water: Start by turning off the water supply to the bathroom, especially if you’re working with plumbing elements like the toilet, tub, or sink. Remove the Toilet and Vanity: Start by removing the toilet. This involves turning off the water supply, draining the toilet, unscrewing the bolts, and lifting it out of place. Next, tackle the vanity—remove all drawers, tape up the mirror (just in case it breaks), and disconnect the plumbing before dismantling the unit. Remove the Flooring and Tiles: The flooring removal process is one of the more challenging tasks in a bathroom renovation. Sometimes tiles come off easily, and other times, you’ll need a SDS drill or 3ft pry bar to work through old adhesives and staples that may have been used in the past. Identifying Unseen Problems: Once you get everything removed, you may uncover some unwelcome surprises, such as hidden dead space . But occasionally, you might be lucky and find an opportunity to expand your wet room by removing unnecessary barriers. Step 2: Plumbing and Electrical Reworking Creating a wet room often involves major plumbing rework, as you're turning the entire space into a shower area. This includes rerouting the drainage system and water lines to accommodate the changes. Rework the Stack and Drainage System: If you’re expanding the wet room, you’ll need to reroute the plumbing stack, ensuring the slope is maintained for proper drainage. New drains are installed for both the toilet and shower, connecting to a vent system that leads up into the attic for proper ventilation. Move HVAC Ducts: In some cases, like the one shown, the existing air register (heating duct) may also need to be moved out of the wet area, ensuring that it doesn’t interfere with the functionality of the new bathroom setup. Step 3: Building the Wet Room Foundation The wet room requires special attention to the floor because of its waterproofing and drainage needs. Recess the Subfloor for the Shower Area: To create a curbless shower, the subfloor in the shower area must be recessed to allow for the required slope. This involves sistering 2x4s to the existing floor joists, adding plywood, and ensuring that everything is securely glued and screwed in place to support the shower pan. Install PEX Plumbing: For flexibility, PEX plumbing is often used in these projects as it can easily be rerouted and customized for the new bathroom layout. Rework Closet Areas: If your bathroom has an attached closet, like in this renovation, this might also get reworked into a larger hallway linen closet, offering better use of space. Step 4: Water Proofing the Wet Room Waterproofing is an essential step in the wet room renovation. Without proper waterproofing, the shower area would quickly succumb to mold and damage. Install CIE Board: The CIE board (a lightweight, easy-to-install material) is used to create a solid waterproof surface. This material is attached to the studs, with special washers to secure the board in place. Add Waterproofing Banding and Silicone: After the CIE board is installed, the seams are sealed using a waterproof banding material to prevent water leakage. Special silicone is applied to the edges to ensure a secure bond and to prevent water from penetrating the corners. Flood Test: After the waterproofing is complete, the floor is checked using a flood test . A temporary barrier (like a 2x4) is added, and buckets of water are used to ensure the room holds water without any leaks. If the flood test is successful, the room is cleared for further work. Step 5: Framing and Structural Adjustments Before tiling can begin, any additional framing and structural work needs to be completed. Create a Niche for the Shower: One of the main features of this bathroom is the large shower niche . The wall studs are cut and reworked to allow for a spacious storage niche. Once the framing is in place, additional drywall work is done to support the tiling around the niche. Install Floating Vanity Wall: Since the vanity needs to be floating, a small false wall is built to house the water lines that can’t be run through an exterior wall (as it may freeze in cold climates). This ensures the vanity stays secure and functional. Step 6: Tile Installation The tile installation process is arguably the most involved part of the wet room transformation. Prepare for Large Format Tile: For the bathroom’s main tile surface, large format tiles are used for a sleek, modern look. The first row is installed with precision, ensuring it’s level and straight. Tile profiles, like Schluter Deco SG , are added to help transition between different materials, like the tile and the glass wall. Cutting Tiles for Niche and Window: For the shower niche and window area , tile is custom cut to fit the spaces. The use of tile miters ensures the corners look seamless, and epoxy is applied to secure the edges. Use of Thinset and Wedge Systems: Thinset is applied using a half-inch square-notch trowel , and a wedge system ensures that the grout lines remain uniform and free of lippage. This is a crucial step in large tile installations. Step 7: Grouting and Finishing Once the tiles are laid, it’s time for grouting, sealing, and final touches. Grouting the Tiles: Two colors of grout are used to match the tile patterns and create a seamless look. The grout is applied, allowed to set, and then wiped away with a damp sponge. After the grout sets, a microfiber towel is used to remove any leftover haze. Applying Silicone Seals: In all corners and seams, silicone sealant is used to ensure the space remains waterproof and flexible. The silicone is applied and smoothed out with a popsicle stick for a clean, professional finish. Step 8: Installing Fixtures and Final Touches Install the Freestanding Tub: The freestanding tub is placed in position, ensuring it’s level and that all feet are balanced. The tailpiece is connected with silicone seals and tightened to ensure no leaks. Finishing the Glass Wall: The custom glass wall is installed, using a laser level to ensure that it fits perfectly with the tiled surfaces. Add Final Touches: Once all fixtures and installations are completed, the bathroom vanity , mirror , and other fixtures are added, giving the bathroom its final form. Step 9: Enjoying Your New Wet Room Once the project is finished, you can enjoy your brand-new wet room —a space that feels open, clean, and incredibly modern. A wet room can also increase the overall value of your home, providing a luxurious touch to your bathroom while offering both functionality and aesthetic appeal. Conclusion: A Worthwhile Investment Transforming a bathroom into a wet room is no small task, but the rewards are worth it. From better space utilization to improved bathroom functionality and design, a wet room brings a lot of value to your home. Whether you're tackling a DIY renovation or hiring professionals, this step-by-step guide provides insight into how to approach the transformation successfully. Happy renovating!
- Why People Embrace Hygge Interior Design to Create a Personal Sanctuary
AI Image by Gemini The Modern Dilemma: Why We Crave a Personal Sanctuary In an era defined by digital saturation, constant connectivity, and a relentless pace, the search for tranquility has become more critical than ever. The pressures of modern life often leave individuals feeling overstimulated and disconnected from what truly matters. This has led to a collective yearning for a retreat—a personal sanctuary that promotes a sense of well-being, comfort, and contentment. It is this fundamental human need that has propelled the Danish concept of Hygge (pronounced hoo-gah) from a cultural philosophy into a global interior design phenomenon. What is Hygge? More Than Just a Cozy Vibe AI Image by Gemini Hygge is a Danish and Norwegian term that embodies a feeling of coziness, contentment, and well-being found in life's simple pleasures. Far more than just an aesthetic, it is a deliberate lifestyle choice centered on creating a warm, inviting, and emotionally safe atmosphere. In interior design, Hygge translates into crafting spaces that serve as a buffer against the stresses of the outside world, focusing on how a home feels rather than just how it looks. It's about building a sanctuary where you can unwind, be present, and reconnect with yourself and your loved ones. The Core Principles: Why Hygge Resonates So Deeply AI Image by Gemini The appeal of Hygge lies in its direct response to the anxieties of contemporary life. It offers a tangible way to reclaim peace and foster a more mindful existence. Several core principles explain why this design philosophy has become so popular. A Retreat from Digital Overload Constant notifications and screen time contribute to a state of technostress and information overload. Hygge design encourages creating spaces that facilitate a “digital detox.” By arranging furniture to promote conversation, building cozy reading nooks, and minimizing electronic distractions, a Hygge home becomes a place to unplug and engage with the present moment. This intentional disconnect is crucial for mental clarity and reducing anxiety. Fostering Connection and Intimacy Hygge emphasizes togetherness and shared experiences. The design philosophy favors creating intimate gathering spots, such as arranging seating in circles to encourage conversation or designing a welcoming dining area for shared meals. This focus on community and connection fulfills a deep psychological need, strengthening bonds with family and friends and combating feelings of loneliness. The Psychology of Comfort: Texture, Light, and Warmth Our surroundings have a profound impact on our emotional state. Hygge masterfully leverages environmental psychology to create a sense of safety and calm. Key elements include: Warm Lighting: Harsh overhead lights are replaced with soft, ambient sources like candles, fireplaces, and dimmable lamps. This warm, golden light is proven to relax the mind, improve mood, and foster creative thinking. Soft Textures: An abundance of plush, touchable textiles—such as chunky knit blankets, faux fur, wool, and linen curtains —invites physical comfort and relaxation. Natural Materials: Incorporating elements like wood, stone, and plants connects the indoor space with the tranquility of the natural world, which is known to reduce stress. This sensory focus helps to ground individuals, making them feel safe and sheltered. Mindful Simplicity in a World of Excess At its heart, Hygge shares principles with minimalism, prioritizing quality over quantity and intention over excess. A Hygge home is typically uncluttered, focusing on cherished items that bring joy or have personal meaning. This rejection of materialism helps reduce the visual “noise” that contributes to mental stress, promoting a clearer mind and a more peaceful environment. Thoughtful choices are key to improving your quality of life, and this is a central tenet of Hygge. Exploring how thoughtful home choices improve living can provide deeper insights into this philosophy. How to Weave Hygge Principles into Your Home AI Image by Gemini Creating a Hygge-inspired sanctuary is an intentional process. It’s about curating an atmosphere that nurtures your well-being. Many are exploring top trends in innovative interior design that align with these comforting principles. The table below outlines key Hygge elements and their purpose. Element Psychological Purpose How to Incorporate Candles & Fireplaces Creates a warm, dynamic glow that lowers stress and promotes relaxation. Group unscented candles together. If you don't have a fireplace, use a collection of pillar candles on a safe surface. Plush Textiles Provides tactile comfort and a sense of being enveloped and safe. Layer sofas and beds with blankets and pillows of varying textures like wool, faux fur, and chunky knits. Add a soft area rug. Natural Elements Fosters a connection to nature, which has a grounding and calming effect. Introduce wooden furniture, stone coasters, houseplants, or a vase of fresh flowers. Neutral Color Palette Evokes a sense of calm and serenity, creating a visually peaceful backdrop. Use shades of white, beige, soft gray, and earthy tones. Benjamin Moore's Simply White is a popular choice for its warmth. Personal Touches Surrounds you with meaningful items that evoke positive memories and a sense of belonging. Display cherished photos, handmade items, and favorite books. Beyond the Living Room: Hygge as a Holistic Approach AI Image by Gemini While often discussed in the context of a lounge room interior design or creating luxury bedroom designs , the principles of Hygge can be applied throughout the home and to life itself. It's about the simple joy of a home-cooked meal, the comfort of a warm drink, and the pleasure of good company. By embracing this philosophy, you are not just decorating; you are mindfully crafting a lifestyle that prioritizes peace and contentment. For those looking to visualize these changes, leveraging technology like an AI home interior design app can be a helpful tool in planning your sanctuary. Conclusion: Crafting Your Personal Haven AI Image by Gemini The movement towards Hygge interior design is a direct and heartfelt response to the demands of the modern world. It is a declaration that our homes should be more than just structures; they should be sanctuaries that nurture our mental and emotional health. By prioritizing comfort, simplicity, and connection, Hygge offers a powerful blueprint for creating a personal haven that promotes a profound sense of well-being and contentment in our daily lives.
- The Power of Minimalism: How Simple Solutions Make the Biggest Impact
In today's fast-paced world, we often find ourselves surrounded by noise — be it visual clutter, overwhelming choices, or complicated solutions to everyday problems. However, there's a growing trend that's shifting the way we think and live: minimalism. This isn't just about decluttering your space; it's about decluttering your mind and focusing on what truly matters. Minimalism doesn't need to be a drastic lifestyle change. It can start with small steps, leading to big transformations, not just in how we live but in how we think, create, and even how we engage with the world around us. The beauty of minimalism lies in its simplicity. What Is Minimalism, Really? Minimalism, as a concept, extends far beyond just living with less. It's about being intentional with your choices, whether it's how you design your home, what you choose to wear, or even the kind of media you consume. It's about curating a life that feels lighter, more purposeful, and, yes, more efficient. Take, for example, the way we approach our physical spaces. It's common to associate a 'clutter-free' home with simplicity. But it's not only about removing excess items; it's about choosing things that truly align with your values. Think quality over quantity. Each item in your home should serve a purpose, not just take up space. Why Minimalism Works Have you ever felt overwhelmed by a mountain of things you don’t even use? Or tried to finish a project but found yourself distracted by all the choices around you? We live in a world where the abundance of options can sometimes paralyze us, making it harder to focus on what we truly want or need. Minimalism forces us to choose wisely. It teaches us that less is more — more time, more clarity, more peace. Here’s how: 1. Focus on What Truly Matters By simplifying, you free up mental and physical space to focus on the things that matter most. Whether it’s spending more time with loved ones, dedicating yourself to a passion project, or just enjoying the quiet, minimalism encourages you to align your life with your core values. 2. Declutter Your Environment, Declutter Your Mind A cluttered environment often leads to a cluttered mind. Minimalism brings order to chaos, which helps in reducing stress levels and improving mental clarity. The less you have to manage, the more time you have for creativity and mindfulness. 3. Sustainability One of the biggest benefits of minimalism is its positive impact on the planet. By purchasing fewer, more purposeful items, we contribute less waste and are more mindful of what we consume. This doesn’t just benefit us but the environment as well. Minimalism in Practice: A Step-by-Step Guide If you’re intrigued by minimalism but don’t know where to start, here’s a practical guide to get you going: 1. Start with Your Space Begin by decluttering one area of your home — your closet, kitchen, or office. Ask yourself, "Do I truly need this item?" "Does it serve a purpose in my life?" Keep only what brings value or joy. 2. Mind Your Media Consumption In a world where information overload is the norm, minimalism can help us stay grounded. Limit your screen time, unsubscribe from unnecessary email lists, and consume media that adds value to your life. 3. Simplify Your Routines Minimalism can also extend to your daily habits. By simplifying your routine, whether it’s meal planning, exercising, or even how you approach work, you can free up time and energy for things that matter more. 4. Quality Over Quantity Instead of collecting a lot of things, invest in fewer high-quality items that will serve you well. This applies to everything — from your wardrobe to furniture, and even to relationships. Cultivate connections that bring positivity to your life. 5. Focus on the Present Minimalism encourages mindfulness. By focusing on the present moment and enjoying life as it is, without the distractions of excess possessions or obligations, you cultivate a sense of gratitude and fulfillment. The Beauty of Simple Solutions In our constant search for happiness, success, and fulfillment, we often overlook the simplest solutions. Minimalism offers a fresh perspective, showing us that we don’t need more to be happy. We simply need less of what doesn’t matter. Whether you’re trying to achieve mental clarity, reduce stress, or make a positive impact on the environment, minimalism offers a powerful yet simple approach. By making intentional choices and focusing on quality over quantity, we can all create a life that is more meaningful, sustainable, and fulfilling. Conclusion: The Minimalist Life Awaits As we’ve seen, minimalism isn’t a one-size-fits-all approach — it’s about creating a lifestyle that reflects your values and priorities. It allows you to eliminate distractions, focus on what’s important, and live a more intentional life. So, take that first step. Declutter your space, simplify your routine, and start making decisions with purpose. In doing so, you might just discover the hidden beauty in living with less. The minimalist life is waiting for you to embrace it.
- How to Replace and Repair an Interior Door Jamb and Casing
Replacing or repairing an interior door jamb and casing might seem like a daunting task, but it’s one of those home repairs that can be done easily with some basic tools and a little patience. Whether your door jamb is damaged, cracked, or just worn out from years of use, this guide will walk you through how to replace the damaged parts and get your door looking and working like new. In this step-by-step blog, we’ll cover everything from removing the old jamb to installing the new casing and lock catch. If you’re dealing with a door that won’t close properly, a broken jamb or casing could be the culprit, so it’s a good idea to fix it sooner rather than later. Tools and Materials You'll Need Before we dive into the instructions, make sure you have the following tools and materials on hand: Tools: Hammer Pry bar or crowbar Tape measure Level Utility knife Circular saw (optional, depending on the job) Drill Drill bits (for screws and lock catches) Brad nailer (or regular hammer and finishing nails) Carpenter’s square Multi-tool (oscillating tool) Clamps (for holding pieces in place) Materials: 1x5 cedar boards (or other preferred wood for the casing) Stop molding (for the door catch) Wood glue Wood filler or wood putty (for gaps and holes) Caulk or silicone sealant (for sealing gaps) Paint or finish to match your room's style Step 1: Removing the Old Jamb and Casing The first step in replacing a door jamb and casing is removing the existing parts. This is where the bulk of the work comes in, as you’ll need to be careful not to damage the surrounding wall or trim. Remove the Door : If the door is still in place, start by removing it. Unscrew the hinges from the door frame with a screwdriver. If the door is stuck or jammed, gently tap the hinge pins out with a hammer and nail set. Cut the Seal : Before removing the casing, use a utility knife to cut the paint or caulk around the edges where the casing meets the wall. This will prevent the paint from peeling off the wall when you remove the casing. You want a clean break so that you don’t damage the wall’s paint or drywall. Remove the Casing : Once the paint seal is cut, use a pry bar or crowbar to gently remove the casing. Start at the edges, working your way around the door frame. Be careful not to force the pry bar into the wall, as this can cause damage. If the casing is particularly tight, you may need to use a multi-tool to cut through any nails or screws that are holding it in place. Remove the Jamb : Once the casing is removed, it's time to take out the door jamb. Depending on how the jamb is installed, you may need to cut through any nails or screws holding it to the wall. Use the pry bar to gently lift and remove the jamb, being cautious not to tear up the wall around it. Clean the Area : Once the old casing and jamb are removed, you’ll likely find a lot of dust, debris, and possibly old nails or screws. Take the time to clean the area thoroughly. Use a vacuum or a dust brush to clean up the area, especially around the wall and the floor. Step 2: Measuring and Cutting the New Jamb Now that the old jamb and casing are out, it's time to measure and cut the new ones. This is a crucial step in ensuring that the new jamb fits perfectly into the space. Measure the Door Frame : Using a tape measure, measure the height and width of the door frame. Be sure to measure the inside of the frame where the jamb will sit. You want your new jamb to fit snugly but also allow room for the door to swing open and close freely. Cut the New Jamb : Once you have your measurements, cut your 1x5 cedar boards to the appropriate size. If you’re using pre-made jamb legs, you can skip this step, but if you're cutting your own, use a circular saw to make the cuts. You’ll want to make sure that the jamb fits flush against the wall and door frame. Dry Fit the Jamb : Before nailing or securing the jamb in place, dry fit it into the frame. Hold the jamb up to the door frame and check to make sure the measurements are correct. Use a level to check the vertical and horizontal alignment. If needed, trim any edges or adjust the fit before securing the jamb. Step 3: Installing the New Jamb Once the new jamb is cut and ready to go, it’s time to install it. This step requires a bit of patience, but the results are worth it. Attach the Jamb to the Frame : Begin by applying wood glue to the back of the jamb, where it will contact the door frame. Use clamps to hold the jamb in place and ensure that it’s aligned properly. While the glue sets, use brad nails or finish nails to secure the jamb to the door frame. Nail the jamb at several points along the edges, making sure it’s held securely in place. Check for Level : After securing the jamb, use a level to double-check that it is perfectly vertical. Adjust the position as needed, then finish nailing the jamb in place. It’s important that the jamb is level to ensure the door operates properly. Cutting the Top Jamb : If the top of the jamb is too long or uneven, measure and cut it to fit. Be sure the top piece is square and flush with the rest of the jamb. This is the most visible part of the door frame, so ensure it’s clean and tidy. Step 4: Adding the Stop Molding The next step is adding the stop molding. This is the small piece of trim that prevents the door from swinging too far inward and helps keep it aligned with the frame. Cut the Stop Molding : Measure the height of the door jamb and cut the stop molding to size. You want it to cover the space where the door meets the jamb but not interfere with the door’s operation. Some stop moldings are pre-made, but if you're custom-making it, simply cut a strip of wood to the right size. Attach the Stop Molding : Using a brad nailer or hammer and finishing nails, secure the stop molding along the sides of the door frame. Make sure it's aligned evenly along the entire height of the jamb. Once it's in place, check that it doesn't obstruct the door from closing properly. Step 5: Installing the Lock Catch The lock catch is a crucial part of the door’s functionality, as it keeps the door securely closed when it’s locked. Measure and Mark the Catch Location : Measure where the catch will go in the door frame. Typically, this will be near the middle of the door. Mark the center point of the catch on the frame, then use a hole saw or spade bit to drill a hole for the catch mechanism. Install the Catch : Once the hole is drilled, install the catch mechanism into the hole. It should fit snugly and be centered in the jamb. Use screws or nails to secure it in place. Test the Door : After installing the catch, test the door to ensure it opens and closes properly. The door should latch securely when the catch is engaged, and the door should swing freely without obstruction. Step 6: Finishing Touches Now that the jamb and casing are installed, you’ll want to make sure everything looks polished and clean. Fill Any Gaps : Use wood filler or caulk to fill any gaps or nail holes in the jamb and casing. This step will give your door frame a professional finish and make it look seamless. Allow the filler to dry before sanding it smooth. Sand and Paint : Once the filler is dry, sand the surface smooth and paint the casing and jamb to match the rest of the room. Choose a paint or finish that matches your home’s interior decor and protects the wood. Final Inspection : Do a final inspection of the door jamb and casing. Make sure everything is secure, level, and properly aligned. Open and close the door several times to ensure it operates smoothly. Conclusion Replacing or repairing an interior door jamb and casing is a project that many homeowners can tackle themselves. It requires some patience, basic tools, and a bit of skill, but the result is a door that not only looks great but also functions properly. By following this step-by-step guide, you’ll have a new, functional door frame in no time. If you’ve been putting off replacing your damaged door jamb or casing, now is the time to take on this DIY project. It’s an affordable way to improve your home’s appearance and functionality. Plus, with the right tools and a little elbow grease, you’ll save money by doing it yourself instead of hiring a professional. So grab your tools, measure carefully, and enjoy the satisfaction of completing this home improvement project on your own!
- 6 DIY Outdoor Furniture Projects to Save Big on Your Backyard Setup
Outdoor furniture can be incredibly expensive, with costs easily climbing to $2,000 or more for just a sofa. But you don’t have to spend that much to make your backyard beautiful. In this guide, I'll show you how I built six incredible DIY outdoor furniture projects for my back deck, saving me over $7,300 compared to buying them from a store. Let’s get started with the first project: a DIY outdoor sofa! Project 1: DIY Outdoor Sofa Building your own outdoor sofa can save you a ton of money, and you can customize it to fit your style. Here's how I did it: Materials: Cedar (great for outdoor projects) 2x4 boards Screws (2.5-inch) Plug cutter and cedar dowels Cushions (approximately $195) Steps: Cut the Wood : Begin by sorting your cedar 2x4s for color, then cut the pieces needed for the armrests and seat base. Assemble the Armrests : Drill 3/8-inch holes into the armrests and join them with wood glue and screws. Use cedar plugs to cover the holes for a polished finish. Seat Base : Create a seat base using 1x4 slats. Attach cleats underneath to support the slats and add inner supports for extra stability. Attach Backrest : Build the backrest with similar slats and attach it securely to the seat base. Add some taper to the back uprights for a modern look. Finishing : Sand the entire structure and apply a spar urethane finish for protection. Attach rubber feet to the bottom to prevent water damage. Cost Breakdown: Store-bought sofa : $1,500 to $3,000 DIY sofa : $474.94 (wood, hardware, finish, and cushions) You’ll save over $2,000 by building it yourself! Project 2: Concrete Top Outdoor Coffee Table Concrete tops on furniture can add a modern, industrial touch to your deck, but store-bought versions can be expensive. Here’s how I built my own concrete top coffee table. Materials: Cedar 2x4s 80-pound concrete bag Melamine (for the form) Spar urethane for finishing Steps: Build the Base : Start by cutting cedar 2x4s to build a simple rectangular base for the table. Secure the parts with screws and glue, adding a support in the center. Make the Concrete Form : Cut melamine sheets to create a form for the concrete top. Apply silicone caulk to ensure smooth edges, then pour the concrete into the form. Finish the Table : Once the concrete is set, attach the top to the base using screws and silicone. Sand the concrete edges and apply a sealer. Cost Breakdown: Store-bought coffee table : $550 to $1,200 DIY coffee table : $190.78 (wood, concrete, finish) By building this yourself, you’ll save over $800! Project 3: Grilling and Chilling Station Create a functional and stylish grilling station with storage for your cooler and grilling tools. Materials: Cedar 2x4s Pocket hole screws Coolers and hardware Steps: Build the Frame : Start by assembling a frame to hold the cooler and storage shelves. Use pocket hole joints for easy assembly. Add Shelves and Supports : Install cleats and shelves for storage, and make sure the cooler has a secure place on the cart. Finish and Attach Hardware : Sand and apply a finish, then add functional elements like a bottle opener and hooks for grilling tools. Cost Breakdown: Store-bought grilling station : $800 DIY grilling station : $321.97 (wood, cooler, hardware) You’ll save over $475 by building it yourself! Project 4: DIY Modern Outdoor Chairs If you don’t like the traditional Adirondack chair design, consider making a more comfortable modern version with better seating height. Materials: Cedar 4x4s (cut into 2x4s) Pocket hole screws and dowels Marine-grade finish Steps: Cut and Assemble the Legs : Use a 15-degree angle on the back legs for a more comfortable recline. Assemble the frame using dowels and pocket hole joinery. Create the Seat and Back : Cut the seat base and backrest slats, and make sure they’re spaced evenly. Attach the slats using screws and glue. Finish the Chair : Apply a marine-grade finish to protect the wood and make it last longer outdoors. Cost Breakdown: Store-bought chairs : $1,250 each DIY chairs : $255.68 for the first chair, $180 for the second chair You’ll save almost $2,000 by making these yourself! Project 5: DIY Outdoor Side Tables Add a couple of stylish concrete-topped side tables to complement your sofa and coffee table. Materials: Cedar 2x4s Concrete mix Melamine for the form Steps: Build the Frame : Construct a simple frame from cedar 2x4s, then build a form using melamine for the concrete top. Pour and Finish the Concrete : Mix the concrete and pour it into the form. Once dry, remove the sides and smooth the edges. Assemble the Tables : Attach the concrete top to the cedar base and apply a sealer. Cost Breakdown: Store-bought side tables : $500 each DIY side tables : $192.49 for the first, $95.61 for the second You’ll save over $700 for two side tables! Project 6: Custom Adirondack Chair Create your own version of the Adirondack chair with a custom design that’s more comfortable and easier to get up from. Materials: Cedar 2x4s Pocket screws, dowels Marine-grade finish Steps: Cut the Legs and Seat : Cut the legs at a 15-degree angle and adjust the seat height for more comfort. Assemble the Frame : Use dowels and screws to attach the frame together. Be sure to add cross supports for extra stability. Finish the Chair : Apply a marine-grade finish to the wood for durability and protection from the elements. Cost Breakdown: Store-bought Adirondack chairs : $750 each DIY Adirondack chair : $170 for the first chair, $99 for the second chair You’ll save over $1,300 by building two Adirondack chairs yourself! Final Thoughts Building your own outdoor furniture is a fantastic way to save money while creating custom, high-quality pieces for your deck or patio. These projects not only save you thousands of dollars but also allow you to add personal touches to your outdoor space. If you want to tackle these projects, you can find detailed build plans linked in the description.
- 3 Easy DIY Kitchen Storage Projects to Maximize Space
Is your kitchen constantly cluttered with spice jars, baking supplies, and cookware that’s hard to access? If you’re like most people, you probably have a kitchen full of stuff that never quite fits neatly into the cabinets. The good news is you don’t need to hire a professional to get your kitchen organized. With a few basic materials and a bit of elbow grease, you can create functional, stylish storage solutions that maximize space. Here are three easy DIY projects to help you organize your kitchen efficiently. Project 1: DIY Spice Rack for Small Spices Spices can be one of the most frustrating things to store in the kitchen, especially if you have multiple duplicate jars cluttering up your shelves. This simple DIY spice rack solves that problem by providing a dedicated, organized space for your most-used spices. Materials Needed: One piece of wood (for the frame) Aluminum rod Brad-point drill bit Brad nails Wood glue Instructions: Cut the Wood : Start by cutting your wood into four pieces—two long pieces for the sides and two shorter pieces for the shelves. Drill Holes for the Aluminum Rod : Use a ¼ inch brad-point bit to drill holes along the front of the shelf where the rod will hold the spices in place. Ensure the holes are deep enough to accommodate the rod but shallow enough so it doesn’t poke through the wood. Shape the Edges : To give the rack a polished look, round off the front corners of the wood with a simple arc. Assemble the Spice Rack : Attach the pieces together using wood glue and nails. For added security, you can clamp it while it dries. Add the Aluminum Rod : Cut the rod to size and insert it through the holes on each shelf. This will prevent your spices from falling out as you open and close the door. Mount the Rack : Install the spice rack on the inside of your cabinet door or on the back of a cupboard door for easy access to your spices. This spice rack is a simple yet effective solution for keeping your most-used seasonings within reach. Plus, it's customizable—if you have more or fewer spices, you can adjust the size or number of shelves. Project 2: Pull-Out Shelving for Hidden Kitchen Storage If you have a small cabinet with limited space, it can be tough to store items like small appliances or baking supplies. The solution? A pull-out shelving unit that utilizes the vertical space in your cabinet while making everything accessible. Materials Needed: ¾ inch plywood (for shelves) ¼ inch plywood (for the bottom of the tray) Drawer slides Edge banding Wood glue and screws Router Instructions: Cut the Wood : Measure the interior dimensions of your cabinet and cut the plywood pieces accordingly. You’ll need four pieces for the sides, a bottom piece, and a back piece. Apply Edge Banding : Edge banding is a quick and easy way to give plywood a professional finish. Use an iron to apply the veneer strip to the edges of the plywood, then trim off the excess. Install Drawer Slides : Attach the drawer slides to the sides of your cabinet and to the pull-out tray. Recess the drawer slides slightly so that the tray can slide in and out smoothly. Assemble the Tray : Assemble the tray using wood glue and screws. Attach the bottom piece of plywood to the frame, and then install the sides. Install the Pull-Out Tray : Slide the tray into place inside the cabinet, ensuring that the slides are securely attached and the tray is level. Finishing Touches : You can even add adjustable shelving inside the tray to make it even more versatile for storing kitchen gadgets or baking supplies. This pull-out storage solution makes use of otherwise wasted vertical space and is perfect for items you don't use daily, like appliances or seasonal dishes. Project 3: Under-Cabinet Drawer for Hidden Storage Have you ever noticed that the space under your cabinets is often just a dark, dusty void? With a little creativity, you can turn that unused area into a functional storage drawer. This project is ideal for storing things like large containers, baking sheets, or even those secret snacks you don’t want anyone else to find! Materials Needed: ½ inch plywood (for the drawer frame) Drawer slides Wood glue and screws Edge banding Drill and screws Light or LED strip Instructions: Remove the Toe Kick : Start by carefully removing the toe kick from underneath your cabinets. This may be a thin, cardboard-like piece or a more substantial molding. Set it aside or replace it with a new one after installing the drawer. Measure and Build the Drawer : Measure the available space under your cabinets and cut plywood to fit the drawer. Attach the sides and bottom to form a frame. Make sure the dimensions are snug to maximize the use of the space. Install Drawer Slides : Attach drawer slides to the sides of the cabinet and the frame of your new drawer. This will allow the drawer to pull out smoothly. Install the Drawer : Slide the drawer into the cabinet, ensuring that it moves freely and fits well into the space. You may need to adjust the slides to make sure everything lines up. Add Lighting (Optional) : If the space is dark, consider adding a small light or LED strip inside the drawer to help you see the contents easily. Replace the Toe Kick : Once the drawer is installed, you can reinstall the toe kick or replace it with a new one. Now you’ve got an extra hidden storage area for larger kitchen items. This under-cabinet storage drawer is perfect for organizing items you don’t use every day but still need easy access to. It’s also a great way to make use of the space that would otherwise remain unused. Conclusion With these three simple DIY storage projects, you can transform your kitchen from chaotic to organized. Whether you need a better way to store spices, make more room in tight cabinets, or hide away snacks, these storage solutions are budget-friendly and easy to make. No need for fancy tools or complicated skills—just some basic woodwork and creativity will help you make your kitchen more functional and clutter-free. Get started today, and enjoy a kitchen that works as hard as you do!
- How to Add Electricity to Your Shed
Transforming your shed into a fully functional workspace or retreat can significantly enhance its utility. Adding electricity is one of the best upgrades you can make. Whether you're running power tools, charging batteries, or even setting up a small TV for some relaxation, electricity can turn your shed into a space that’s not only practical but comfortable. The good news is, adding electricity to your shed doesn't have to be a complicated or expensive process. Let’s walk through an easy, budget-friendly way to bring power to your shed, step by step. Two Basic Ways to Run Electricity to Your Shed When considering how to bring electricity to your shed, there are two basic options: hardwiring or using an extension cord. Both have their pros and cons, and the best option depends on your needs, budget, and level of comfort with electrical work. 1. Hardwiring (Traditional Method) Hardwiring your shed involves digging a trench to run electrical service to your shed, which requires permits and professional installation. You’ll need to bury cables at least 24 inches deep, depending on the type of cable and conduit used. After burying the cable, you would install a junction box and run power throughout the shed. This method offers a permanent, secure electrical setup but comes with higher costs, complexity, and the need for permits. 2. Using an Extension Cord (Simple and Cost-Effective) A far simpler method is to run electricity using an extension cord from your home. This is the method we’ll explore in detail. You’ll need a weatherproof outdoor extension cord, a weather-resistant electrical box, and a recessed plug to make everything tidy. With this approach, there’s no need for trenching or professional help, and you can have electricity up and running in no time. Step 1: Plan Your Electrical Setup Before you start, it's important to determine how you want to use electricity in your shed. Will you use power tools? Do you need outlets for lighting or small appliances? Planning out your needs will help you decide where to place outlets, lighting, and other power sources. For example, you might want: Overhead lighting for work areas. Power outlets near your workbench and for charging equipment. A ventilation fan for air circulation, especially if your shed is in a hot or humid area. Entertainment options , such as a small TV or speakers. Step 2: Setting Up the Outdoor Power Source The next step is setting up the power source. You’ll need an outdoor-rated extension cord that can handle the required load for the tools and appliances you plan to run. Recessed Male Plug Installation: Instead of using a standard extension cord plug hanging outside the shed, a recessed male plug offers a more elegant and weather-resistant solution. The plug is mounted into the wall, and an extension cord is plugged in from the outside. On the inside, the cord can be routed to wherever you need power. Steps: Drill a hole : Use a hole saw to drill a hole on the side of the shed where you want the plug to go. Install the recessed plug : Fit the recessed male plug into the hole and secure it in place. Seal it up : Apply caulk around the edges of the hole to prevent water or pests from entering. Plug in your extension cord : The weatherproof plug ensures that when not in use, the outlet stays protected from the elements. Step 3: Run the Extension Cord Inside Once your outdoor power source is set up, you’ll need to run the extension cord inside. The best part about this setup is that it’s completely flexible. You can move the outlets around as needed. Using a Multi-Outlet Extension Cord: A great option is a 50-foot extension cord with multiple outlets spaced evenly along the length of the cord. This allows you to easily add power at multiple spots in the shed without needing to splice wires. Simply plug in the extension cord, route it along the studs, and secure it in place using nails or cable clamps. Step 4: Installing Lighting and Ventilation Once you have power in your shed, it's time to install lighting and any other electrical appliances, like a fan for ventilation. Here’s how to install both: Installing LED Lighting: LED lights are a great choice because they’re energy-efficient and don’t generate too much heat. You can mount small LED strip lights or 3-foot T5 lights on the walls or ceiling. The lights often come with clips or screws for easy installation, and they’re usually linked together, so you can daisy chain them along the walls. Place the lights in key areas like your workbench or near the entrance, ensuring that they’re close enough to the plug but not blocking your workspace. Installing a Ventilation Fan: A fan is essential to keep air circulating, especially if you plan to store sensitive materials or tools. A 120mm fan connected to a 12V adapter is an ideal solution. Install the fan in a vent opening to keep the air fresh and reduce humidity that could cause rust or mold. If you want to automate the fan, consider using a temperature-controlled outlet , which turns the fan on once the shed reaches a certain temperature, keeping the interior comfortable. Step 5: Final Touches Now that you’ve got power, lighting, and ventilation in place, it’s time to tidy up your wiring. Use cable clamps to secure any loose cables along the studs, and make sure everything is neat and out of the way to avoid tripping hazards. If you plan to add more equipment, consider placing additional outlets near your workbench, charging stations, or any other locations you’ll need power. Optional: Off-Grid Power with Solar Panels If you're off the grid or just prefer a sustainable energy solution, you can opt for a solar-powered setup . Pair a solar power station with your shed’s electrical setup to run everything from lights to a small TV. Solar power stations, such as the Jackery Home Power 3600 Plus , can provide backup power and be charged via solar panels, ensuring your shed is powered even when there’s no electricity available. Conclusion Adding electricity to your shed can make it a more versatile and functional space, all while staying within a reasonable budget. Whether you choose the simple extension cord method or go for a solar-powered setup, the process is straightforward, and with a little planning, you can power up your shed in no time. Plus, with the ability to move things around, you won’t be stuck with a permanent setup, giving you the flexibility to adjust your space as your needs change. By adding lighting, ventilation, and outlets for charging or using tools, you’ll have a much more enjoyable and efficient workspace or hobby area.
- DIY Bathroom Remodel for Under $2,500
A bathroom remodel can feel like a daunting project, especially when you're trying to stick to a budget. Professional contractors often charge tens of thousands of dollars for a full remodel. However, with careful planning, the right materials, and a bit of elbow grease, it’s entirely possible to transform your bathroom into a beautiful, functional space without breaking the bank. In this blog, we’ll walk you through a bathroom remodel on a budget, using a real-life example of how it’s done for under $2,500. We’ll break down the steps, materials, and tips to achieve this look without hiring expensive contractors. Step 1: Planning the Budget and Priorities The first step to any successful remodel is setting a clear budget. For our example project, let us aim for a total cost of under $2,500, which is significantly lower than the typical $10,000+ cost of hiring a professional contractor. Here’s how to approach planning your remodel on a budget: 1.1 Set Your Priorities Start by determining which aspects of the bathroom are most important to you. You might want to upgrade the flooring, install a new vanity, or add new lighting fixtures. Identifying your top priorities helps focus your budget and ensures you spend money where it matters most. 1.2 Break Down Your Budget In this example, the remodel was broken down into several key areas: Plumbing and Fixtures : The plumbing (including shower valve, faucet, etc.) was replaced for around $100. Flooring : Luxury vinyl plank (LVP) tiles were chosen for their easy installation and durability, costing around $220. Drywall and Paint : For drywall, mud, and paint, the cost was $266. Vanity and Hardware : The new vanity, mirror, faucet, and lighting came to $960. Miscellaneous Supplies : Additional hardware and small tools were budgeted at $100. The total cost for the remodel was $2,443, which is just under the $2,500 target. Step 2: Demolition and Removal The next phase in any remodel is demolition—removing outdated or damaged fixtures, flooring, and walls. This phase can be messy but is essential for starting fresh. In our example, we started by removing the old vanity, toilet, and flooring. 2.1 Vanity Removal Before pulling out the vanity, make sure to turn off the water supply. Use a wrench to disconnect the plumbing and remove any screws holding the vanity in place. If you plan to replace the vanity with something new, there’s no need to be too careful with the removal process. However, if you want to save the vanity for reuse, be sure to carefully disconnect the plumbing and keep it intact. 2.2 Flooring and Wall Removal If your bathroom has old tile or damaged flooring, it's time to remove it. In this case, the existing floor was covered in cracked ceramic tiles set into a mortar bed. The removal process involved using a wrecking bar and hammer to lift the tiles and mortar. The subfloor underneath was in good condition, which saved us time and money in replacing it. Walls may also need to be removed, especially if they’re outdated or damaged. In our example, the walls were covered in old, almond-colored tiles, which were not only unsightly but also poorly installed. It made sense to tear out the old tiles and replace the drywall, which helped give the space a fresh, modern look. Step 3: Replacing the Plumbing Fixtures Once the old fixtures were removed, we moved on to replacing the plumbing. In our example project, the bathroom featured an outdated shower valve that was in need of replacement. A new shower valve was installed with PEX piping for quick, solderless connections. 3.1 Installing a Shower Valve Replacing a shower valve involves removing the old valve and installing the new one. In this case, the new valve was placed at 36 inches from the floor, which is a comfortable height for most users. The connections were made using PEX tubing and SharkBite connectors, which eliminated the need for soldering and made installation faster and easier. 3.2 Reconnecting the Toilet Once the flooring was installed, we moved the toilet flange to sit on top of the new LVP flooring. This is a key step, as installing the flooring after the toilet flange ensures a cleaner, more professional look. Step 4: Drywall Installation and Mudding With the plumbing done, it was time to focus on the walls. The drywall needed to be replaced in areas where the old tiles were removed. 4.1 Installing New Drywall New drywall was installed where necessary, especially in areas around the shower and tub. The new drywall was taped, mudded, and sanded to create a smooth surface. While drywall mudding can be tricky, using the right tools and applying thin coats of mud helped achieve a professional-looking result. 4.2 Sanding and Painting After the drywall mud dried, sanding was necessary to smooth out any imperfections. While sanding can be labor-intensive, the result is worth it. Once the sanding was done, the bathroom was painted with a fresh coat of paint in a light, neutral color. Step 5: Installing the Tub and Shower Surround Once the walls and plumbing were in place, the next big step was installing the bathtub and shower surround. 5.1 Installing the Bathtub The tub was installed on a bed of mortar to provide stability and support. This step is important because the tub needs to remain level and secure when it’s in use. The mortar also ensures that the tub doesn’t shift over time. 5.2 Installing the Shower Surround The tub surround was a three-piece system that locked into place without requiring additional caulking or seam sealing. This made the installation process quicker and less messy. Step 6: Installing the Flooring For the flooring, luxury vinyl plank (LVP) tiles were used for their durability, ease of installation, and modern aesthetic. 6.1 Choosing the Layout We opted for a lengthwise layout to make the most of the room’s dimensions. This decision ensures the tiles run along the longest wall, creating a seamless look. The first few rows were easy to install, but as we reached the toilet flange, we had to make some adjustments. 6.2 Cutting and Fitting Tiles LVP tiles are easy to cut with a utility knife or tile cutter. We used a tapping block to fit the tiles into place and avoid damaging the edges. Once the tiles were cut to fit around the toilet flange and other obstacles, the rest of the flooring went in smoothly. Step 7: Final Touches The final phase of the remodel involved adding all the finishing touches. This included: Vanity Installation : A new oak vanity was installed with a black faucet and black hardware for a modern, stylish look. Lighting and Mirror : A new black lighting fixture was added, along with a simple, elegant mirror that complemented the vanity. Caulking and Sealing : To seal the edges around the tub, we used color-matched silicone caulk, ensuring a watertight finish that looked professional. Final Thoughts and Cost Breakdown This bathroom remodel, from start to finish, came in at just under $2,500. The breakdown of costs is as follows: Plumbing and Fixtures : $97 Flooring (LVP + Subfloor) : $220 Drywall, Mudding, and Paint : $266 Vanity, Faucet, and Lighting : $960 Miscellaneous Supplies : $100 Total Cost : $2,443 By doing the work yourself, you can save a significant amount of money compared to hiring a contractor. The key is careful planning, choosing budget-friendly materials, and taking your time with each step. With a little patience and effort, you can achieve a beautiful bathroom remodel for a fraction of the cost.
- Residential Pressure Washing and Gutter Cleaning
Maintaining a clean and well-kept home exterior not only boosts its curb appeal but also ensures that the house stays in good condition. Whether you're preparing to sell or simply want to improve the aesthetics and functionality of your home, pressure washing and gutter cleaning are essential tasks. In this blog, we’ll walk you through everything you need to know, from soft washing your house to gutter cleaning, roof care, and tackling stubborn stains. By the end of this post, you’ll be equipped with the knowledge to handle or hire someone for these important tasks, saving you time, money, and the frustration of poorly done work. The Importance of House Washing: Keeping Your Home Looking New The exterior of your home is constantly exposed to the elements—rain, snow, sun, and wind. Over time, dirt, mildew, and stains can accumulate, making your home look dirty and aged. House washing not only enhances the curb appeal but also prolongs the life of your home. Power washing uses high-pressure water to clean surfaces like vinyl siding, brick, and concrete, removing dirt, grime, mold, and algae. But, when done improperly, it can cause damage. That’s where the right technique comes in. Soft Washing vs. Pressure Washing While many homeowners may consider using a pressure washer on their entire house, this isn’t always the best approach. Soft washing is a gentler alternative that uses a mix of low-pressure water and cleaning solutions. Soft washing is ideal for siding, roofs, and windows, ensuring that the surface isn’t damaged by high-pressure water. Pressure washing, on the other hand, can be used on more durable surfaces like driveways, patios, and concrete. When choosing between soft washing and pressure washing, it's important to consider the material of your home’s exterior and the type of stain you're dealing with. Step 1: Pre-Washing Inspection Before starting any power washing or soft washing task, inspect the area you plan to clean. Pay attention to the following: Oxidation : Often caused by previous attempts at power washing or due to the material’s age, oxidation can appear as dull, faded spots. If you notice oxidation on the surface of the siding or roof, inform your customer about it beforehand. It’s also essential to check the oxidation before deciding to apply any chemicals. Staining : Identify any stains, such as calcium deposits or hard water stains, which may need specialized treatment. These stains are typically not handled in a standard house wash and require additional cleaning agents. Soffits and Windows : Always clean soffits thoroughly and rinse them well. Leaving dirt or debris on soffits could cause streaks on the windows when it rains. Gutter Condition : Check the gutters for blockages and debris. A clean gutter is vital for water flow and prevents leaks. Step 2: Preparing for Gutter Cleaning Gutter cleaning is one of the most important maintenance tasks for homeowners, yet it’s often neglected. Gutters are designed to collect rainwater and direct it away from the roof and foundation, preventing water damage. Over time, however, leaves, twigs, and other debris can clog up the gutters, resulting in poor drainage, leaks, and possible damage to the roof or foundation. Regular cleaning is necessary, especially before the rainy season. Tools You’ll Need: Ladder : Ensure it’s sturdy and reaches your gutters safely. Gutter Scoop or Gloves : Use a gutter scoop to remove large debris and gloves for safety. Leaf Blower : A leaf blower can make the job much easier by clearing the majority of the debris quickly. Garden Hose : Once the large debris is cleared, use a hose to wash away any remaining smaller debris. The Cleaning Process: Position the Ladder : Start by placing the ladder securely beneath the gutters. Ensure that the ground is level for safety. Clear the Debris : Use your hands or a scoop to remove all leaves and debris. If there’s a lot of buildup, use a leaf blower to clear out the gutters, which can save a lot of time. Check for Blockages : After clearing out the debris, use a hose to check for blockages. If water doesn’t drain properly, there might be a clog deeper in the downspout. Flush the Gutters : Use your hose to flush out any remaining debris in the gutters and downspouts. This will ensure the water flows freely. Clean the Surrounding Area : Once you’re done, clean the area beneath the gutters to remove any mess created during the process. This will make the whole process look more professional. Step 3: House Wash – Soft Washing Techniques With the gutters cleaned and any potential issues identified, it’s time to clean the house. Soft washing is the ideal method to clean vinyl, brick, and other soft surfaces on your home. The Soft Washing Process: Choose the Right Solution : Prepare your soft washing solution. For most home exteriors, a mix of water, soap, and mild bleach should be sufficient to kill any mold, mildew, or algae. However, be mindful of the surface you’re cleaning to avoid using too strong a chemical solution. Apply the Solution : Using a low-pressure sprayer, apply the soft wash solution starting from the top of the house and working your way down. This ensures that the solution runs down and doesn’t leave streaks. Let It Sit : Allow the solution to sit for 10-15 minutes, but make sure it doesn’t dry out. This allows the cleaning agents to break down dirt, stains, and algae. Rinse the Surface : After the solution has had time to work, rinse the surface thoroughly with low-pressure water. Start from the top and work your way down again. Rinsing properly is crucial to avoid streaking, especially on windows and soffits. Step 4: Tackling Special Problems During the house wash, there may be areas that need special attention. These could include the roof, hard water stains, or oxidation. Roof Cleaning : Cleaning a roof requires extra care. If the roof is steep and dangerous to walk on, consider using a ladder or a pole-mounted pressure washer to reach the high areas. For heavily soiled roofs, soft wash cleaning with a chemical solution is often the best approach. Stubborn Stains : Hard water stains or rust spots may not come off during a basic house wash. In these cases, you may need to use specialized cleaners designed for hard water or rust. Step 5: Final Touches and Clean-Up Once the washing is done, it’s important to inspect the job and make sure everything looks perfect. Walk around the property with your client to ensure they’re satisfied with the results. Pay attention to details like: Are there any missed spots? Are the windows streak-free? Are the soffits clean? Has the foundation been treated for algae or dirt? Clean up any remaining mess, including debris from the gutters and any overspray from the house wash. Costs and Pricing: How Much Does It Cost? When it comes to pricing a house wash, gutter cleaning, or roof treatment, here’s an overview: House Wash : On average, a residential house wash costs between $300 and $800. Factors like house size, the type of material, and the complexity of the job (e.g., difficult access) can influence the cost. Gutter Cleaning : Gutter cleaning typically costs between $100 and $300, depending on the house size and the amount of debris. Roof Cleaning : If you're cleaning the roof separately from a house wash, this can cost anywhere between $200 and $600, depending on the size and the type of roof. The total price for a full service, including roof cleaning, house washing, and gutter cleaning, can add up to between $600 and $1,500, depending on the services provided. Conclusion Cleaning your home’s exterior, including the roof, gutters, and siding, is an essential part of home maintenance. Whether you choose to do it yourself or hire a professional, regular maintenance can help prevent costly repairs in the future. A clean home not only looks great but also helps prevent damage from mold, mildew, and water buildup. Remember, the tools and techniques you use matter, and taking your time to do the job properly will yield the best results. If you're unsure about tackling these tasks on your own, hiring a professional power washing service can ensure a thorough, safe, and efficient job. By following the tips and steps in this guide, you can keep your home’s exterior clean, functional, and visually appealing—without breaking the bank. Happy cleaning!